Vince87Original postMontreal, Qc, Canada · Aug 26, 2009#1Hi all ! as promised in the other thread, here's a Step by Step DIY for the Cruise Control installation (swith method) on 07-08 liftback Yaris (should be pretty similar on the sedan)...
I just to say a special thanks to CTScott for the discovery, the instructions and for his help through the process and also to nickhjort for being the guinea pig for this model.
Enjoy !
Replies 414
jetaimejscBville, TN · Aug 27, 2009#2awesome and thanks. Im finally going to do it!
goku87AK · Aug 27, 2009#3sweeeet. ive been waiting for this.
flutie98NY · Aug 27, 2009#4AWESOME! Will be doing this next week.
Anyone know a good place to source the clutch M/T switch needed?
slothman86Savannah, GA · Aug 27, 2009#5wow! I should have waited for this!
CTScottUSA, CT · Aug 27, 2009#6Excellent job with the write-up! Now, we just need someone to do one for using the OEM stalk.
goku87AK · Aug 27, 2009#7once i find one i'll get right on that. :D
flutie98NY · Aug 28, 2009#8CTScott,
Is there any 12v signal that goes high from the ECU on the 07LB when you hit the on button? I would like to wire in a indicator LED
goku87AK · Aug 28, 2009#9julienrlottawa · Aug 29, 2009#10Hello, I wanted to do this but could not find the parts (even with the part numbers) for the covers\panels on the dash (so I can swap it for the normal one if I take the car in for servicing or something or want to sell the car as a trade in in the future), so I made the mirror cover one myself! It happens to be a hobby of mine to make plastic objects \ casting and molding, so if anyone needs a mirror cover, the master mold is made, and since that was the expensive part, i can make them for pretty cheap if anyone wants one for 10$ shipping anywhere included :). Takes about 24 to have one made and ready so it could be sent pretty quickly.
IllusionXBrossard, QC · Aug 29, 2009#11I have YET to meet up with PK1980 for the cruise stalk :(
nick.dollimountHalifax, NS Canada · Sep 1, 2009#12julienrlottawa · Sep 1, 2009#13that is pretty sweet, but 37$... buy an old gamecube controller and use the joystick on that or something lol :p
CTScottUSA, CT · Sep 1, 2009#14That is very cool. I bought a bunch of different types of 4-way joystick switches to experiment with, but they were all too hard to package into something usable. The only downside is that at that price, it's more expensive than an OEM eBay cruise stalk.
julienrlottawa · Sep 1, 2009#15more expensive than an ORM ebay cruise stalk? where do people find these cheap stalks???? I only found 100$+ ones :(
nick.dollimountHalifax, NS Canada · Sep 1, 2009#16I'm sure I could find a cheaper version at a local shop... going to check one out my friends suggests maybe today or tomorrow.
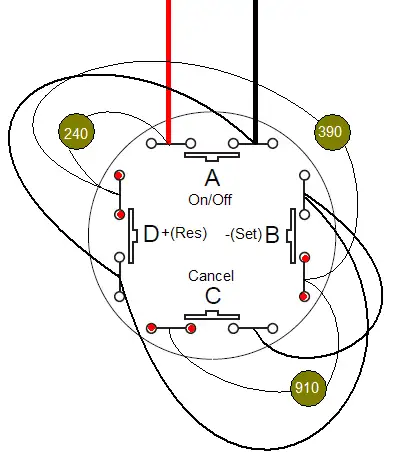
CTScott,
Does this diagram suit the setup? I know it's not proper... I don't know what diagrams really should look like and all I had was a screenshot from the pdf and Paint to work with 👍
Originally Posted by
nick.dollimount ↑ I'm sure I could find a cheaper version at a local shop... going to check one out my friends suggests maybe today or tomorrow.
CTScott,
Does this diagram suit the setup? I know it's not proper... I don't know what diagrams really should look like and all I had was a screenshot from the pdf and Paint to work with 👍
Correct.
Originally Posted by
julienrl ↑ more expensive than an ORM ebay cruise stalk? where do people find these cheap stalks???? I only found 100$+ ones :(
Check out this post for a list of vehicles that all use the same stalk:
Can we do this? (aka The DIY Cruise Control Thread)Nice! I'm very excited to add this in =D I like the idea of the little 4-way switch more than the stalk though. Will look much cleaner =D **stoked**
CTScottUSA, CT · Sep 1, 2009#21 Originally Posted by
nick.dollimount ↑ Nice! I'm very excited to add this in =D I like the idea of the little 4-way switch more than the stalk though. Will look much cleaner =D **stoked**
I wonder if it is mechanically limited to the 90 degree positions or if you can accidentally press two switches at the same time with a 45 degree motion?
Originally Posted by
CTScott ↑ I wonder if it is mechanically limited to the 90 degree positions or if you can accidentally press two switches at the same time with a 45 degree motion?
From the specs below, I would guess that it's only one at a time? I'll have to make sure about that when I'm going to check out that parts store. I'm sure if it closed two connections at once, that would be bad?
Technical/Catalog Information 500-526
Vendor APEM Components
Category Switches
Type Navigation Switch, PCB Mount
Actuator Type 4-Way Selector
Switch Function 2 Axis
Output Mechanical Switch
Operating Force 100gf
Contact Rating @ Voltage 0.05A @ 24VDC
Termination Style PC Pin
Lead Free Status Lead Free
RoHS Status RoHS Compliant
Other Names 500 526
500526
679 2289 ND
6792289ND
679-2289
I noticed in the PDF that it says actuation at 90 degree positions, which hopefully means that only one can be closed at a time. If more than one could be, then you could be trying to bump it up with the + and accidentally hit off.
nick.dollimountHalifax, NS Canada · Sep 1, 2009#24Yeah, that would be counter productive :P
nickhjortOneida, NY · Sep 1, 2009#25Wow, awesome job on the write-up man. I wish I could have done it, but I'm not that organized :) and flutie98...CTScott put together an LED module (that I still have yet to install...sorry scott) :( But I will get to it soon and do pics and a small write up on it so he can sell em to you guys and you can install them.
yaris-meAnaheim, CA · Sep 1, 2009#26Thank you, Vince87 and CTScott. This is my next project.👍
nick.dollimountHalifax, NS Canada · Sep 4, 2009#27Woot! My clutch switch is in the shop today; picking it up tomorrow. I'll probably do this up on Sunday, as long as I can get the switch and resistors on Sunday.
yaris-meAnaheim, CA · Sep 5, 2009#28I couldn't find the resistors 290 and 340. Are those the correct values? They also had 1/4, 1/2 and 1 watt resistors. Which wattage?
CTScottUSA, CT · Sep 5, 2009#29 Originally Posted by
yaris-me ↑ I couldn't find the resistors 290 and 340. Are those the correct values? They also had 1/4, 1/2 and 1 watt resistors. Which wattage?
It's actually 240 and 390.
You can use any value within these ranges:
216 to 264 ohms for one between resume and on/off
351 to 426 ohms for the one between set and resume
819 to 1001 ohms for the one between set and cancel
For wattage, 1/8 or 1/4 watt is fine.
Originally Posted by
CTScott ↑ It's actually 240 and 390.
You can use any value within these ranges:
216 to 264 ohms for one between resume and on/off
351 to 426 ohms for the one between set and resume
819 to 1001 ohms for the one between set and cancel
For wattage, 1/8 or 1/4 watt is fine.
Thanks!👍
Just installed the factory cruise parts. I used all new parts from TRDSPARKS, Very easy install. On my 09 3dr. liftback w/manual trans. Yes the icons in the cluster work also!.THANKS to all that provided part #s and insite.
Vince87Thread starterMontreal, Qc, Canada · Sep 8, 2009#32Hey just a quick question for you guys: has anyone done it on a 2006 yaris? I thought it was still the Echo, hence I wrote in the DIY that it was for the 07-08...
CTScottUSA, CT · Sep 8, 2009#33 Originally Posted by
Vince87 ↑ Hey just a quick question for you guys: has anyone done it on a 2006 yaris? I thought it was still the Echo, hence I wrote in the DIY that it was for the 07-08...
06 should be the same as 07-08. Echos ended in 05. Canada got the Yaris in 06, and the US in 07.
Hi, Does anyone have the radio shack resistor part numbers by chance... Would love to try this mod, I just got my 2007 yaris yesterday, and no cruise is a bummer for my 60 mile commute, thanks in advance!
julienrlottawa · Sep 12, 2009#35 Originally Posted by
opt101 ↑ Hi, Does anyone have the radio shack resistor part numbers by chance... Would love to try this mod, I just got my 2007 yaris yesterday, and no cruise is a bummer for my 60 mile commute, thanks in advance!
radioshack usually sells reisitors in packs, not individually. I used a 300 resistor pack (3 or 4$) and just combined the ones I needed to get the appropriate resistance, but this is long and requires a multimeter or reading all teh color codes (even worse). Your best bet is Digikey.
If you buy the 500 piece "value pack" for $12.99 you get an assortment that includes 220 ohms, 390 ohms, and 1K ohms.
If you buy them as the 5 packs for $0.99 each, you can get 220 ohms (271-011) and 1K ohms (271-004), but not something in the range of 351 to 426 ohms. Although, You can buy a pack of 150 ohm resistors (271-010) and use one of those in series with one of the 220 ohm ones to get 370 ohms.
opt101Connecticut · Sep 13, 2009#37I just need the simple one in the diagram, on/off and set as I drive 55 mph straight and there really isn't any need for the 4 button set up. So if I get the value pack, it will have the 390 but will it have the 240 ohm that’s depicted in the picture, where do I get that one,
opt101Connecticut · Sep 13, 2009#38also, can anyone point out the d3 connector better, I spent 20 minutes looking for it, I found the main section with all the plugs is it located there, or somewhere else. Sorry I'm very new to this car, thanks in advance.
CTScottUSA, CT · Sep 13, 2009#39 Originally Posted by
opt101 ↑ also, can anyone point out the d3 connector better, I spent 20 minutes looking for it, I found the main section with all the plugs is it located there, or somewhere else. Sorry I'm very new to this car, thanks in advance.
If you look at my original DIY on this there is a picture that shows D3 clearly:
DIY - 2009 Cruise Control for $10, without pulling the steering wheel and airbag Originally Posted by
opt101 ↑ I just need the simple one in the diagram, on/off and set as I drive 55 mph straight and there really isn't any need for the 4 button set up. So if I get the value pack, it will have the 390 but will it have the 240 ohm that’s depicted in the picture, where do I get that one,
If you are doing the two switch method, then you really just need one resistor in the 567-693 ohm range. The Value pack includes a 680 ohm resistor which would be perfect.
Out of curiosity, where in CT are you? I am in Southbury and have an inventory of literally thousands of resistors.
Thanks for the better diagram CTScott, now I know where it is, I'm located just out side New Haven.
YamilRSan Diego, CA · Sep 13, 2009#42CTScott, If you're willing to sell the switches and the resistors all ready wired for the two switches configuration, I'll be willing to buy them of you.
opt101Connecticut · Sep 13, 2009#43CTScott, would these resistors work?
Radio shack part # 271-1117
680 ohm 1/2W 5% Carbon Film Resistor pk/5
or do I need the ones in the value pack,
also will these switches work.
Radio shack part # 275-1571
SPST 0.5-Amp Momentary Switch (2-Pack)
One red and one black. Rated 0.5 amps at 125VAC and mounts in a 3/8" hole.
or are these better
Radio shack part # 275-609
3A 250VAC momentary switches normally open
And my last question, if the vehicle goes for service, I assume all this would have to be pulled out as it would most likley void the warranty? Thanks in advance.
CTScottUSA, CT · Sep 13, 2009#44 Originally Posted by
opt101 ↑ CTScott, would these resistors work?
Radio shack part # 271-1117
680 ohm 1/2W 5% Carbon Film Resistor pk/5
or do I need the ones in the value pack,
also will these switches work.
Radio shack part # 275-1571
SPST 0.5-Amp Momentary Switch (2-Pack)
One red and one black. Rated 0.5 amps at 125VAC and mounts in a 3/8" hole.
or are these better
Radio shack part # 275-609
3A 250VAC momentary switches normally open
And my last question, if the vehicle goes for service, I assume all this would have to be pulled out as it would most likley void the warranty? Thanks in advance.
680 Ohms is fine. The 1/2 watt resistors are physically larger, but are fine.
For the switches either is fine. I used 275-644, but really any normally open momentary switch is fine. You are switching 0 current, so the rating really doesn't matter.
As far as warranty goes; Unless the dealer can prove that your DIY cruise control actually caused something to fail, they can't say that you voided the warranty.
Originally Posted by
YamilR ↑ CTScott, If you're willing to sell the switches and the resistors all ready wired for the two switches configuration, I'll be willing to buy them of you.
I could. I would just have to find switches that mount from the rear, rather than front, so you could just drill your holes, poke the switches through, connect the wires, and cruise.
One of the switches that Opto101 mentioned above, would work for that:
Picture lost · rsk.imageg.netthe ones pictured above are tiny, just got back from radio shack and after seeing them in person, I went with the 275-644
Picture lost · rsk.imageg.net
Much better option
Off to find pin 40 now, will update with photos and status
opt101Connecticut · Sep 13, 2009#47Worked out great!!! Thanks to everyone, especially CTScott for the further incite, and everyone else who made the how to pdf! I opted for the 2 button set up as I drive a set speed during my commute. The parts where easily obtained from my local radio shack.
Parts list:
Qty (1) Radio shack part # 271-1117 680 Ohm 1/2W Resistor
Qty (2) Radio shack part # 275-644 3A 125V SPST Pushbutton
12 Feet of wire
Ground loop terminal
All together I was just under 15 bucks
I used the grommet on top of the ECU for easy access to the interior.
My only concern is I put the wire into pin 40 and let a couple strands come out the end of the main harness connector as depicted, re connected it to the ecu, but I was wondering will the wire in pin 40 just stay there, should I try to put that rubber piece I removed on the side of the wire so to make sure it stays put or don't worry about it?
Here is my dash install
Picture lost · www.atzinsurance.com
I also used a hot glue gun to make sure everything stays put behind trim piece.
Picture lost · www.atzinsurance.com
🎉
CTScottUSA, CT · Sep 13, 2009#48For the pin 40 connection, the ideal thing would be to use one of the actual waterproof pins for that connector. You can actually purchase the terminal, with a wire pre-crimped to it from Toyota:
82998-24250 is a single wire with the terminal and waterproof plug for connecting to the ECM.
Otherwise, I would at the very least put a dab of silicone where the wire enters the connector to keep moisture out.
flutie98NY · Sep 14, 2009#49 Originally Posted by
CTScott ↑ For the pin 40 connection, the ideal thing would be to use one of the actual waterproof pins for that connector. You can actually purchase the terminal, with a wire pre-crimped to it from Toyota:
82998-24250 is a single wire with the terminal and waterproof plug for connecting to the ECM.
Otherwise, I would at the very least put a dab of silicone where the wire enters the connector to keep moisture out.
I just ordered this part and attempted to install it. I think it might be the wrong part #, its just a little big and will not fully seat in the connector. And let me tell you I tried to force it in there.
Originally Posted by
flutie98 ↑ I just ordered this part and attempted to install it. I think it might be the wrong part #, its just a little big and will not fully seat in the connector. And let me tell you I tried to force it in there.
Can you snap some pictures? There are three pins for the A21 connector. 82998-24250 is the smallest width of the three. The two others are for the wider width pins.
Also, the pin will only fully insert in one position. If it is flipped over, it will go in most of the way, but will not seat.
 Yarisworld