Yarisworld
Ill snap some pics when i get home from work. I tried all 4 orientations and the one that seats the most still is not fully in.Originally Posted by CTScott ↑Can you snap some pictures? There are three pins for the A21 connector. 82998-24250 is the smallest width of the three. The two others are for the wider width pins.
Also, the pin will only fully insert in one position. If it is flipped over, it will go in most of the way, but will not seat.
DIY Cruise Control on 07-08 Yaris (step by step)
415 posts · 355,617 views · page 2 of 9
Replies continued
I posted yesterday the results of my install on my 09 manual sedan and at first I ran into the same problem with the repair terminal not fitting. I ripped the waterproofing sleeve trying to jam it in with fine needle nose pliers.
My post is at the end of Can we do this? (aka The DIY Cruise Control Thread)
On connector A21 there is a locking mechanism that you must push to one side to allow the terminal to slide in place and yes it would only go in one way, which happened to be the 4th position I tried. You then push back the white plastic slide piece and it will lock the terminal in place.
My post is at the end of Can we do this? (aka The DIY Cruise Control Thread)
On connector A21 there is a locking mechanism that you must push to one side to allow the terminal to slide in place and yes it would only go in one way, which happened to be the 4th position I tried. You then push back the white plastic slide piece and it will lock the terminal in place.
hmm any pics as to where that locking slider is?Originally Posted by Soylentglass ↑I posted yesterday the results of my install on my 09 manual sedan and at first I ran into the same problem with the repair terminal not fitting. I ripped the waterproofing sleeve trying to jam it in with fine needle nose pliers.
My post is at the end of Can we do this? (aka The DIY Cruise Control Thread)
On connector A21 there is a locking mechanism that you must push to one side to allow the terminal to slide in place and yes it would only go in one way, which happened to be the 4th position I tried. You then push back the white plastic slide piece and it will lock the terminal in place.
It's the white thing at one end of the connector:Originally Posted by flutie98 ↑hmm any pics as to where that locking slider is?
Lock latched:
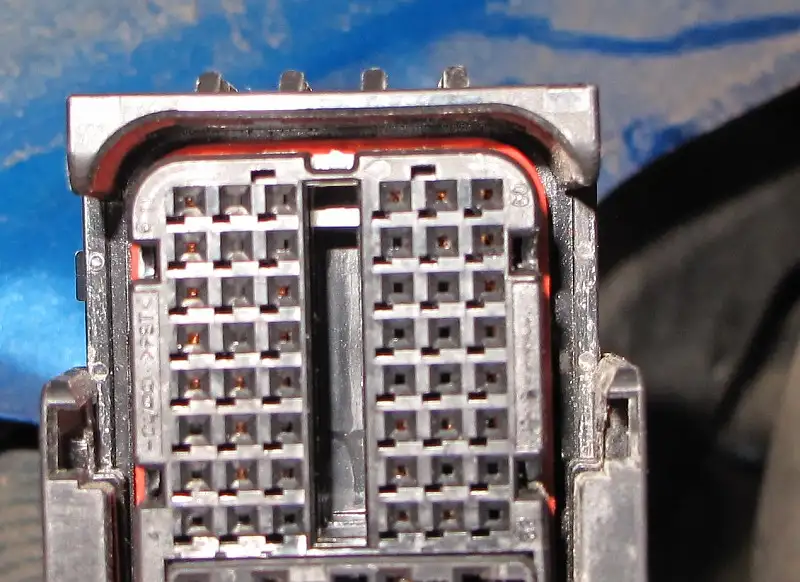
Lock released:
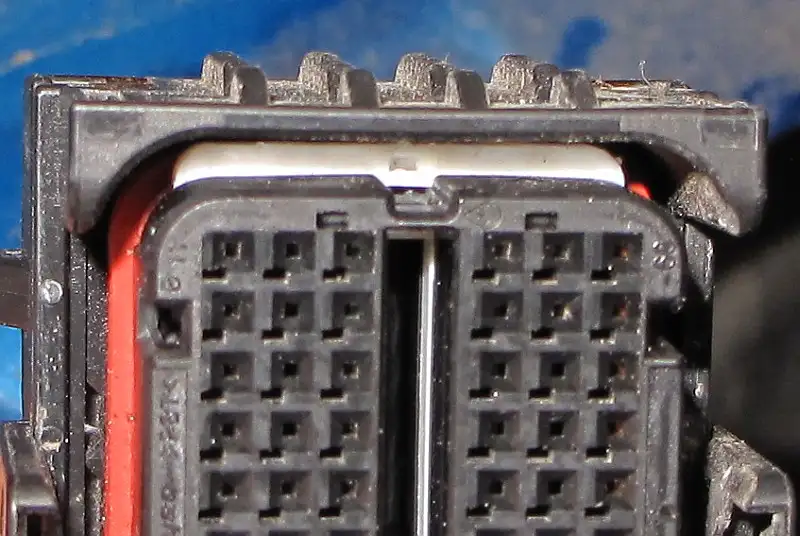
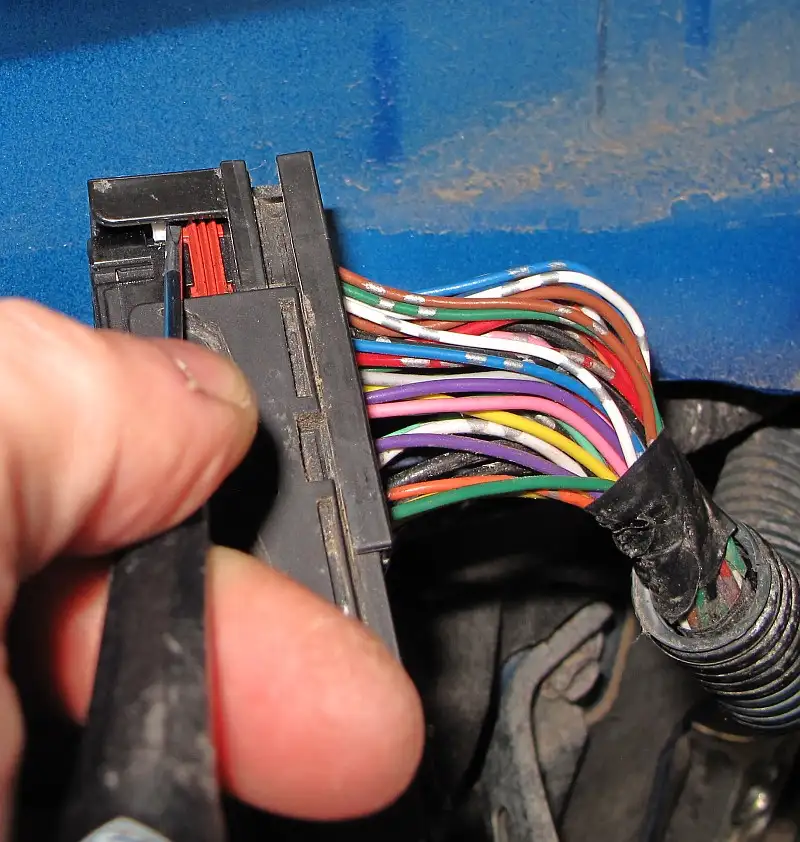
Pop it with a small screwdriver from the side:
well darn, I feel like an idiot now. Thanks CTScott
Don't - The first time I tried to pop a pin I did everything short of chewing on the connector. I had no clue that every connector has a locking mechanism until I read it in the service manual.Originally Posted by flutie98 ↑well darn, I feel like an idiot now. Thanks CTScott
Just out of curiosity where in the service manual does it depict this locking mechanism for A21?Originally Posted by CTScott ↑Don't - The first time I tried to pop a pin I did everything short of chewing on the connector. I had no clue that every connector has a locking mechanism until I read it in the service manual.
EDIT: Just seated the terminal correctly, thanks again!
Originally Posted by CTScott ↑Can you snap some pictures? There are three pins for the A21 connector. 82998-24250 is the smallest width of the three. The two others are for the wider width pins.
Also, the pin will only fully insert in one position. If it is flipped over, it will go in most of the way, but will not seat.
where do you buy this wire using the part number?
Just in case you are still curious, I found examples of locking mechanisms in the wiring diagram manual, page 14 through 16. Page 14 on the bottom left has some nice figures of a terminal with the "terminal retainer" both in the lock position and the "temporary" lock position, which is where I think a small piece of the terminal contacts the back of the retainer and holds it in place, but not as firmly as when you put the retainer in the lock position. There doesn't seem to be an example of a connector just like A21, but in the last figure on page 16 the connector on the left seems to have a somewhat similar retainer. Also, the third figure down on page 15 shows a terminal inserted into a connector with the waterproofing sleeve on it.Originally Posted by flutie98 ↑Just out of curiosity where in the service manual does it depict this locking mechanism for A21?
EDIT: Just seated the terminal correctly, thanks again!
You can order it through your local dealer or from TRDsparks.comOriginally Posted by julienrl ↑where do you buy this wire using the part number?
I got my oem connector with lead on it yesterday (local dealer had a list of 14 and change, but was able to get 20% through my dealings with them through work), and thankfully saw the above posts on how to open the lock mech, worked like a charm, hopefully someone updates the how to to include this new info! Thanks again for all your help guys!
Just installed on my wife's 2007 Yaris... It worked first time... and i am not good with this type of stuff. Thanks again guys for all your hard work on this... 🎉 Saved a bundle... 🙇
I just received my insulated wire from trdsparks... I will update the DIY this week end so that nobody breaks his A21 connector while trying to fit it... Thanks again to CTScott for figuring this one out (what would we do without you?) !
Rostra makes kits for many vehicles. When they designed the Yaris one, they probably just used their standard method. Who'd have thunk that Toyota would build in the functionality, but just not put the stalk there to use it.Originally Posted by Taboolie ↑From reading the posts in this thread, it appears as though this does indeed work however I'm curious why the Rostra kit has is so complex in comparison?
I mean really, if it was just as easy as running one wire through the firewall why would they bother with all of the other ones?
Is it that the Rostra one supports many models & years and this DIY trick is only for the 07 and 08?
Also, I'm not sure if anyone answered this already, but would there be any reason I couldn't purchase an OEM cruise stalk and use the wires from this with this method?
If it's safe and works then I'd rather spend $25 on the OEM stalk and a couple of bucks on some wire then $250-500 for an aftermarket kit.
Thanks
Hey guys and CTScott..
I assume based on the interchangeable parts that this kit from the CruiseControl store will fully work with our Yaris which is for the 08 Corolla?...
The kit includes the stalk and wire harness?
I know it is expensive, but since it has the cutting tool to cut the hole in the trim for the stalk to go through I am considering it..
http://www.cruisecontrolstore.com/ez...3/250-1768%20C
P.S... The switch to turn on the cruise control on the stalk, it is a mechanical switch to where it stays in when turned on, or a digital switch to where when pressed, it sends the signal to the ECU to which turns on the dash indicator?... Since I don’t have the dash indicator, I would rely on the switch to let me know if the cruise is on or off
thanks guys!
I assume based on the interchangeable parts that this kit from the CruiseControl store will fully work with our Yaris which is for the 08 Corolla?...
The kit includes the stalk and wire harness?
I know it is expensive, but since it has the cutting tool to cut the hole in the trim for the stalk to go through I am considering it..
http://www.cruisecontrolstore.com/ez...3/250-1768%20C
P.S... The switch to turn on the cruise control on the stalk, it is a mechanical switch to where it stays in when turned on, or a digital switch to where when pressed, it sends the signal to the ECU to which turns on the dash indicator?... Since I don’t have the dash indicator, I would rely on the switch to let me know if the cruise is on or off
thanks guys!
Originally Posted by CB900F2 ↑Hey guys and CTScott..
I assume based on the interchangeable parts that this kit from the CruiseControl store will fully work with our Yaris which is for the 08 Corolla?...
The kit includes the stalk and wire harness?
I know it is expensive, but since it has the cutting tool to cut the hole in the trim for the stalk to go through I am considering it..
http://www.cruisecontrolstore.com/ez...3/250-1768%20C
P.S... The switch to turn on the cruise control on the stalk, it is a mechanical switch to where it stays in when turned on, or a digital switch to where when pressed, it sends the signal to the ECU to which turns on the dash indicator?... Since I don’t have the dash indicator, I would rely on the switch to let me know if the cruise is on or off
thanks guys!
Now that is crazy expensive. You can buy the lower cover with the hole already in it for about $15 (part number 45184-52130-B0) and an ebay stalk for well under $50.
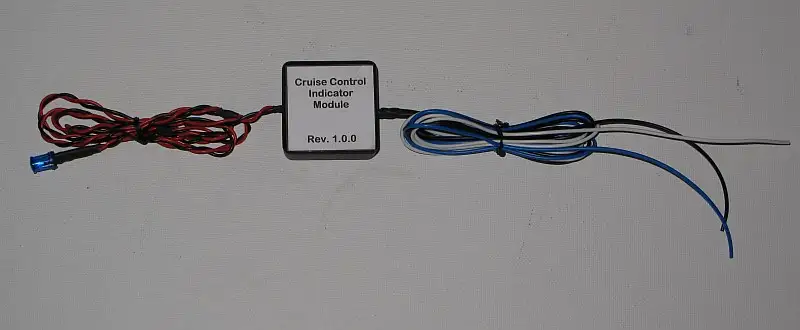
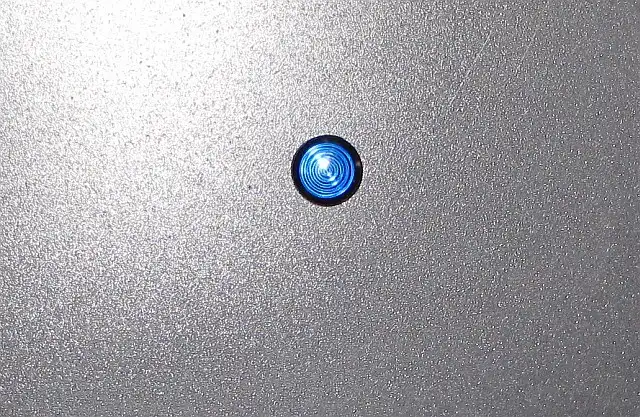
As for the indicator, the switch is a momentary input to the ECM, so on 07-08's there is no indicator. I designed a circuit using a small microprocessor to see the button press and be able to distinguish between the on/off and the other buttons being pressed. Nickjhort installed and is using my prototype one. Cruz_gsr contacted me this week about getting one made, so I built some production ones and have been meaning to post a thread with them for sale. Below is a picture of the module. There is a panel mount blue LED for the indicator (that just requires a 1/4" hole). Two of the three wires are connected to the stalk (or switches for the full DIY version) and the third is connected to the ignition switched wire on the keyswitch. The modules are $25 shipped to the US and $30 shipped to Canada.
Hmm I got all done with it and I get nothing when I push any of my switches. However, I definately have power going to the switches and my ground seems to work just fine, however I didn't have the correct resistors so I tried to pair them to get in range and I have a strong feeling I misread one or simply added wrong. I'll order the correct resistors and replace the ones I have and see if it works. On the upside me and my dad did this over the weekend and my car still works perfectly.
Originally Posted by Taboolie ↑Well I bit the bullet and ordered the kit from trdsparks. Figured $200 is a heck of a lot cheaper then $450-500 from the dealer. Plus I'll get the nice stalk with an indicator light.
What pushed me over the edge was I took a close look at the instrument cluster and couldn't see a cruise indicator. '07 HB with power package :(
Plus I drove 500km on Sat and my foot and leg cramped up big time! Cruise it is! :)
My on and only concern is the location of the connector near the transmission the instructions refer to, I'm sure I'll find it eventually but right now I have NO idea where that thing is.
You must have bought the Rostra kit, if the instructions involve a connection at the transmission. The Rostra kit has a far more complicated set of instructions than our DIY method. The only gain with the Rostra kit is the indicator LED on the stalk.
As you noticed, the 07-08's don't have the cluster indicator. My Cruise Indicator Module that I mentioned above adds the indicator to 07-08's (and you place the indicator where you want it) with far less labor than installing the Rostra kit.
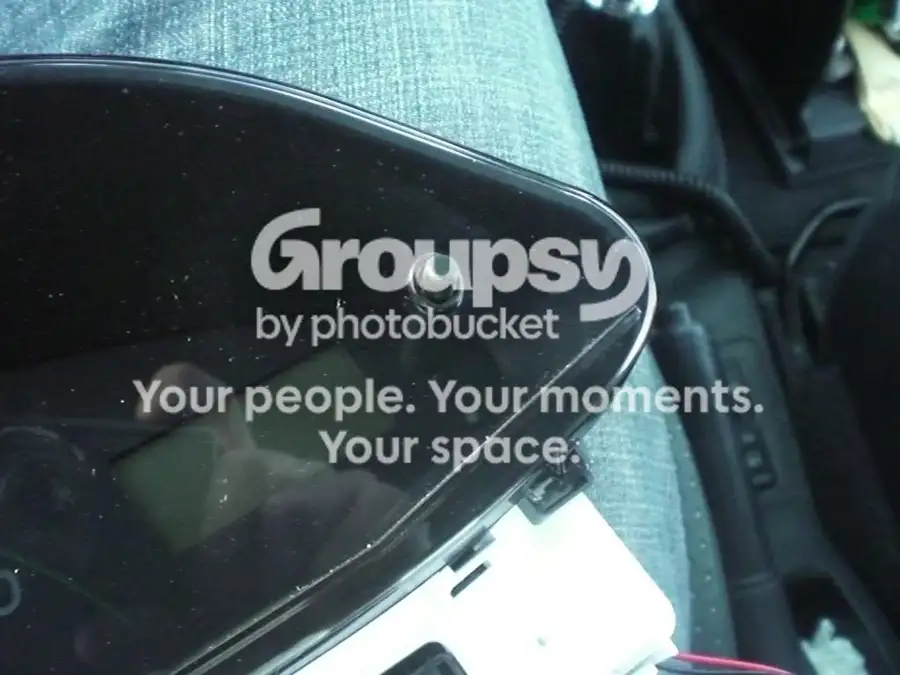
I would totally go with CTScott's method with the Indicator Module. It's cheap and looks just as good as the Kits, or OEM installation. As long as you place the LED where you want it. I actually put mine in the Gauge Cluster to make it look more OEM, but I think it looks better than OEM myself. I'm sure if you take the time and have the skill you could scratch the OEM icon on the black cluster cover and it would look totally OEM.
The module does exactly what it says in the "CAN WE DO THIS" thread post #398. The light comes on for 1 second on power up and then works like a charm when in use. I equipped it with a white "12V ready" LED, but you can use whatever color you want.
I've noticed only one thing with your Module CTScott. When I hit the on/off switch two times really fast the CC reads two pushes, but the Module only reads one and actually inverts the LED. So you have to hit it again twice really fast to reset it. Also when I turn on my HID headlights there is a quick power drain that resets the module (the light comes on for a second and then the LED is reversed again because the drain doesn't reset the CC) But this only happens if I turn my CC on before the headlights. So if I hit the lights first I have no problems.
It's totally invisible until you hit the switch...see that little white dot?
Video of it working...
http://s236.photobucket.com/albums/f...t=CIMG7073.flv
The module does exactly what it says in the "CAN WE DO THIS" thread post #398. The light comes on for 1 second on power up and then works like a charm when in use. I equipped it with a white "12V ready" LED, but you can use whatever color you want.
I've noticed only one thing with your Module CTScott. When I hit the on/off switch two times really fast the CC reads two pushes, but the Module only reads one and actually inverts the LED. So you have to hit it again twice really fast to reset it. Also when I turn on my HID headlights there is a quick power drain that resets the module (the light comes on for a second and then the LED is reversed again because the drain doesn't reset the CC) But this only happens if I turn my CC on before the headlights. So if I hit the lights first I have no problems.
It's totally invisible until you hit the switch...see that little white dot?
Video of it working...
http://s236.photobucket.com/albums/f...t=CIMG7073.flv
Originally Posted by nickhjort ↑I would totally go with CTScott's method with the Indicator Module. It's cheap and looks just as good as the Kits, or OEM installation. As long as you place the LED where you want it. I actually put mine in the Gauge Cluster to make it look more OEM, but I think it looks better than OEM myself. I'm sure if you take the time and have the skill you could scratch the OEM icon on the black cluster cover and it would look totally OEM.
The module does exactly what it says in the "CAN WE DO THIS" thread post #398. The light comes on for 1 second on power up and then works like a charm when in use. I equipped it with a white "12V ready" LED, but you can use whatever color you want.
I've noticed only one thing with your Module CTScott. When I hit the on/off switch two times really fast the CC reads two pushes, but the Module only reads one and actually inverts the LED. So you have to hit it again twice really fast to reset it. Also when I turn on my HID headlights there is a quick power drain that resets the module (the light comes on for a second and then the LED is reversed again because the drain doesn't reset the CC) But this only happens if I turn my CC on before the headlights. So if I hit the lights first I have no problems.
It's totally invisible until you hit the switch...see that little white dot?
Picture lost · i236.photobucket.com
Video of it working...
http://s236.photobucket.com/albums/f...t=CIMG7073.flv
The quick press issue is due to switch deboucning. I found that the radio shack switches require almost 100ms of debouncing. With higher quality switches the debouncing can be significantly reduced.
I can't believe that the HIDs draw it down that much. You may want to consider a heftier battery or you might run into some problems. In doing some experimentation I found that the ECM becomes very flaky if the battery voltage sags below 9 volts.
Dude.. You DA MAN!!!!
Originally Posted by CTScott ↑Now that is crazy expensive. You can buy the lower cover with the hole already in it for about $15 (part number 45184-52130-B0) and an ebay stalk for well under $50.
As for the indicator, the switch is a momentary input to the ECM, so on 07-08's there is no indicator. I designed a circuit using a small microprocessor to see the button press and be able to distinguish between the on/off and the other buttons being pressed. Nickjhort installed and is using my prototype one. Cruz_gsr contacted me this week about getting one made, so I built some production ones and have been meaning to post a thread with them for sale. Below is a picture of the module. There is a panel mount blue LED for the indicator (that just requires a 1/4" hole). Two of the three wires are connected to the stalk (or switches for the full DIY version) and the third is connected to the ignition switched wire on the keyswitch. The modules are $25 shipped to the US and $30 shipped to Canada.
Attachment 29263
Attachment 29264
hi guys,I'm from China with 08'Yaris 1.6AT 5doors liftback,i have done the CC work just like it,but the cc don't work,is it haven't programs in my ECM/ECU?🙇😢😢Originally Posted by CTScott ↑Correct.
quick question,
im not real familiar with electrical circuits and whatnot, but when adding 2 resistors in a series is it equivalent to the sums of the 2 resistors?
the reason I ask is because i could not find a resistor between 351-426, so i grabbed a 250 and a 150, assuming that together they'd make 370?
or am I just being way too simple minded?
im not real familiar with electrical circuits and whatnot, but when adding 2 resistors in a series is it equivalent to the sums of the 2 resistors?
the reason I ask is because i could not find a resistor between 351-426, so i grabbed a 250 and a 150, assuming that together they'd make 370?
or am I just being way too simple minded?
That's correct. When you connect them in series you sum the resistance (so 250+150 = 400).Originally Posted by coffiend ↑quick question,
im not real familiar with electrical circuits and whatnot, but when adding 2 resistors in a series is it equivalent to the sums of the 2 resistors?
the reason I ask is because i could not find a resistor between 351-426, so i grabbed a 250 and a 150, assuming that together they'd make 370?
or am I just being way too simple minded?
Okay thanks man, much appreciated
thanks,than ive been waiting for this!but i'm not sure that can be use in my car at china!
Unfortunately, it won't work on your Yaris. Another person from China tried it and verified that your ECM is not setup for cruise control.Originally Posted by flybabys ↑thanks,than ive been waiting for this!but i'm not sure that can be use in my car at china!
Two questions: 1) To make the A21-40 connection, are you just jamming the wire into the receptacle housing and hoping it makes connection to the corresponding pin on the ECM? Or do you know the part number for the proper crimp terminal to snap into the housing? 2) Why are you running the clutch switch to the engine bay fuse box instead of to C20-56 on the ECM?
I'm not at my desk right now to easily do the search, so if you look at the other two cruise control threads, you'll find my posting with the part number for the correct pin for the ECM connector.Originally Posted by tomlock ↑Two questions: 1) To make the A21-40 connection, are you just jamming the wire into the receptacle housing and hoping it makes connection to the corresponding pin on the ECM? Or do you know the part number for the proper crimp terminal to snap into the housing? 2) Why are you running the clutch switch to the engine bay fuse box instead of to C20-56 on the ECM?
For the clutch switch connection, you can go to either point, although the fuse box connection is easier to get to from the clutch switch.
What Voltage should i see at pin 40 🤷
If your ECM supports cruise, pin 40 should measure 12 V with the ignition on, and nothing connected to the pin (other than your voltmeter).Originally Posted by 1NZYaris1 ↑What Voltage should i see at pin 40 🤷
Forgetting the clutch switch or bypass of it wouldn't cause an issue, other than the cruise not kicking on.Originally Posted by yaris07hb
Is it possible that my failure to follow instructions, not jumping the clutch switch terminals, and attempting to activate the cruise has affected my ECM? I find nothing out of place, nor did I disturb anything other than the ground lug on the battery and the ECM connector to install the wire at Pin 40.
Has anyone else had a rough idle during or after performing this mod? Is it a super-coincidence that I now must perform a forum search on rough idle, and then go clean my MAS or something else?
Thanks...
Your rough idle is probably due to having pulled the connector off of the ECM. Connector A21 carries power to the ECM, so when you pull it, you reset the short term data. Drive it for a couple of days and it should cure itself.
Same thing happened here when I first did the mod to install the factory stalk on my '07 MT LB, CTScott's right: Give it a full tank of gas to re-learn things, it'll behave itself again.Originally Posted by yaris07hb ↑I still have a very low, very rough idle. This was not the case before yesterday.
So I need some help with the actual routing of the wires...
I have an 08 Sedan MT. I have gone with the 4 button method and Installed them on a project box from the Shack ( I don't want to drill my dash because i want to eventually get a stalk). I'm stowing it in the Drivers side mini glove box essentially the same as mounting on the power mirror panel. I have run the negative lead to the Driver's side door sill to the ground bolt. My issue is how did you guys route this cable over to the passenger side floor (to access the grommet under the carpet)? any pictures of this process would be really nice. Also some help with the clutch switch routing would be nice too.
Thanks guys.... I'm and Audio Engineer so the soldering and electrical stuff is pretty easy for me, but I have never really worked on cars. So I need that help.
I have an 08 Sedan MT. I have gone with the 4 button method and Installed them on a project box from the Shack ( I don't want to drill my dash because i want to eventually get a stalk). I'm stowing it in the Drivers side mini glove box essentially the same as mounting on the power mirror panel. I have run the negative lead to the Driver's side door sill to the ground bolt. My issue is how did you guys route this cable over to the passenger side floor (to access the grommet under the carpet)? any pictures of this process would be really nice. Also some help with the clutch switch routing would be nice too.
Thanks guys.... I'm and Audio Engineer so the soldering and electrical stuff is pretty easy for me, but I have never really worked on cars. So I need that help.
I have a factory Cruise stalk if anyone is interested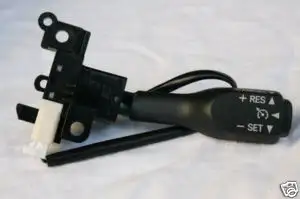
Hey guys,
My brother helped me install the DIY cruise control today, and it works great! Tonight however, I was testing the cruise again and randomly the P/S (Power Steering) indicator came on. It may have come on after one of the following, but I'm not sure exactly what cause this... I tried to recreate the problem. It might have come on because...
1) I accidentally held "Cancel" instead of "Set" - would that cause a problem?
2) I tried to "Set" the cruise below 25 mph, which I know isn't supported, wondering if that was the problem and the light came on then.
Has anyone experienced something similar with the DIY Cruise Control and the Power Steering indicator? If so, what was the issue you found with it?
Any help would be really appreciated... I just want to make sure nothing is going to blow up or melt down or anything :-) Thanks!
My brother helped me install the DIY cruise control today, and it works great! Tonight however, I was testing the cruise again and randomly the P/S (Power Steering) indicator came on. It may have come on after one of the following, but I'm not sure exactly what cause this... I tried to recreate the problem. It might have come on because...
1) I accidentally held "Cancel" instead of "Set" - would that cause a problem?
2) I tried to "Set" the cruise below 25 mph, which I know isn't supported, wondering if that was the problem and the light came on then.
Has anyone experienced something similar with the DIY Cruise Control and the Power Steering indicator? If so, what was the issue you found with it?
Any help would be really appreciated... I just want to make sure nothing is going to blow up or melt down or anything :-) Thanks!
Originally Posted by hirstmusic ↑Hey guys,
My brother helped me install the DIY cruise control today, and it works great! Tonight however, I was testing the cruise again and randomly the P/S (Power Steering) indicator came on. It may have come on after one of the following, but I'm not sure exactly what cause this... I tried to recreate the problem. It might have come on because...
1) I accidentally held "Cancel" instead of "Set" - would that cause a problem?
2) I tried to "Set" the cruise below 25 mph, which I know isn't supported, wondering if that was the problem and the light came on then.
Has anyone experienced something similar with the DIY Cruise Control and the Power Steering indicator? If so, what was the issue you found with it?
Any help would be really appreciated... I just want to make sure nothing is going to blow up or melt down or anything :-) Thanks!
Check the power steering ECU (located directly above the steering column). Depending on how you pulled your wires through, you may have loosened one of the connectors. Neither of the two events you mentioned would cause an issue.
Originally Posted by 1NZYaris1 ↑I have a factory Cruise stalk if anyone is interested
Price on this? Would this work with my car?
Thanks
Duane
You guys are FREAKING AMAZING!
I almost bought the Rostra CC back in the summer because I was so sick of trips with my foot cramping up.
Now I'm so glad I didn't. Thanks for coming up with this and sharing your knowledge.
🙇
I almost bought the Rostra CC back in the summer because I was so sick of trips with my foot cramping up.
Now I'm so glad I didn't. Thanks for coming up with this and sharing your knowledge.
🙇
Wow this is awesome. It sounds easy enough that I could do it knowing nothing about cars or electronics. I was searching for this though because I am moving to Gainesville, fl from Atlanta, Ga tomorrow. I had to make the trip a couple days ago and my leg and back were killing me. I was hoping to find a way I could pull something off in a couple of hours. You think it's possible? I have a couple of guys familiar with cars and electrical stuff that are coming to help me move tomorrow...
The other thing was I really liked the "test" install Yaris07hb did, because then I could worry about mounting it later. Or possibly something even simpler... installing it in a slip of cardboard... I have tons of cardboard.
Also is the only worry with modifying the remote possibility of voiding a warranty? I bought my '08 HB used, and I don't have a warranty, at least that I know of... it's my first nice new to me car.
The other thing was I really liked the "test" install Yaris07hb did, because then I could worry about mounting it later. Or possibly something even simpler... installing it in a slip of cardboard... I have tons of cardboard.
Also is the only worry with modifying the remote possibility of voiding a warranty? I bought my '08 HB used, and I don't have a warranty, at least that I know of... it's my first nice new to me car.
Originally Posted by cynsofdm ↑Wow this is awesome. It sounds easy enough that I could do it knowing nothing about cars or electronics. I was searching for this though because I am moving to Gainesville, fl from Atlanta, Ga tomorrow. I had to make the trip a couple days ago and my leg and back were killing me. I was hoping to find a way I could pull something off in a couple of hours. You think it's possible? I have a couple of guys familiar with cars and electrical stuff that are coming to help me move tomorrow...
The other thing was I really liked the "test" install Yaris07hb did, because then I could worry about mounting it later. Or possibly something even simpler... installing it in a slip of cardboard... I have tons of cardboard.
Also is the only worry with modifying the remote possibility of voiding a warranty? I bought my '08 HB used, and I don't have a warranty, at least that I know of... it's my first nice new to me car.
It can be done in a few minutes with the right tools. In the "Can we do this" thread that started this whole idea, I test wired it to two stand-alone switches as a quick test before drilling holes in the dash.
So this may be a silly question but... this works on an AT liftback as well? Just ignore the parts that say "MT only?"
Also, I'm a bit confused on the part where you connect to the ECU. Is there a specific crimp/connector, some other method to plug into the ECU?
Also, I'm a bit confused on the part where you connect to the ECU. Is there a specific crimp/connector, some other method to plug into the ECU?
Correct on the AT - Works the same and ignore the clutch switch part.Originally Posted by frankencar ↑So this may be a silly question but... this works on an AT liftback as well? Just ignore the parts that say "MT only?"
Also, I'm a bit confused on the part where you connect to the ECU. Is there a specific crimp/connector, some other method to plug into the ECU?
For the ECM connection (on 06-08 Yaris), you need to actually add a pin to the smaller of the two connectors on the ECM. I highly recommend using the actual Toyota "repair terminal", which is the pin with its waterproof sleeve and a piece of wire pre-connected to it. (Part number: 82998-24250)
I performed this mod several months ago on my wife's 2007, 3 door liftback and decided to use the two switch method. Mounted two black switches on the small removable panel to the right of the column, just below the driver's side glove box. One switch provides on/off and the other switch provides the set function.
This mod has been working great and makes the car very pleasant to drive on all but the shortest trips. Plus one can't help but smile when knowing you have built your own cruise control for less than $10.
Thanks to all who posted schematics, pics, and ideas.
This mod has been working great and makes the car very pleasant to drive on all but the shortest trips. Plus one can't help but smile when knowing you have built your own cruise control for less than $10.
Thanks to all who posted schematics, pics, and ideas.
Originally Posted by CTScott ↑Correct on the AT - Works the same and ignore the clutch switch part.
For the ECM connection (on 06-08 Yaris), you need to actually add a pin to the smaller of the two connectors on the ECM. I highly recommend using the actual Toyota "repair terminal", which is the pin with its waterproof sleeve and a piece of wire pre-connected to it. (Part number: 82998-24250)
You forgot to add your module for the led. ;) A plus!
Duane
Ok so of course I HAVE to do this!! I have a M/T, does the brake disengage the Cruise Control or do I have to depress the clutch?
Thanks,
MYT
Thanks,
MYT
Either will disengage it provided that you install the clutch switch, rather than bypassing it.Originally Posted by myt ↑Ok so of course I HAVE to do this!! I have a M/T, does the brake disengage the Cruise Control or do I have to depress the clutch?
Thanks,
MYT
Hey CTScott,
Is there a "sticky" or FAQ summarizing which mod procedure one should follow for different years/models of Yaris? I went through the long thread a month or two ago and I remember thinking that it would be better to add my own 2-way switch, but lately it seems everyone is talking about adding the stalk.
I ask this partly on your behalf -- if there's a sticky or FAQ up front in these CC threads, then surely you'll get fewer questions.
Is there a "sticky" or FAQ summarizing which mod procedure one should follow for different years/models of Yaris? I went through the long thread a month or two ago and I remember thinking that it would be better to add my own 2-way switch, but lately it seems everyone is talking about adding the stalk.
I ask this partly on your behalf -- if there's a sticky or FAQ up front in these CC threads, then surely you'll get fewer questions.
That's a good point. There are sooooo many different threads (with bizillions of posts) all discussing with the same questions popping up, as it is pretty hard to find the answers without wading through. I think I will put one together...Originally Posted by rtom ↑Hey CTScott,
Is there a "sticky" or FAQ summarizing which mod procedure one should follow for different years/models of Yaris? I went through the long thread a month or two ago and I remember thinking that it would be better to add my own 2-way switch, but lately it seems everyone is talking about adding the stalk.
I ask this partly on your behalf -- if there's a sticky or FAQ up front in these CC threads, then surely you'll get fewer questions.
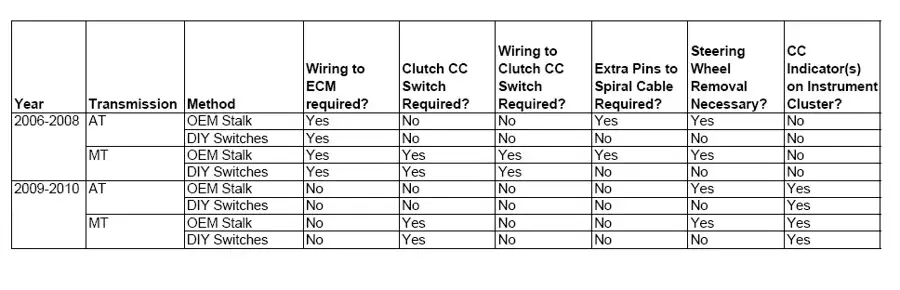
Here's a start: