Yarisworld Archive

DIY - 2009 Cruise Control for $10, without pulling the steering wheel and airbag

293 posts · 385,443 views · page 1 of 6

CTScottOriginal postUSA, CT · Apr 29, 2009#1
This DIY came from the following thread, discussing the possibility of adding cruise control by simply adding the OEM cruise control stalk:

Can we do this? (aka The DIY Cruise Control Thread)

2009 Yaris are prewired for cruise control. To enable this functionality one may add the OEM stalk, but doing so requires the removal of the steering wheel and airbag. Also, the dealer price for the OEM stalk is ~$125.

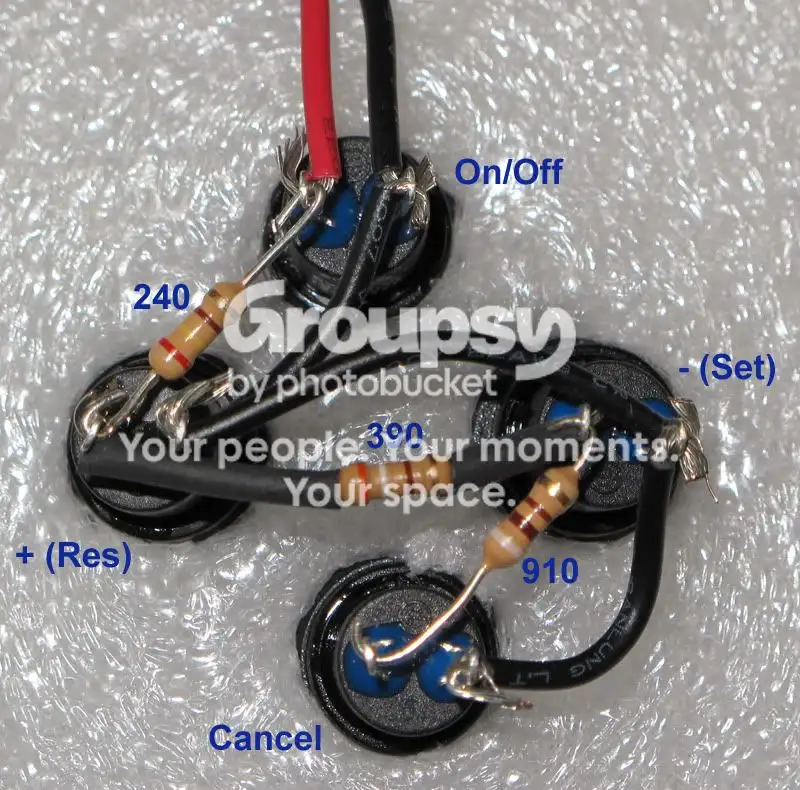
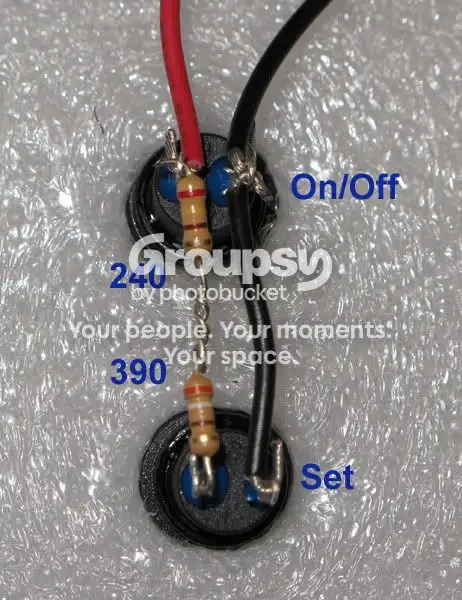
After looking at the cruise control section of the service manual, I realized that the stalk's functionality (On/Off, -(Set), +(Resume), and Cancel) could be recreated using four switches and three resistors. Alternately, basic cruise control functionality (On/Off and Set) can be provided using two switches and one (or two) resistors.

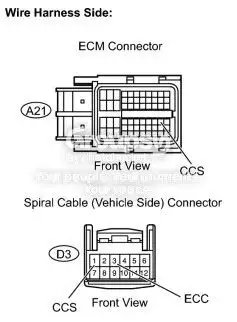
Currently, it is believed that this will also work for 07-08 Yaris, but a wire will have to be connected to connector A21 of the ECM or Connector AD4 (which is located above the top of the fuse panel, just under the dash).

Note: For Manual Transmission equipped Yaris, the "Cruise Control Clutch Switch" is needed as well. This is a second clutch switch (there's already one called the "Clutch Start Switch"). The "Cruise Control Clutch Switch" connects to connector A29. Its part number is: 88280-14030 and it lists for ~$18.


Materials required:
4 - Switches (SPST, Normally Open, Momentary) (Digikey part number EG1900-ND, $2.44 each)
1 - 240 Ohm Resistor (Digikey part number 240QBK-ND, $.06)
1 - 390 Ohm Resistor (Digikey part number 390QBK-ND, $.06)
1 - 910 Ohm Resistor (Digikey part number 910QBK-ND, $.06)
~4ft - Wire, 20-24 AWG, 2 colors

I purchased the switches and resistors from Digikey (http://www.digikey.com/).
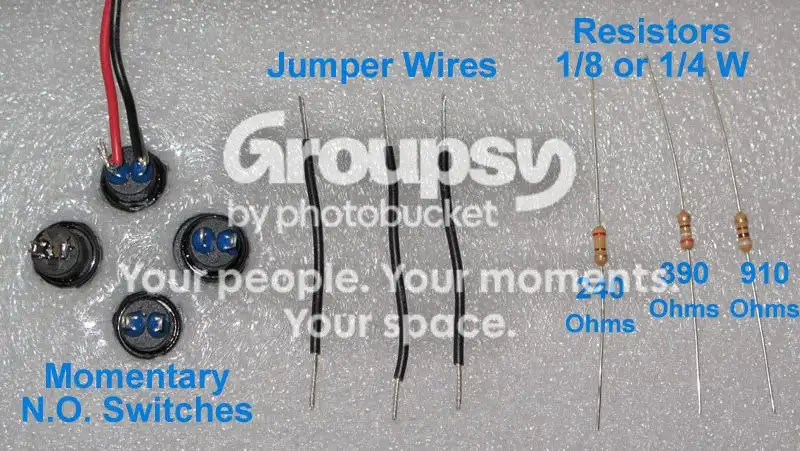


Procedure:

1. Make sure your car is pre-wired for cruise control:

Check the Combination Meter for the Crusie Control Lights:
Shining a flashlight to the right of the speedometer will make the two
cruise control icons visible if they are present. They will not illuminate,
but will look like the two below:



2. Remove the lower steering column cover:

Rotate the steering wheel all the way to either side, and remove the two screws:



Remove the screw by the steering wheel tilt lever:


Squeeze the lower steering column cover, by the seam between it and the upper, and gently pull down to remove it.


3. Identify the Cruise Control wires on Connector D3 (white connector at the base of the steering wheel next to the yellow connector): CCS (Blue wire in Pin 1) and ECC (Brown wire in Pin 3).
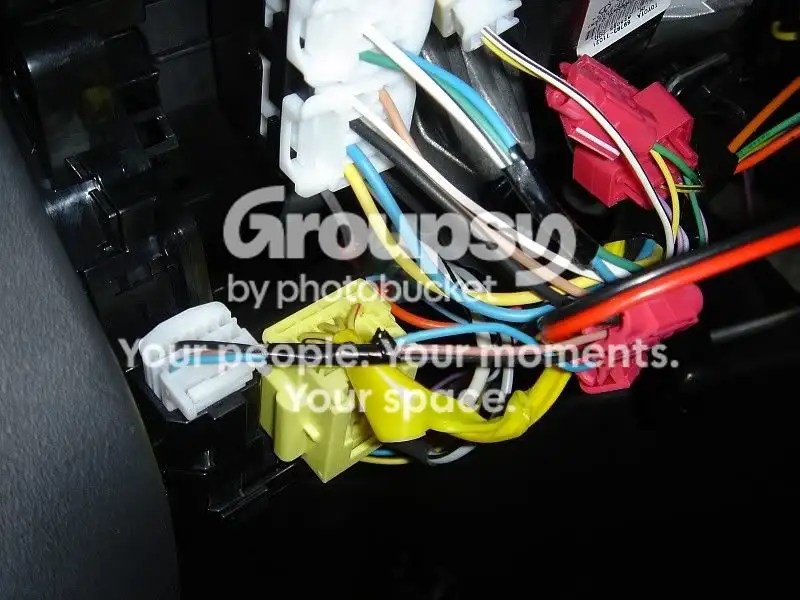


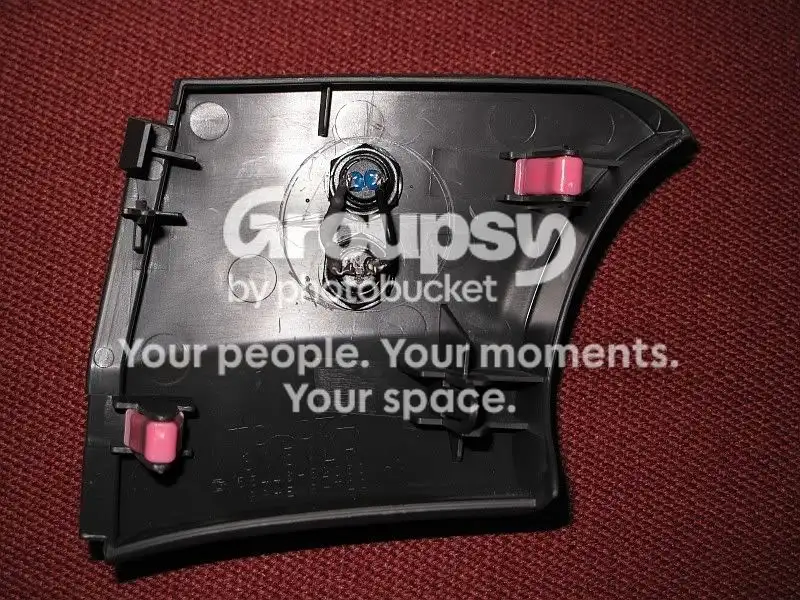
4. Chose a location to mount the switches. I mounted mine to the "push button start" cover to the right of the key switch. This location has a hole behind it approximately 1-5/8" in diameter. If using this location you must make sure that the back of the switches line up with this hole:

Switches mounted:
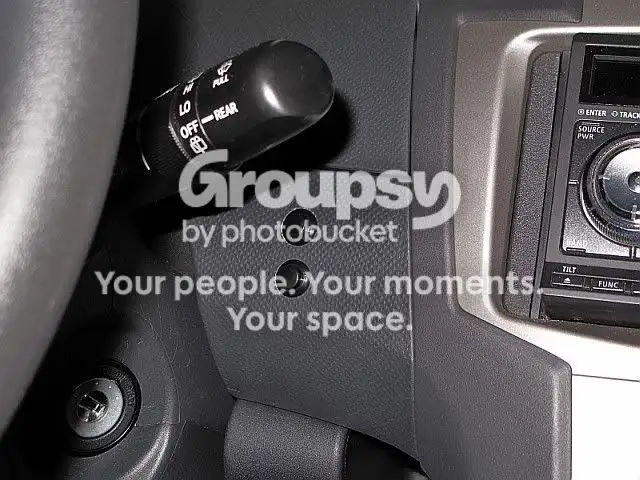

Hole behind cover:
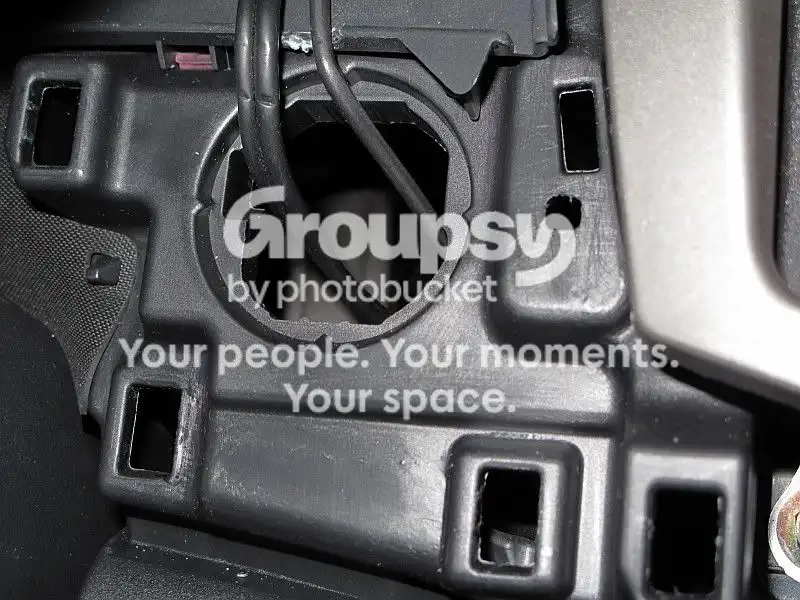

Rear of cover (with two switches mounted):


5. Mount and wire switches:
Switches can be mounted in various positions, but wiring between them will be the same. Note that in the 4 switch example the leads of the 390 Ohm resistor are covered with heat shrink tubing to keep them from making contact with the other switch terminals.

4 Switch wiring:

2 Switch wiring (The two resistors could be replaced with a single 567-693 Ohm one) :


6. Connect wires from switch assembly to wires on connector D3.
Red wire from switches connects to blue wire of D3 Pin 1.
Black wire from switches connects to brown wire of D3 Pin 3.


7. Test Cruise Control functions:
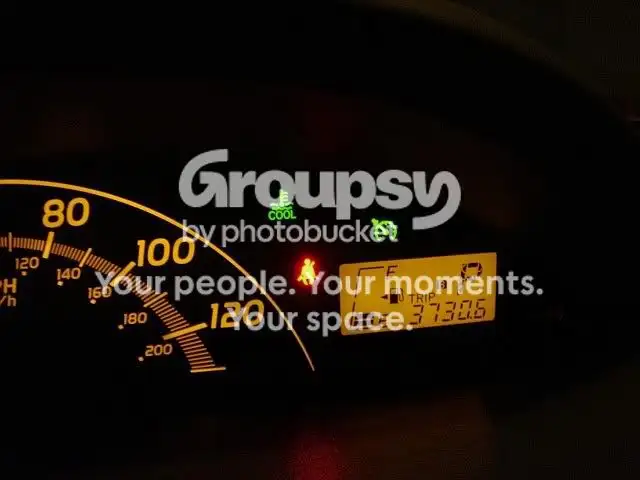
On/Off function can be tested with the engine off and the ignition switch in the on position. Pressing the button once should illuminate the cruise control icon. Pressing it again should make the light go off:


The Set function requires that the car be moving at 25 MPH or greater. Pressing the Set switch at >25MPH will cause the SET light to illuminate.
Replies 292

KCALB SIRAYVirginia · Apr 29, 2009#2
very interesting, subscribed
MGarganoNJ · Apr 30, 2009#3
Originally Posted by CTScott ↑
To enable this functionality one may add the OEM stalk, but doing so requires the removal of the steering wheel and airbag.
Is there any way to install the OEM stalk without removing the steering wheel & airbag?
CTScottThread starterUSA, CT · Apr 30, 2009#4
Originally Posted by MGargano ↑
Is there any way to install the OEM stalk without removing the steering wheel & airbag?
No. It mounts under them, and the connector for the spiral cable is buried under there as well. Removing them is not a huge deal, it just requires some caution and care to not pop the airbag or break the clockspring.
MGarganoNJ · Apr 30, 2009#5
Is there a DIY for removing the steering wheel & airbag?
CreeperGeorgia · Apr 30, 2009#7
so you can do this with only 2 switches? on/off and set?
CTScottThread starterUSA, CT · Apr 30, 2009#8
Originally Posted by Creeper ↑
so you can do this with only 2 switches? on/off and set?
Correct. That's what I did with mine. In any vehicle that I've had with cruise, I never find myself using the tap up/down or coast/resume, so I just went with two switches.
LtNoogieWest Hills, CA · Apr 30, 2009#9
In instruction #7, the picture shows that the car thought this mod was pretty "cool" and said so!
CTScottThread starterUSA, CT · Apr 30, 2009#11
Originally Posted by Tamago ↑
http://www.allelectronics.com/make-a...-SWITCH/1.html

would be a nice switch, if it spring centers.. takes the place of two pushbuttons :)

True. I also experimented with a 4-way joystick switch (intended for cell phones or portable video games), but it was a bit too small.
KCALB SIRAYVirginia · Apr 30, 2009#12
Wonder if I can have this done by the end of July? Oh where does time go? I really like this DIY, very cool.
DerFlosserUSA · Apr 30, 2009#13
Great stuff Scott...👍
AstromanWenatchee, WA · Apr 30, 2009#14
Really cool! Might try this with the girlfriends '09. I'm glad yarisworld has smart people on it 😁 Great DIY!
marcustoronto, canada · Apr 30, 2009#15
interesting...wicked man..
mikenacaratoBrentwood, TN · Apr 30, 2009#16
thread tools > subscribed!
mikenacaratoBrentwood, TN · Apr 30, 2009#17
heeeck ya, although i only have to drive like 20 mins lol
KCALB SIRAYVirginia · Apr 30, 2009#18
Originally Posted by ChinoCharles ↑
Um SUBSCRIBED. Would come in handy for the IA road trip.
My thoughts as well👍
mikenacaratoBrentwood, TN · Apr 30, 2009#19
el oh el, im glad my work truck had cruise on my way to ATL last weekend. well, i dont think the yaris would even move with a bunch of semi-truck brake drums in the back lol
Pitt YarisPittsburgh · Apr 30, 2009#20
Extremely awesome diy. I'm gonna find a flashlight to see if I have cruise.
yaris-meAnaheim, CA · Apr 30, 2009#21
Great!🎉
YarisDudeLebanon, Ohio · Apr 30, 2009#22
Like it! Does anyone have a pic as to where exactly the wires are at on fuse block area for the 07 HB? Looks like a real nice weekend project.
CTScottThread starterUSA, CT · Apr 30, 2009#23
Originally Posted by YarisDude ↑
Like it! Does anyone have a pic as to where exactly the wires are at on fuse block area for the 07 HB? Looks like a real nice weekend project.
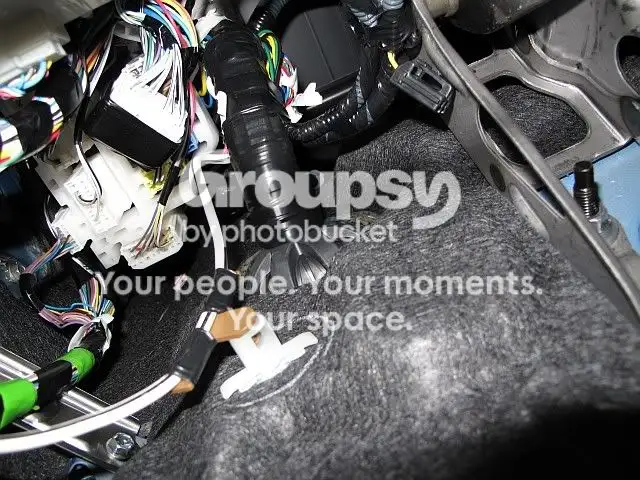
To access the wire under the dash you would actually have to lift the top of the dash. The connector is above the fuse block. In this picture of the main cable harness going through the fire wall you can see the top of the back of the fuse block in the top left corner (the white plastic). The junction connector AD4 is above the connector with the wide black tape. Lying on the floor with my head on the brake pedal I can barely reach my hand up that far. PK198105 is planning on trying to get at it by raising the top of the dash this weekend.


The other place that the wire on 07-08's can be accessed is at the ECM (which is easier to get at). The key with tapping the wire there would be to use a waterproof tap or cold-shrink tape to ensure that moisture doesn't get at the connection.

This image shows the CCS terminal (pin 40) on the ECM connector A21.


Attached picture not available

Only one wire would need to be run to this connector (my red one in the DIY), as the other (the black wire) can grab any ground point.
ka0sxCA east bay · Apr 30, 2009#24
So only the wiring doesn't exist on the '08? =(
CTScottThread starterUSA, CT · Apr 30, 2009#25
Originally Posted by ka0sx ↑
So only the wiring doesn't exist on the '08? =(
And, many 07-08's also don't have the indicator light on the combination meter.
schleppyBoston, MA · Apr 30, 2009#26
Scott, you are a true asset to this forum. Thanks so much for putting this together!
CB900F2Toronto · May 1, 2009#27
So true!... 👎 😢 😢

Originally Posted by CTScott ↑
And, many 07-08's also don't have the indicator light on the combination meter.
uncleyarisToronto · May 1, 2009#28
Fantastic!!!!!!!!!
ka0sxCA east bay · May 2, 2009#29
Originally Posted by CB900F2 ↑
So true!... 👎 😢 😢
an LED is a suitable replacment for a stupid logo.......

does the 08 ECU have the coding in all the ecu's for cruise? If so i might consider doing this the hard way.......
CTScottThread starterUSA, CT · May 2, 2009#30
Originally Posted by ka0sx ↑
an LED is a suitable replacment for a stupid logo.......

does the 08 ECU have the coding in all the ecu's for cruise? If so i might consider doing this the hard way.......

The indicator on the combination meter is actually controlled by the CAN bus, so adding your own LED for cruise is not trivial.
nickhjortOneida, NY · May 2, 2009#31
So even if my 07 lifty doesn't have those indicator lights, there's a chance I can still do this mod with the switches and some LEDs? And where did you get those little switches?
nickhjortOneida, NY · May 2, 2009#32
Just reading all the other threads and posts on this topic and answered my own question :) I can't wait to start ripping $hit apart!!
frownonfunRGV, Texas · May 2, 2009#33
subscribed
TDB-1pa · May 2, 2009#34
Just did this DIY on my 09 5 speed and it works great. I had to jump the clutch switch connector untill I get the switch, just dont step on the clutch while on cruise!!!
THANKS to all who helped figure this out
nickhjortOneida, NY · May 2, 2009#35
What will happen if you hit the clutch while in cruise (if you jump the clutch switch)?
nickhjortOneida, NY · May 2, 2009#36
I guess I should have read the other thread first :) You said it will over rev if you hit the clutch while jumping the switch in cruise control. Why would you need to use the clutch while in cruise anyway. If some $hit goes down you just have to hit the break to turn off the cruise then cluth after it turns off right? It's not gunna mess anything up mechanically just by jumping the clutch switch is what I'm getting at I guess.
jambo101Montreal Canada · May 2, 2009#37
Thats what an auto forum is all about,thanks CTScott
RagnaCaTVillalba, Puerto Rico · May 2, 2009#38
learning
momerathBaton Rouge, LA · May 2, 2009#39
Hello. I'm eager to try this out next week. I just have a couple of questions.

Question #1:

You stated in step 6: "Connect wires from switch assembly to wires on connector D3. Red wire from switches connects to blue wire of D3 Pin 1. Black wire from switches connects to brown wire of D3 Pin 3."

It's unclear whether or not I connect the switch assembly wires to the blue/brown wires themselves or to the connectors. The picture isn't clear because I'm not seeing the added black and red switch assembly wires. Is the picture under step 6 a before or after? It is exactly the same as the picture under step 3.

Question #2:

How do you remove the "push button start" cover? I tried playing with it to see if I could snap it off but I had no luck. It seems pretty firmly in place. I didn't want to force it too much for fear of breaking it off.

Question #3:

How easy is it to run the wire from that cover to the steering wheel assembly? Is there a direct path from the cover into the assembly?

thanks!
nickhjortOneida, NY · May 2, 2009#40
TDB-1, to jump the switch connector, you simply put a wire from one terminal to the other (the switch plug only has 2 terminals right)? You didn't put a fuse or anything in there just in case?
TDB-1pa · May 2, 2009#41
Correct, I actually used a small spade terminal and just pushed it into the connector. Just don't step on the clutch when using cruise!!!! I have not hit the clutch but think if you did it would rev the motor till the computer or rev limiter figures out what is happening.
nickhjortOneida, NY · May 2, 2009#42
Gotcha. Thanks again man! And of course thanks to all the smart people who know how to do this stuff and make it easier for us dumb people to DIY :) I'm going outside right now to set this push-button system up. I'll let you know how it goes.
CTScottThread starterUSA, CT · May 2, 2009#43
Answers in red below:


Originally Posted by momerath ↑
Hello. I'm eager to try this out next week. I just have a couple of questions.

Question #1:

You stated in step 6: "Connect wires from switch assembly to wires on connector D3. Red wire from switches connects to blue wire of D3 Pin 1. Black wire from switches connects to brown wire of D3 Pin 3."

It's unclear whether or not I connect the switch assembly wires to the blue/brown wires themselves or to the connectors. The picture isn't clear because I'm not seeing the added black and red switch assembly wires. Is the picture under step 6 a before or after? It is exactly the same as the picture under step 3.

Picture 3 and 6 are actually the same "after picture". The red tap-splices are how I connected my red and black wires to the brown and blue wires.


Question #2:

How do you remove the "push button start" cover? I tried playing with it to see if I could snap it off but I had no luck. It seems pretty firmly in place. I didn't want to force it too much for fear of breaking it off.


You have to pull the black vertical trim along side of the AC controls / radio (just get your fingers under the edge and pull it out). Once that is removed the cover pulls right off.


Question #3:

How easy is it to run the wire from that cover to the steering wheel assembly? Is there a direct path from the cover into the assembly?


Very easy - When you come through the back of that hole you loop to the left and right up along the wiring harness for the steering column.


thanks!
tk-421Dagobah · May 2, 2009#44
Wow... this is really really cool. I'm pretty sure I don't have the LEDs on the dash, but I don't mind adding some in the same panel as the buttons.

Excellent job, Scott and Pavel!
d1nzfeasia · May 2, 2009#45
anyone tried on the sedan yet?
mariannisrael · May 4, 2009#46
any one knows if the 2007 model come ready to install cruise controll? (its the same model as 2009)
mariannisrael · May 4, 2009#47
Originally Posted by PK198105 ↑
did you read the Can we do this thread
ofcorse. but i go tired on page 4. and skipped to the last pages.
havent found any info about it.
by the way. just now i looked in the 2007 manual - cruise controll. and its exactly as described. also has the plugs as shown. the same wires. and need the same resistors.
i think it will work the same as my dealer said: "its exactly the same vehicle. 2007 2008 2009 no changes what so ever" he was right.

the post is for AT and MT... but here we have only Robotic Transmission... so i think i'll consider robotic transmission as an automatic transmission... hope it will work.

any advice guys?
CTScottThread starterUSA, CT · May 4, 2009#48
Originally Posted by mariann ↑
ofcorse. but i go tired on page 4. and skipped to the last pages.
havent found any info about it.
by the way. just now i looked in the 2007 manual - cruise controll. and its exactly as described. also has the plugs as shown. the same wires. and need the same resistors.
i think it will work the same as my dealer said: "its exactly the same vehicle. 2007 2008 2009 no changes what so ever" he was right.

the post is for AT and MT... but here we have only Robotic Transmission... so i think i'll consider robotic transmission as an automatic transmission... hope it will work.

any advice guys?
Does your 07 have the brown and blue wires in the D3 connector?

Also, does it have the cruise indicator on the combination meter?

If it doesn't have the D3 wires, then it will require the work that nickhjort did on page 16 of the other thread. Once all of the trial and error is sorted out in the other thread we'll put together a DIY for Yaris which need the additional work.
regalPA · May 5, 2009#49
very cool, but is there a tutorial for thos of us who want to you the OEM stock to keep it stock looking? Sounds a much better way to go that the $220 aftermarket option.
suillerTurin - Piedmont - italy · May 5, 2009#50
above all can we do on 2009 model??