 Yarisworld
My yaris's engine is 4ZRFE,1600cc,Super ECT 4-speed AT,ABS yes,VSC no,maybe only have the 1600cc engines of the Chinese market.
DIY - 2009 Cruise Control for $10, without pulling the steering wheel and airbag
293 posts · 385,443 views · page 5 of 6
Replies continued
I think you are correct. Are you able to see the part number label on your ECM?Originally Posted by SEALL ↑My yaris's engine is 4ZRFE,1600cc,Super ECT 4-speed AT,ABS yes,VSC no,maybe only have the 1600cc engines of the Chinese market.
Anybody know about relevant wiring in 2010 liftbacks?
I'd like to try this on a 2010 2-door base liftback purchased in the US!
I'd like to try this on a 2010 2-door base liftback purchased in the US!
2010 is identical to 2009 for the DIY cruise mod.Originally Posted by rtom ↑Anybody know about relevant wiring in 2010 liftbacks?
I'd like to try this on a 2010 2-door base liftback purchased in the US!
I don't know what's the part number,I saw the lable on my ECM,there are some number on it:89661-0DA20 ; TD275100-9872 ; C90.😕Originally Posted by CTScott ↑I think you are correct. Are you able to see the part number label on your ECM?
89661-0DA20 is the part number. It looks like it is a China specific ECM.Originally Posted by SEALL ↑I don't know what's the part number,I saw the lable on my ECM,there are some number on it:89661-0DA20 ; TD275100-9872 ; C90.😕
It seems useless to put on a USDM ECM.
Agreed. I don't think it would be compatible with your engine.Originally Posted by SEALL ↑It seems useless to put on a USDM ECM.
Although there is no success, but very grateful to you for your help,And your very pleasant exchanges.👍👍Originally Posted by CTScott ↑Agreed. I don't think it would be compatible with your engine.
The part number on my ECM is 89661-52C00Originally Posted by CTScott ↑So far it looks like only US and Canada Yaris have the cruise functionality built into the ECM. In the UAE do you get European Yaris? If so, cruise is definitely not built in.
I would say that there is a good chance that that ECM doesn't have cruise control, as that part number is not a USDM/CAN one and so far it appears that just ECMs for those markets have the functionality. One test that you can try is to measure the voltage on pin 40 of the ECM connector A21, with the connector in and the ignition in the ON position. If you measure +12VDC to ground on that pin, then there is a good chance that your ECM supports cruise. If you measure 0 VDC to ground, then it definitely does not.Originally Posted by sabya78 ↑The part number on my ECM is 89661-52C00
Picture lost · i236.photobucket.com
Hi guys im new here , joined because im getting my yaris tomorrow and was intrigued by this mod.
Can someone show me with microsoft paint maybe, how i can wire up this switch?
http://www.alliedelec.com/search/pro...px?SKU=9485541
~mkie~
Can someone show me with microsoft paint maybe, how i can wire up this switch?
http://www.alliedelec.com/search/pro...px?SKU=9485541
~mkie~
Where is the switch connector ?Originally Posted by nickhjort ↑TDB-1, to jump the switch connector, you simply put a wire from one terminal to the other (the switch plug only has 2 terminals right)? You didn't put a fuse or anything in there just in case?
Originally Posted by t2mike2 ↑Hi guys im new here , joined because im getting my yaris tomorrow and was intrigued by this mod.
Can someone show me with microsoft paint maybe, how i can wire up this switch?
http://www.alliedelec.com/search/pro...px?SKU=9485541
~mkie~
This thread shows the details on the clutch switch connector:Originally Posted by t2mike2 ↑Where is the switch connector ?
Link to a thread or page that is not in the archive
Thanks alot dude that is VERY very helpfull, very excited im going to pick up my yaris now. I'll post pics when this mod is done.Originally Posted by CTScott ↑Attachment 31196
Thanks again.
~Mike~
done.
funny thing is i went to have it inspected... and the guy tells me...
"i hate to tell ya this ,... but the horn doesnt work....". Then it hit me... THATS what the black wire that i assumed did nothing was ! :p
Doesnt look pretty inside since i had to bootleggedly crimp alot of stuff but it works!
Picture lost · g.imagehost.org Picture lost · g.imagehost.org
~mike~
funny thing is i went to have it inspected... and the guy tells me...
"i hate to tell ya this ,... but the horn doesnt work....". Then it hit me... THATS what the black wire that i assumed did nothing was ! :p
Doesnt look pretty inside since i had to bootleggedly crimp alot of stuff but it works!
Picture lost · g.imagehost.org Picture lost · g.imagehost.org
~mike~
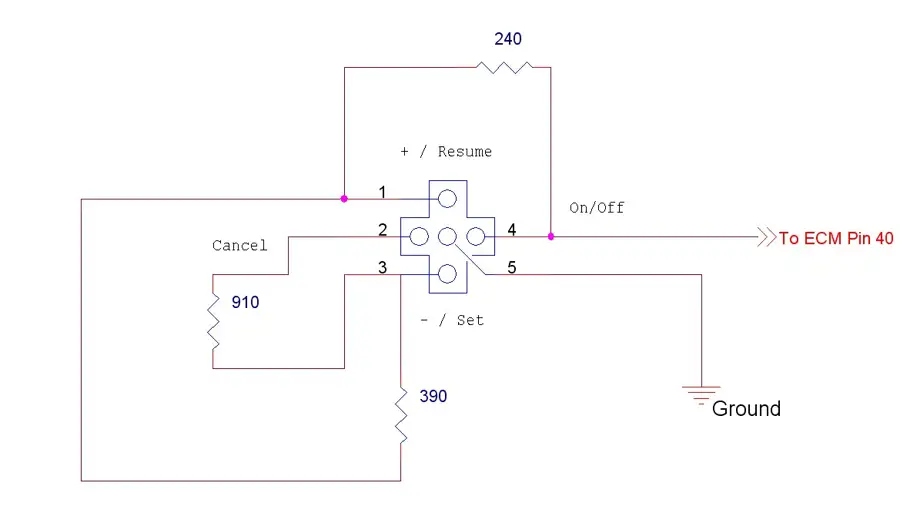
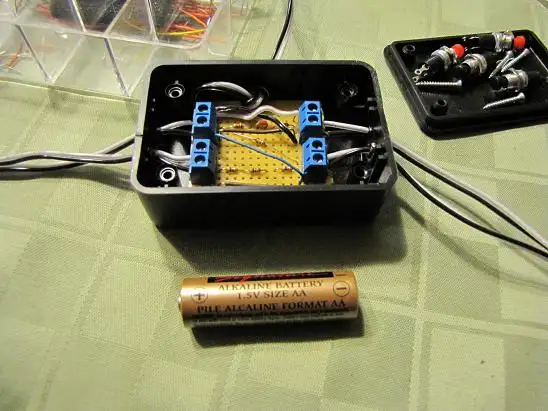
I'm going to try the 4 button set up and plan on getting it installed this weekend. I decided to put all the resistors in their own enclosure and attach the buttons with butt connectors. I can tuck the module up under the dash and if a button ever goes bad (read as: When I spill my drink into one), I can simply unplug the switch and replace it without any soldering. I have some buttons but I'm going to see if I can find something better.
I'll take more pics as I progress.
I couldn't find the right resistors so I had to stack them to get the right Ohm requirements.
I've got about $24 dollars into it so far.
Added more pics. I haven't settled on where I want the buttons or what type I want so I installed the cheap ones I had next to the Aux Port for now
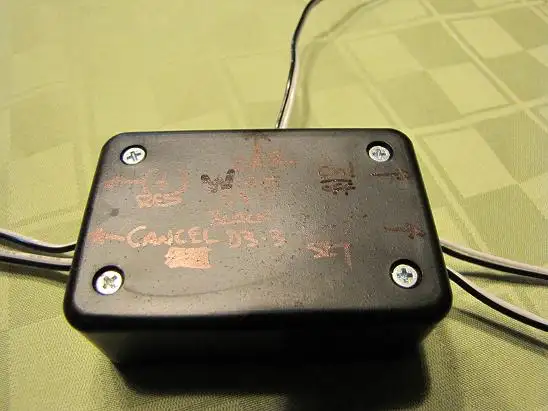
I mounted the CC module on the cross bar under the steering wheel. The box has to lay on its bottom, not on its side as shown in the first picture of it. The steering column cover wont fit if it mounted on its side.
It works! CTScott, and everyone else that contributed, thank you for all the great info.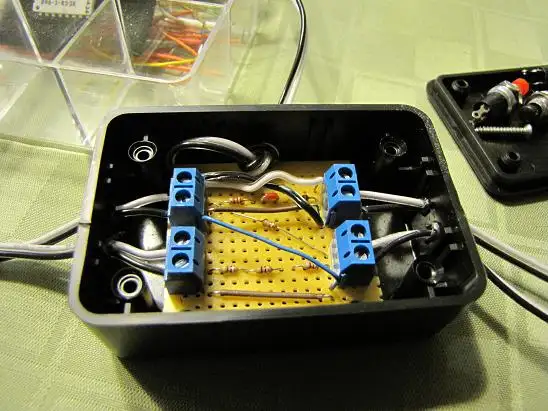
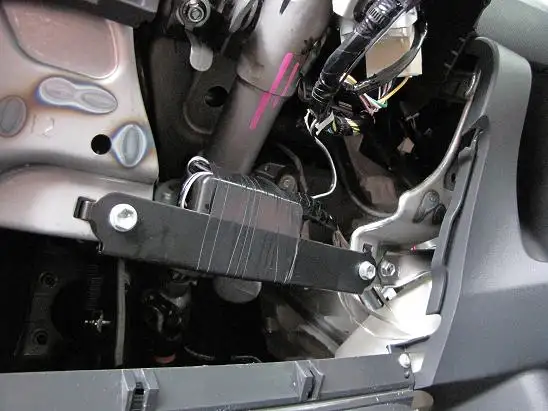
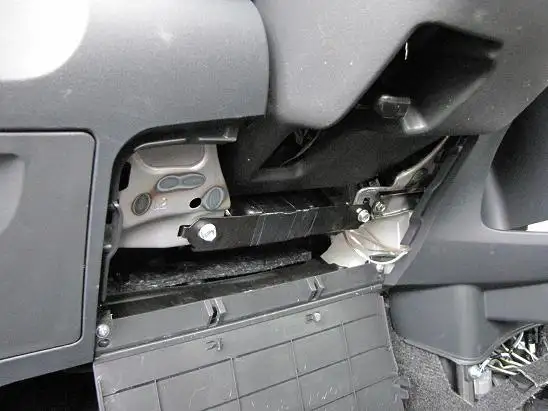
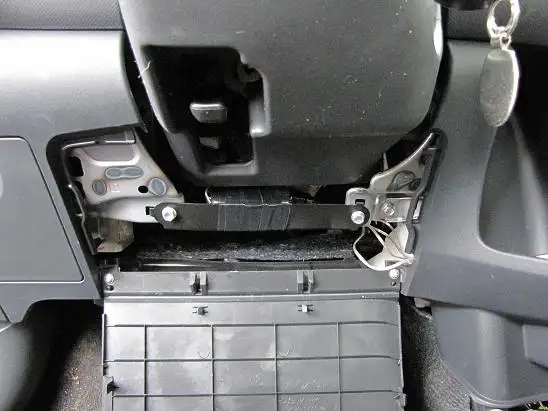
I'll take more pics as I progress.
I couldn't find the right resistors so I had to stack them to get the right Ohm requirements.
I've got about $24 dollars into it so far.
Added more pics. I haven't settled on where I want the buttons or what type I want so I installed the cheap ones I had next to the Aux Port for now
I mounted the CC module on the cross bar under the steering wheel. The box has to lay on its bottom, not on its side as shown in the first picture of it. The steering column cover wont fit if it mounted on its side.
It works! CTScott, and everyone else that contributed, thank you for all the great info.
How does that little panel pull out? (The "push button start cover".) Is there a trick to it? Thanks. I pulled it part way out and it seems to not want to part company with the panel on the right side.
Ingenious!
You have to remove the vertical trim to the right of it first (which you can just pull off with your fingers as well).Originally Posted by drunix ↑How does that little panel pull out? (The "push button start cover".) Is there a trick to it? Thanks. I pulled it part way out and it seems to not want to part company with the panel on the right side.
So in a sedan yaris 2009 you just have to do the switch mount and connect the red wire to the blue one and the black wire(ground) to the brown one of the d3 connector ? Am I right ?😕
It depends on when in 09 the sedan was built. Some people with 09 sedans have found that the blue wire from the ECM to the steering column is not present. If it is, then the answer to your question is "Yes".Originally Posted by packetrace ↑So in a sedan yaris 2009 you just have to do the switch mount and connect the red wire to the blue one and the black wire(ground) to the brown one of the d3 connector ? Am I right ?😕
thank you Scott it worked perfectly :D It'S amazingg !!Originally Posted by CTScott ↑It depends on when in 09 the sedan was built. Some people with 09 sedans have found that the blue wire from the ECM to the steering column is not present. If it is, then the answer to your question is "Yes".
Thanks for the great DIY...Im going to try it this week.... 2010 Yaris...Found the Icons for the Set & Cruise on the top left section of the Cluster panel.Originally Posted by CTScott ↑Correct. That's what I did with mine. In any vehicle that I've had with cruise, I never find myself using the tap up/down or coast/resume, so I just went with two switches.
This worked out great! Had the job done in a hour...cost was under ten dollars..radio shack came threw with the buttons and resistors.Originally Posted by saltwt ↑Thanks for the great DIY...Im going to try it this week.... 2010 Yaris...Found the Icons for the Set & Cruise on the top left section of the Cluster panel.
Thanks...
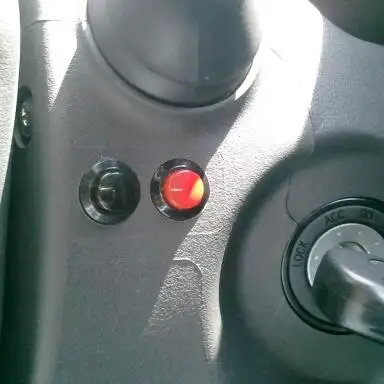
Awesome! Just got mine done. $25.48 total. All parts from Radio Shack except for the splice/tap connectors. I forgot to get them while I was there, but grabbed them at advance auto parts for a little over a dollar. They are included in the price though. I got the red and black buttons (which came in one package), three pack of wiring: red, green, and black 20ga, 470ohm and 100ohm 1/4w resistors, 2 18-22ga splice/tap connectors (red), and the soldering iron kit. Thank you so much to those that put in the time to figure this out for the rest of us! :)
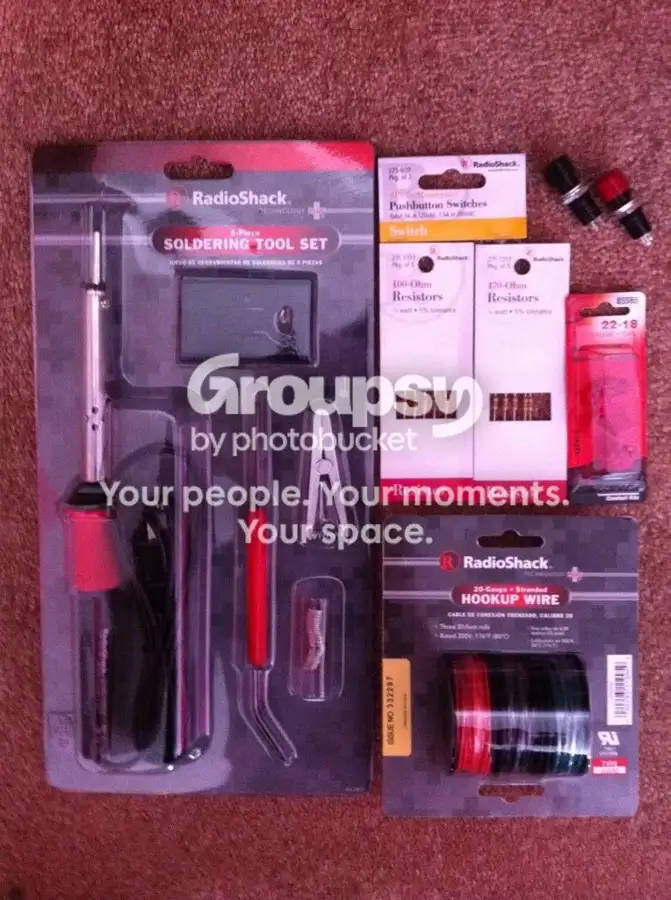

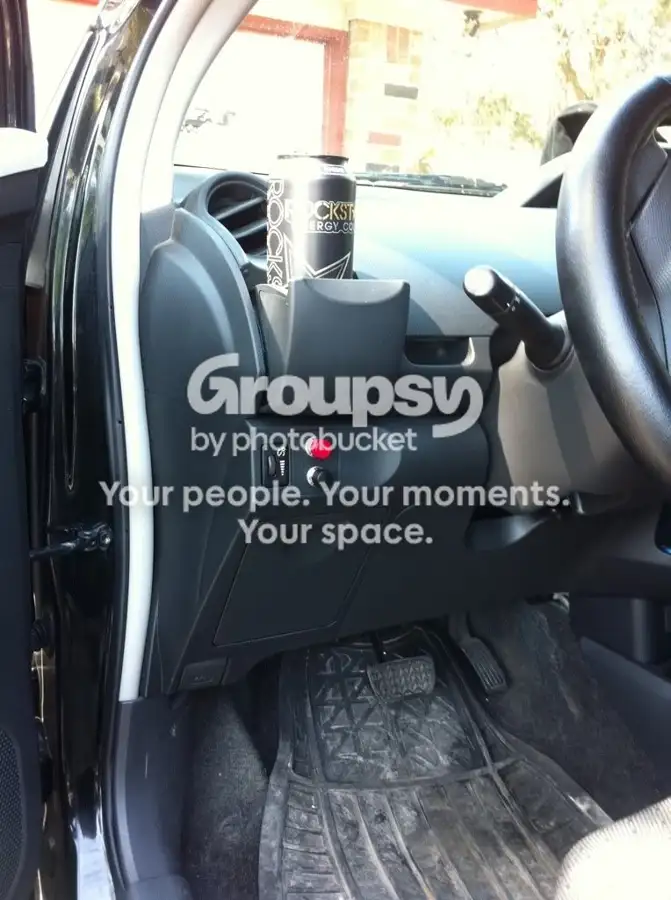
I followed the instructions with the 4 switch method (minus installing the clutch switch) and even got a connector for the ecm to make sure it connects. I am still not getting this to work. I connected the ground to the metal bar underneath the steering wheel. I believe I made a good jump on the clutch connecter.
What problems have people had with this and the solutions? Maybe I'm just missing something silly. I'm trying to drive from KC to Chicago in a week and would really prefer this to work.
What problems have people had with this and the solutions? Maybe I'm just missing something silly. I'm trying to drive from KC to Chicago in a week and would really prefer this to work.
The biggest problems are typically bad connections or the ECM pin not being fully inserted. If you have a multimeter, with the ignition in the on position, measure the voltage at your switches where the ECM wire connects. It should read 12 V and then if you press and hold the on/off switch it should drop to 0 V.Originally Posted by mjmuck ↑I followed the instructions with the 4 switch method (minus installing the clutch switch) and even got a connector for the ecm to make sure it connects. I am still not getting this to work. I connected the ground to the metal bar underneath the steering wheel. I believe I made a good jump on the clutch connecter.
What problems have people had with this and the solutions? Maybe I'm just missing something silly. I'm trying to drive from KC to Chicago in a week and would really prefer this to work.
hey was just curious i looked for the cc connector under the dash on my 07 yaris, cant seem to find.. Do not all of these cars have this connector? I dont see the yellow connector nor the one i need.. I pulled the drop down cover down, every side panel around steering wheel. Am i missing something or did they not all come with this?
All have it. You have to remove the lower steering wheel cover (the one that the tilt lever pokes through) to see it.Originally Posted by rob1987 ↑hey was just curious i looked for the cc connector under the dash on my 07 yaris, cant seem to find.. Do not all of these cars have this connector? I dont see the yellow connector nor the one i need.. I pulled the drop down cover down, every side panel around steering wheel. Am i missing something or did they not all come with this?
This is my favorite thread of all time! 🤘
So I did this, however using the two switch method I got the on button to work but the set button wouldn't. I drove to 25+ mph and it wouldn't work. What could be the issue?
Edit: It's a 5 SPD, used the jumper cable and no cigar. Any ideas?
Edit: It's a 5 SPD, used the jumper cable and no cigar. Any ideas?
You must have wired it up wrong. You must have the up or down wired in there instead.Originally Posted by andru47 ↑So I did this, however using the two switch method I got the on button to work but the set button wouldn't. I drove to 25+ mph and it wouldn't work. What could be the issue?
Edit: It's a 5 SPD, used the jumper cable and no cigar. Any ideas?
BTW I thought of the two button but went with the four button and Im glad I did. You can drive the car in heavy traffic by pushing buttons instead of turning it off.
Check the resistor for set. Someone else recently had an issue where the resistors they purchased were incorrectly labeled. If you have a multimeter, you can check the resistance.Originally Posted by andru47 ↑So I did this, however using the two switch method I got the on button to work but the set button wouldn't. I drove to 25+ mph and it wouldn't work. What could be the issue?
Edit: It's a 5 SPD, used the jumper cable and no cigar. Any ideas?
This was the perfect DIY for me; I recently picked up a Used '09 3-Dr base Yaris.(Auto-transmission; manual windows and door-locks; no power option)
Because of this blog, I come to find that my basic Yaris has Cruise Control all pre-wired for me to tap into.
So, I followed your directions; and now I have a 2-switch setup that is the envy of the family. (yes, we're easily amused.)
Many thanks to everyone who added their comments. I, too, purchased the wrong type of switches at first - (N.C. instead of N.O.) - the On/Off would work, but the SET would not. But, after I got the right switches, both worked like a charm.
Also, another deviation that worked for me is:> Radio Shack didn't have the exact Ohm rated Resisters. So, I went with 2 (330 Ohms) since it still fell into the correct range.
I'm not a mechanic, and i'm the last person to ask about Ohms and Resisters... I learned how to Solder basic connectors through this process; and i didn't even burn myself...
Special Thanks to CTScott for the pictures and quick answers to everyone's questions..!!
Oh, by the way, i placed my 2 switches over to the left of the steering wheel, next to the Dimmer wheel. I found it easier to pop out the empty slot next to the Dimmer wheel.
Because of this blog, I come to find that my basic Yaris has Cruise Control all pre-wired for me to tap into.
So, I followed your directions; and now I have a 2-switch setup that is the envy of the family. (yes, we're easily amused.)
Many thanks to everyone who added their comments. I, too, purchased the wrong type of switches at first - (N.C. instead of N.O.) - the On/Off would work, but the SET would not. But, after I got the right switches, both worked like a charm.
Also, another deviation that worked for me is:> Radio Shack didn't have the exact Ohm rated Resisters. So, I went with 2 (330 Ohms) since it still fell into the correct range.
I'm not a mechanic, and i'm the last person to ask about Ohms and Resisters... I learned how to Solder basic connectors through this process; and i didn't even burn myself...
Special Thanks to CTScott for the pictures and quick answers to everyone's questions..!!
Oh, by the way, i placed my 2 switches over to the left of the steering wheel, next to the Dimmer wheel. I found it easier to pop out the empty slot next to the Dimmer wheel.
When I told my boss (we build very sophisticated military and space electronic devices) I added cruise control to my then new 2009 Toyota for $10 from a source on the internet he was agast. "But what if you ruin your new car?"
I told him I was pretty sure they know what they are talking about.
I have the four switch and its handier to use that the factory setup on my wifes Camry.
I told him I was pretty sure they know what they are talking about.
I have the four switch and its handier to use that the factory setup on my wifes Camry.
I added a three button version (no cancel) of this to my 09 sedan. Works great. I was wondering if it would be a similar procedure to add cruise to an 09 camry? My sister recently purchased one and is going to be driving cross country in the next few months in it. I've looked at some other forums and have found a few instances of people adding the stalk type without having to run wires, but if anyone (CTScott) knows offhand if the button method would work, that would be awesome. I think I might just go ahead and attempt it, though.
Sadly, I do know that it is identical for the Camry. It is still pins 1 and 2 of the steering column side of the spiral cable connector. Pin 1 (CCS) is grey instead of blue on the Camry, and pin 2 (ground) is brown like the Yaris.Originally Posted by Kaykogi ↑I added a three button version (no cancel) of this to my 09 sedan. Works great. I was wondering if it would be a similar procedure to add cruise to an 09 camry? My sister recently purchased one and is going to be driving cross country in the next few months in it. I've looked at some other forums and have found a few instances of people adding the stalk type without having to run wires, but if anyone (CTScott) knows offhand if the button method would work, that would be awesome. I think I might just go ahead and attempt it, though.
Good to know. Thanks, Scott. I think I'll give it a go.Originally Posted by CTScott ↑Sadly, I do know that it is identical for the Camry. It is still pins 1 and 2 of the steering column side of the spiral cable connector. Pin 1 (CCS) is grey instead of blue on the Camry, and pin 2 (ground) is brown like the Yaris.
CTScott, you're awesome for posting this! I just did it on my 2011. At first, only the on/off was working, but after reading the entire thread, I found that I was also a victim of resistors that were incorrectly marked. I bought the correct ones, and I am in business. Thanks again!
Yay! I've been waiting almost 2 years for this day. Ever since I spotted the thread, I have been itching to put cruise in my Yaris - only waiting for the warranty to run out. My only tweak from the parent post instructions was to use a dual throw momentary toggle switch instead of 2 push button switches.
http://www.flyinglow.ca/flyinglow/20...rol-on-my.html
Thanks a bunch guys!
http://www.flyinglow.ca/flyinglow/20...rol-on-my.html
Thanks a bunch guys!
I am using Illuminated Pushbutton Switches E-Switch model LP1OA1AB (Digikey EG4641-ND).
Everything works great (thanks guys), but the blue LEDs are too bright.
Each switch has a blue LED with a forward voltage drop of 3.4 to 4.0 VDC at 20 mA.
I used a 2.2 k resistor to limit the LED current to less than 5 mA.
I stole +12 volts and ground from D29 (Instrument Panel Dimmer Control Connector) thusly:
************************************************** **********
+12 VDC from D29 Pin 5 - Brown: Power in from PANEL1 fuse
|
2.2 k Resistor (times four – one per LED)
|
LED (four LED's total)
|
Ground from D29 Pin 3 - White/Black: Ground
************************************************** **********
I would like the brightness of the LEDs to be controlled by the dimmer pot. Instead of connecting the resistors to Pin 5 (+12 VDC) like I have now, it seems to me I can connect the resistors to either,
1. Pin 2 - Light Green: Output to radio, AC lights, etc
2. Pin 8 - Yellow: Output to Cluster
3. Pin 9 - Orange: Output to Hazard warning signal switch and Door lock switch
Which, of any, of these do you think would work best?
BTW if anyone expresses an interest, I will gladly post the exact circuit I used, plus a photo of the LP1 illuminated switches in all their blueness.
Thanks,
Scott
Everything works great (thanks guys), but the blue LEDs are too bright.
Each switch has a blue LED with a forward voltage drop of 3.4 to 4.0 VDC at 20 mA.
I used a 2.2 k resistor to limit the LED current to less than 5 mA.
I stole +12 volts and ground from D29 (Instrument Panel Dimmer Control Connector) thusly:
************************************************** **********
+12 VDC from D29 Pin 5 - Brown: Power in from PANEL1 fuse
|
2.2 k Resistor (times four – one per LED)
|
LED (four LED's total)
|
Ground from D29 Pin 3 - White/Black: Ground
************************************************** **********
I would like the brightness of the LEDs to be controlled by the dimmer pot. Instead of connecting the resistors to Pin 5 (+12 VDC) like I have now, it seems to me I can connect the resistors to either,
1. Pin 2 - Light Green: Output to radio, AC lights, etc
2. Pin 8 - Yellow: Output to Cluster
3. Pin 9 - Orange: Output to Hazard warning signal switch and Door lock switch
Which, of any, of these do you think would work best?
BTW if anyone expresses an interest, I will gladly post the exact circuit I used, plus a photo of the LP1 illuminated switches in all their blueness.
Thanks,
Scott
Nice switch choice!
On the dimmer rheostat connector, the brown wire is +12 and the light green wire is headlight switched rheostat output (which goes from 0V for full illumination to +12 for completely off). You will probably still need to add a larger resistor value to make the switch LEDs be less annoying. With the blue LEDs you often have to go as high as 10K to keep them from being blinding.
On the dimmer rheostat connector, the brown wire is +12 and the light green wire is headlight switched rheostat output (which goes from 0V for full illumination to +12 for completely off). You will probably still need to add a larger resistor value to make the switch LEDs be less annoying. With the blue LEDs you often have to go as high as 10K to keep them from being blinding.
Thank you, Scott, for you quick reply.
I will use the light green wire and put a 10 k trim pot upstream of the 2.2 k resistors.
It occurs to me that it might be a good idea for ANYone using illuminated switches to have a trim pot upstream of the 2.2 k resistors so they can adjust the LED maxumum brightness as seems best to them.
Thanks, again,
Scott
I will use the light green wire and put a 10 k trim pot upstream of the 2.2 k resistors.
It occurs to me that it might be a good idea for ANYone using illuminated switches to have a trim pot upstream of the 2.2 k resistors so they can adjust the LED maxumum brightness as seems best to them.
Thanks, again,
Scott
hi guys i got a t3 zen 2010
plug d3
pins 123 empty
but 4 has light green
5 has brown
and 6 has pink
how do i do it on my car
thanx
plug d3
pins 123 empty
but 4 has light green
5 has brown
and 6 has pink
how do i do it on my car
thanx
Unfortunately, the ECM on your car does not have the cruise control function built in. Prior to 2012, only US and Canada Yaris had it.Originally Posted by mbera ↑hi guys i got a t3 zen 2010
plug d3
pins 123 empty
but 4 has light green
5 has brown
and 6 has pink
how do i do it on my car
thanx
have 2 questions for CtScott the almighty yaris guru:
i have a november 2008 built 2009 yaris sedan (Canadian market)
1. if i use the 2 switch setup, and i turn it on and have to brake will the CC automatically deactivate?
2. how do you tap into the cables on the connector from the on/off switch?
3. is the D3 connector the white connector on the LEFT side of the yellow connector?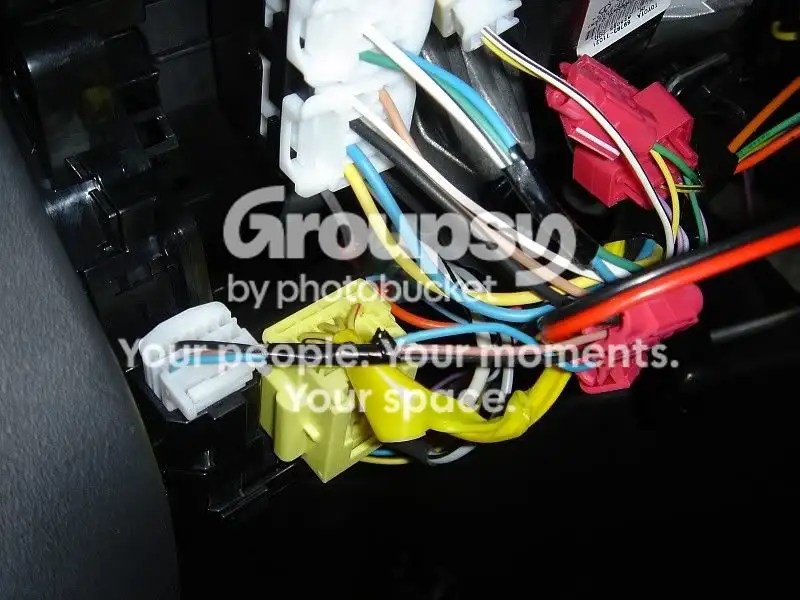
i have a november 2008 built 2009 yaris sedan (Canadian market)
1. if i use the 2 switch setup, and i turn it on and have to brake will the CC automatically deactivate?
2. how do you tap into the cables on the connector from the on/off switch?
3. is the D3 connector the white connector on the LEFT side of the yellow connector?
Originally Posted by 09sedan ↑have 2 questions for CtScott the almighty yaris guru:
i have a november 2008 built 2009 yaris sedan (Canadian market)
1. if i use the 2 switch setup, and i turn it on and have to brake will the CC automatically deactivate?
2. how do you tap into the cables on the connector from the on/off switch?
Yes the brake overrides CC.
If yours has the wiring from the ECM to the steering column, then you can use splice tap connectors (available from most auto parts stores) to connect to the existing wires. Your Canadian sedan may not have the wiring from the ECM to the steering column, and if that is the case you would need to add the ECM pin.
This thread has a DIY with more details:
DIY: 2006-2011 Yaris OEM Cruise Control Complete Installation
ok cool thanks for the info!, so D3 connector is left side of the yellow connector ? and if there is a blue wire there, then i can just tap into it, if not i have to run a wire through the firewall to the ecm?Originally Posted by CTScott ↑Yes the brake overrides CC.
If yours has the wiring from the ECM to the steering column, then you can use splice tap connectors (available from most auto parts stores) to connect to the existing wires. Your Canadian sedan may not have the wiring from the ECM to the steering column, and if that is the case you would need to add the ECM pin.
This thread has a DIY with more details:
DIY: 2006-2011 Yaris OEM Cruise Control Complete Installation