 Yarisworld
If you put the key in, but don't turn it, what happens?Originally Posted by hatch2008 ↑from what google has told me i need to have ign 1 and 2 connected to a relay which as far as i can tell my prostart instructions say is optinal, also when the car is cranking if i put the key in and to the on pos. it starts. anyone noe what i should do hear , or how the2 ign wires are suppose to be connected. starting to really hate prostart lol.
Remote Start DIY Wiring Guide 2006-2010 Yaris
252 posts · 402,288 views · page 3 of 6
Replies continued
The IG2 should be connected to the "5th relay output" and the jumper needs to be in the 2nd ignition output position.
ok so i did have everything connected correctly as i check it over 100 times lol , and i have found and fixed my problem, after finding all my wires connected properly and speaking to scott too assure i had them connected propery, thanks a milllion scott really appricate it, i decided to open up the prostart control unit and make sure nothing seemed out of place , what i found was that two of my pins for my bypass in the prostart unit where not even soldered to the circuit board. i exchanged the unit at my local store, plugged in the new one, programmed it and the remote start worked like a charm. jus thought i would post this incase some else has a similar problem, sometimes you may be doing it right but the brand new part is faulty. thanks again scott
Wow! That was a good (bad) find. It is amazing how poor quality control is on so many products these days.Originally Posted by hatch2008 ↑ok so i did have everything connected correctly as i check it over 100 times lol , and i have found and fixed my problem, after finding all my wires connected properly and speaking to scott too assure i had them connected propery, thanks a milllion scott really appricate it, i decided to open up the prostart control unit and make sure nothing seemed out of place , what i found was that two of my pins for my bypass in the prostart unit where not even soldered to the circuit board. i exchanged the unit at my local store, plugged in the new one, programmed it and the remote start worked like a charm. jus thought i would post this incase some else has a similar problem, sometimes you may be doing it right but the brand new part is faulty. thanks again scott
Wow, was this thing made in the USA or something? :DOriginally Posted by CTScott ↑Wow! That was a good (bad) find. It is amazing how poor quality control is on so many products these days.
(I keeeed)
Hi,
I'm trying to install an Avital 4003 remote starter add-on module with a Fortin Key Override All transponder key bypass.
I need help to figure out how to connect the remote starter/transponder bypass to the wires shown by CTScott in his manual.
So far I identified Avital and Fortin Installation instructions to match CTScott's manual
Avital 4003
Primary harness (H1), 9-pin connector
H1/1 LIGHT GREEN/BLACK (-) FACTORY ALARM DISARM -
H1/2 GREEN/WHITE (-) FACTORY ALARM REARM -
H1/3 YELLOW (+) IGNITION OUT (TO ALARM) -
H1/4 WHITE/BLUE (+/-) ACTIVATION INPUT -
H1/5 ORANGE (-) GROUND WHEN LOCKED - Available only when adding a receiver (P/N 543H) and remote (P/N 474L)
H1/6 BROWN (-) HORN OUTPUT - Available only when adding a receiver (P/N 543H) and remote (P/N 474L) - Horn in DIY manual
H1/7 RED/WHITE (-) TRUNK RELEASE OUTPUT - Available only when adding a receiver (P/N 543H) and remote (P/N 474L)
H1/8 Black (-) CHASSIS GROUND CONNECTION - Ground in DIY manual
H1/9 White (+/-) LIGHT FLASH OUTPUT - (+) Factory configured - (+) Parking lights wire in DIY manual
4-pin satellite harness diagram
1 BLUE (-) STATUS OUTPUT - ?
2 ORANGE (-) ACCESSORY OUTPUT - ?
3 PURPLE (-) STARTER OUTPUT - ?
4 PINK (-) IGNITION OUTPUT - ?
Heavy gauge
1 PINK (+) OUTPUT TO IGNITION CIRCUIT - Ignition #1 GREEN in DIY manual or #1 PINK as per post #35 Skylinecar1982
2 PURPLE (+) OUTPUT TO STARTER CIRCUIT - Starter in DIY manual
3 ORANGE (+) OUTPUT TO ACCESSORY CIRCUIT - Accessory in DIY manual
4 & 6 RED (+) (30A) HIGH CURRENT 12V INPUT - They must be connected to a high current source. Since the factory supplies (+) 12V to the key switch that is used to operate the motor, it is recommended that these wires be connected there - (+) Battery Voltage in DIY manual ?
5 PINK/WHITE (+) PROGRAMMABLE OUTPUT FOR ACCESSORY OR IGNITION - Ignition #2 PINK in DIY manual or #2 GREEN as per post #35
Remote start harness (H2), 5-pin connector
H2/1 BLACK/WHITE (-) NEUTRAL SAFETY SWITCH INPUT - ?
H2/2 VIOLET/WHITE TACHOMETER INPUT WIRE - Tach signal in DIY manual
H2/3 BROWN (+) BRAKE SWITCH SHUTDOWN WIRE - Brake switch in DIY manual
H2/4 GRAY (-) HOOD PINSWITCH SHUTDOWN WIRE - Hood Safety Switch in DIY manual
H2/5 BLUE/WHITE (-) 200mA 2ND STATUS/REAR DEFOGGER OUTPUT - ?
Fortin Key Override All
Purple/White RX Data In - RX in DIY manual
Yellow/Black RT Data Out - RT in DIY manual
Blue (-) While running - Remote starter in DIY manual ? Where to the remote starter?
Green Key Sense - Key Sense in DIY manual
Red +12V - (+) Battery Voltage
Black Ground - Ground
Thanks
I'm trying to install an Avital 4003 remote starter add-on module with a Fortin Key Override All transponder key bypass.
I need help to figure out how to connect the remote starter/transponder bypass to the wires shown by CTScott in his manual.
So far I identified Avital and Fortin Installation instructions to match CTScott's manual
Avital 4003
Primary harness (H1), 9-pin connector
H1/1 LIGHT GREEN/BLACK (-) FACTORY ALARM DISARM -
H1/2 GREEN/WHITE (-) FACTORY ALARM REARM -
H1/3 YELLOW (+) IGNITION OUT (TO ALARM) -
H1/4 WHITE/BLUE (+/-) ACTIVATION INPUT -
H1/5 ORANGE (-) GROUND WHEN LOCKED - Available only when adding a receiver (P/N 543H) and remote (P/N 474L)
H1/6 BROWN (-) HORN OUTPUT - Available only when adding a receiver (P/N 543H) and remote (P/N 474L) - Horn in DIY manual
H1/7 RED/WHITE (-) TRUNK RELEASE OUTPUT - Available only when adding a receiver (P/N 543H) and remote (P/N 474L)
H1/8 Black (-) CHASSIS GROUND CONNECTION - Ground in DIY manual
H1/9 White (+/-) LIGHT FLASH OUTPUT - (+) Factory configured - (+) Parking lights wire in DIY manual
4-pin satellite harness diagram
1 BLUE (-) STATUS OUTPUT - ?
2 ORANGE (-) ACCESSORY OUTPUT - ?
3 PURPLE (-) STARTER OUTPUT - ?
4 PINK (-) IGNITION OUTPUT - ?
Heavy gauge
1 PINK (+) OUTPUT TO IGNITION CIRCUIT - Ignition #1 GREEN in DIY manual or #1 PINK as per post #35 Skylinecar1982
2 PURPLE (+) OUTPUT TO STARTER CIRCUIT - Starter in DIY manual
3 ORANGE (+) OUTPUT TO ACCESSORY CIRCUIT - Accessory in DIY manual
4 & 6 RED (+) (30A) HIGH CURRENT 12V INPUT - They must be connected to a high current source. Since the factory supplies (+) 12V to the key switch that is used to operate the motor, it is recommended that these wires be connected there - (+) Battery Voltage in DIY manual ?
5 PINK/WHITE (+) PROGRAMMABLE OUTPUT FOR ACCESSORY OR IGNITION - Ignition #2 PINK in DIY manual or #2 GREEN as per post #35
Remote start harness (H2), 5-pin connector
H2/1 BLACK/WHITE (-) NEUTRAL SAFETY SWITCH INPUT - ?
H2/2 VIOLET/WHITE TACHOMETER INPUT WIRE - Tach signal in DIY manual
H2/3 BROWN (+) BRAKE SWITCH SHUTDOWN WIRE - Brake switch in DIY manual
H2/4 GRAY (-) HOOD PINSWITCH SHUTDOWN WIRE - Hood Safety Switch in DIY manual
H2/5 BLUE/WHITE (-) 200mA 2ND STATUS/REAR DEFOGGER OUTPUT - ?
Fortin Key Override All
Purple/White RX Data In - RX in DIY manual
Yellow/Black RT Data Out - RT in DIY manual
Blue (-) While running - Remote starter in DIY manual ? Where to the remote starter?
Green Key Sense - Key Sense in DIY manual
Red +12V - (+) Battery Voltage
Black Ground - Ground
Thanks
H1/6 BROWN (-) HORN OUTPUT - Available only when adding a receiver (P/N 543H) and remote (P/N 474L) - Horn in DIY manual
That seems strange, but it appears that to have the horn honk, you have to purchase the additional module. I would measure continuity between this pin and ground to see if that really is the case (it should jump from an open circuit to 0 ohms when the horn should honk).
1 PINK (+) OUTPUT TO IGNITION CIRCUIT - Ignition #1 GREEN in DIY manual or #1 PINK as per post #35 Skylinecar1982
Green has worked for most, but if for some reason yours is like his, where the IG1 and IG2 seem to be reversed, you can swap it. With most systems, the IG1 and IG2 relays are activated simultaneously.
5 PINK/WHITE (+) PROGRAMMABLE OUTPUT FOR ACCESSORY OR IGNITION - Ignition #2 PINK in DIY manual or #2 GREEN as per post #35
As above.
4 & 6 RED (+) (30A) HIGH CURRENT 12V INPUT - They must be connected to a high current source. Since the factory supplies (+) 12V to the key switch that is used to operate the motor, it is recommended that these wires be connected there - (+) Battery Voltage in DIY manual ?
The battery power location noted in my PDF is correct for these two.
H2/5 BLUE/WHITE (-) 200mA 2ND STATUS/REAR DEFOGGER OUTPUT - ?
An optional output that can be used for various functions such as turning on the defogger.
Blue (-) While running - Remote starter in DIY manual ? Where to the remote starter?
Connect to the second status output (H2/5) and in the configuration mode, configure it for latched, rather than pulsed output.
Red +12V - (+) Battery Voltage
Black Ground - Ground
Connect to same power/ground points as the remote starter.
That seems strange, but it appears that to have the horn honk, you have to purchase the additional module. I would measure continuity between this pin and ground to see if that really is the case (it should jump from an open circuit to 0 ohms when the horn should honk).
1 PINK (+) OUTPUT TO IGNITION CIRCUIT - Ignition #1 GREEN in DIY manual or #1 PINK as per post #35 Skylinecar1982
Green has worked for most, but if for some reason yours is like his, where the IG1 and IG2 seem to be reversed, you can swap it. With most systems, the IG1 and IG2 relays are activated simultaneously.
5 PINK/WHITE (+) PROGRAMMABLE OUTPUT FOR ACCESSORY OR IGNITION - Ignition #2 PINK in DIY manual or #2 GREEN as per post #35
As above.
4 & 6 RED (+) (30A) HIGH CURRENT 12V INPUT - They must be connected to a high current source. Since the factory supplies (+) 12V to the key switch that is used to operate the motor, it is recommended that these wires be connected there - (+) Battery Voltage in DIY manual ?
The battery power location noted in my PDF is correct for these two.
H2/5 BLUE/WHITE (-) 200mA 2ND STATUS/REAR DEFOGGER OUTPUT - ?
An optional output that can be used for various functions such as turning on the defogger.
Blue (-) While running - Remote starter in DIY manual ? Where to the remote starter?
Connect to the second status output (H2/5) and in the configuration mode, configure it for latched, rather than pulsed output.
Red +12V - (+) Battery Voltage
Black Ground - Ground
Connect to same power/ground points as the remote starter.
I see; thanks for making things clear.
It seems that the horn will wait.
Is there a possibility to connect the transponder key bypass to the other STATUS wire (4-pin satellite harness diagram/1 BLUE (-) STATUS OUTPUT)?
Then to program the remote module to start the rear defogger and the engine together? Or to connect the second STATUS wire to the defogger wire?
I would like to have the rear defogger working with the remote, when the heating is on during winter time.
Tx
It seems that the horn will wait.
Is there a possibility to connect the transponder key bypass to the other STATUS wire (4-pin satellite harness diagram/1 BLUE (-) STATUS OUTPUT)?
Then to program the remote module to start the rear defogger and the engine together? Or to connect the second STATUS wire to the defogger wire?
I would like to have the rear defogger working with the remote, when the heating is on during winter time.
Tx
Originally Posted by samltd ↑I see; thanks for making things clear.
It seems that the horn will wait.
Is there a possibility to connect the transponder key bypass to the other STATUS wire (4-pin satellite harness diagram/1 BLUE (-) STATUS OUTPUT)?
Then to program the remote module to start the rear defogger and the engine together? Or to connect the second STATUS wire to the defogger wire?
I would like to have the rear defogger working with the remote, when the heating is on during winter time.
Tx
Either should work. The defogger (-) wire is the black wire on the defogger switch, BTW.
Thanks, I have few more questions.
Running a wire behind the A/C panel to the switch, or better trying to find the wire's other end and to connect over there?
The neutral switch is necessary for an automatic?
Where the hood switch goes actually and where do I pass the wire from the remote start module to it?
Regards.
Running a wire behind the A/C panel to the switch, or better trying to find the wire's other end and to connect over there?
The neutral switch is necessary for an automatic?
Where the hood switch goes actually and where do I pass the wire from the remote start module to it?
Regards.
I would connect at the back of the AC panel, as that is easy to get to. The next to points are connector 1E (which is up high under the dash) and 4Q (which is buried under a cover on the back side of the under-dash fuse panel).Originally Posted by samltd ↑Thanks, I have few more questions.
Running a wire behind the A/C panel to the switch, or better trying to find the wire's other end and to connect over there?
The neutral switch is necessary for an automatic?
Where the hood switch goes actually and where do I pass the wire from the remote start module to it?
Regards.
Autos do not need a neutral wire, since they will only start in neutral.
The hood switch (should you choose to install it) needs to mount where it will be pressed when the hood is closed. And, the base of it needs to be in contact with bare metal (or needs to have a ring terminal connection to a ground point). You can run a wire to it by going through the giant grommet that is up by where the steering column goes through the firewall.
Will do how you say 👍
Thanks a lot.
Thanks a lot.
Hey CTScott,
I just got an Ultrastart 1280 and can't wait to install it this weekend. 🎉
The manual:
http://www.ultrastarters.com/Feature...L-REV-2008.pdf
Did you have to cut any wires in terms of connecting to the starter and ignition wires of the car?
I have a 2010 Liftback with no power or keyless entry.
🙇
Thanks to this forum i was able to complete my cruise control addition which has been amazing seeing that I drive 100 miles roundtrip to work everyday.
So back to the autostart, I got some wiretaps for the rest of the connections that are needed but I am a little unsure about the starter part and the clutch bypass. 🤷
This will be the third alarm I install and the other two were alot easier (no autostart).
Let me know how you got yours hooked up so that when I actually start the job it won't turn into a whole day event. 😎
Thanks 👍
I just got an Ultrastart 1280 and can't wait to install it this weekend. 🎉
The manual:
http://www.ultrastarters.com/Feature...L-REV-2008.pdf
Did you have to cut any wires in terms of connecting to the starter and ignition wires of the car?
I have a 2010 Liftback with no power or keyless entry.
🙇
Thanks to this forum i was able to complete my cruise control addition which has been amazing seeing that I drive 100 miles roundtrip to work everyday.
So back to the autostart, I got some wiretaps for the rest of the connections that are needed but I am a little unsure about the starter part and the clutch bypass. 🤷
This will be the third alarm I install and the other two were alot easier (no autostart).
Let me know how you got yours hooked up so that when I actually start the job it won't turn into a whole day event. 😎
Thanks 👍
Originally Posted by bad_bwoy007 ↑Hey CTScott,
I just got an Ultrastart 1280 and can't wait to install it this weekend. 🎉
The manual:
http://www.ultrastarters.com/Feature...L-REV-2008.pdf
Did you have to cut any wires in terms of connecting to the starter and ignition wires of the car?
I have a 2010 Liftback with no power or keyless entry.
🙇
Thanks to this forum i was able to complete my cruise control addition which has been amazing seeing that I drive 100 miles roundtrip to work everyday.
So back to the autostart, I got some wiretaps for the rest of the connections that are needed but I am a little unsure about the starter part and the clutch bypass. 🤷
This will be the third alarm I install and the other two were alot easier (no autostart).
Let me know how you got yours hooked up so that when I actually start the job it won't turn into a whole day event. 😎
Thanks 👍
I didn't cut any on mine - All connections were just taps. But, if you are going to hook-up the anti-grind, then that is the one place where you have to cut and insert the remote starter connections in between. I typically don't bother hooking up the anti-grind on my own cars.
For the clutch bypass, you will wire it as a "type 3" where the normally open relay contacts will be connected to the yellow and black wires on the clutch switch connector (so those are taps, rather than cuts).
Thanks for the quick response. 🎉
So is this how the relay should be hooked up?
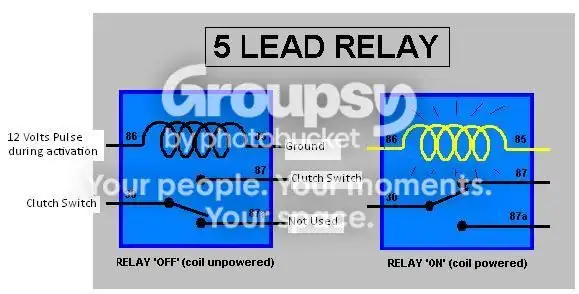
If so, what would you use as you 12 volt pulse to activate the relay?
The Starter output?
PIN-1 YELLOW Starter Output-This wire will test 0V when the key is off, in the Accessory position and when
the Ignition is in the on position. The starter wire is 12volts during the start/ crank position only.
So is this how the relay should be hooked up?
If so, what would you use as you 12 volt pulse to activate the relay?
The Starter output?
PIN-1 YELLOW Starter Output-This wire will test 0V when the key is off, in the Accessory position and when
the Ignition is in the on position. The starter wire is 12volts during the start/ crank position only.
Correct - The starter output wire should feed the relay coil.Originally Posted by bad_bwoy007 ↑Thanks for the quick response. 🎉
So is this how the relay should be hooked up?
If so, what would you use as you 12 volt pulse to activate the relay?
The Starter output?
PIN-1 YELLOW Starter Output-This wire will test 0V when the key is off, in the Accessory position and when
the Ignition is in the on position. The starter wire is 12volts during the start/ crank position only.
Thanks for all the help. You are the man. 👍
CTScott,
Got so troubles here with the install.
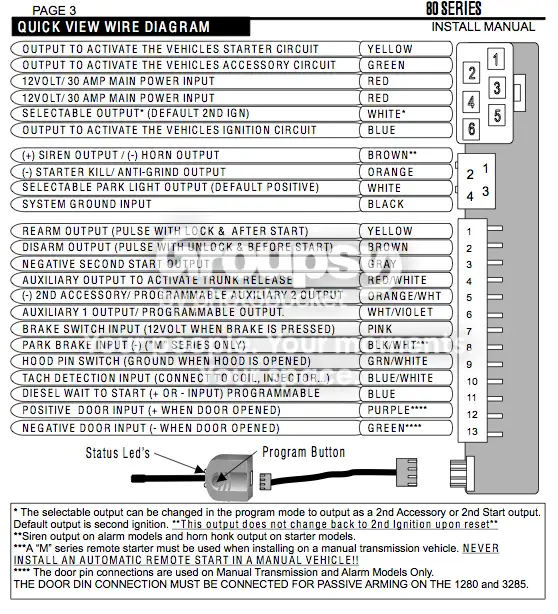
I'm just doing a quick test to see if I could get the system to start.
I have the:
Yellow(Output to starter circuit) to Black(Yaris - Starter)
Green(Output to ACC circuit) to White(Yaris - ACC)
Red
Red
*Both Red wires tapped together then into the 12v fuse location.
White(2nd IGN) to Pink(Yaris - IGN#2)
Blue(IGN circuit) to Green(Yaris - IGN#1)
For now I am just pressing the clutch switch with my hand, will bypass it later.
Only thing I can think of is if my wiretaps didn't make solid connections. I did undo and redo some to verify there where connecting.
Currently I am simulating the system:
I have the system ground connected to ground.
On the 13 wire connection, I only need the Brake switch, park brake, and door input for now.
I also attempted the reservation mode to no avail.
MANUAL TRANSMISSION INSTALL MANUAL SYSTEM PROGRAMMING - Menu 1
RESERVATION MODE
Manual transmission remote starters must be set into Reservation Mode before the remote starter will activate. The activation type of Reservation Mode is determined when the system is installed.
Auto Reservation Mode (Default) 1- While the vehicle is running, place into neutral and apply the park brake.
2*- Press and release the brake pedal twice. The park lights will flash twice, the SIREN or HORN (opt.) will chirp twice and the doors will unlock (opt.). 3-Turn the ignition key off and the vehicle will continue running. 4**- Within 30 seconds, exit the vehicle and close all the doors. The vehicle will then shut off .
Manual Reservation Mode (Optional) 1- While the vehicle is running with the key, place transmission into neutral
and apply the park brake. 2- Press and release the START button. The park lights will flash twice, the SIREN or HORN (opt.) will chirp twice and the doors will unlock (opt.). 3- Turn the ignition key off and the vehicle will continue running. 4- Exit the vehicle and close all the doors. 5**- Press and hold the START button for 3 seconds, the vehicle will then shut off.
* If the park lights do not flash and stay on or the SIREN (HORN optional) chirps a third time, repeat Step 2. ** If the vehicle has dome light delay, the vehicle may stay running until the dome light turns off. This is normally no longer than 30 seconds.
**TEST RESERVATION MODE**
1) Press the start button on the remote without setting the Reservation Mode. The park lights should flash 4 times without starting the vehicle. If the vehicle starts THE WRONG REMOTE STARTER HAS BEEN INSTALLED!!!
2) Set the Reservation Mode then remote start the vehicle. Shut off with the remote wait 10 seconds then open the passenger door. Press Start on the remote and Reservation Mode should be cancelled. (4 flashes) if not, check for proper door pin connections.
*****FOR SAFETY REASONS ALL DOOR PINS INCLUDING THE REAR HATCH MUST BE CONNECTED.******
Any ideas?
Got so troubles here with the install.
I'm just doing a quick test to see if I could get the system to start.
I have the:
Yellow(Output to starter circuit) to Black(Yaris - Starter)
Green(Output to ACC circuit) to White(Yaris - ACC)
Red
Red
*Both Red wires tapped together then into the 12v fuse location.
White(2nd IGN) to Pink(Yaris - IGN#2)
Blue(IGN circuit) to Green(Yaris - IGN#1)
For now I am just pressing the clutch switch with my hand, will bypass it later.
Only thing I can think of is if my wiretaps didn't make solid connections. I did undo and redo some to verify there where connecting.
Currently I am simulating the system:
I have the system ground connected to ground.
On the 13 wire connection, I only need the Brake switch, park brake, and door input for now.
I also attempted the reservation mode to no avail.
MANUAL TRANSMISSION INSTALL MANUAL SYSTEM PROGRAMMING - Menu 1
RESERVATION MODE
Manual transmission remote starters must be set into Reservation Mode before the remote starter will activate. The activation type of Reservation Mode is determined when the system is installed.
Auto Reservation Mode (Default) 1- While the vehicle is running, place into neutral and apply the park brake.
2*- Press and release the brake pedal twice. The park lights will flash twice, the SIREN or HORN (opt.) will chirp twice and the doors will unlock (opt.). 3-Turn the ignition key off and the vehicle will continue running. 4**- Within 30 seconds, exit the vehicle and close all the doors. The vehicle will then shut off .
Manual Reservation Mode (Optional) 1- While the vehicle is running with the key, place transmission into neutral
and apply the park brake. 2- Press and release the START button. The park lights will flash twice, the SIREN or HORN (opt.) will chirp twice and the doors will unlock (opt.). 3- Turn the ignition key off and the vehicle will continue running. 4- Exit the vehicle and close all the doors. 5**- Press and hold the START button for 3 seconds, the vehicle will then shut off.
* If the park lights do not flash and stay on or the SIREN (HORN optional) chirps a third time, repeat Step 2. ** If the vehicle has dome light delay, the vehicle may stay running until the dome light turns off. This is normally no longer than 30 seconds.
**TEST RESERVATION MODE**
1) Press the start button on the remote without setting the Reservation Mode. The park lights should flash 4 times without starting the vehicle. If the vehicle starts THE WRONG REMOTE STARTER HAS BEEN INSTALLED!!!
2) Set the Reservation Mode then remote start the vehicle. Shut off with the remote wait 10 seconds then open the passenger door. Press Start on the remote and Reservation Mode should be cancelled. (4 flashes) if not, check for proper door pin connections.
*****FOR SAFETY REASONS ALL DOOR PINS INCLUDING THE REAR HATCH MUST BE CONNECTED.******
Any ideas?
What does it do or not do?
Well I just spend 2 hours outside verifying some connections.Originally Posted by CTScott ↑What does it do or not do?
I am grounding the park brake connection for now and connecting the negative door input (when opened) to 12 volts to simulate doors closed.
Hood pin switch is not connect to anything and it's reading positive voltage so that is good.
For now i'm just pushing the clutch with my foot.
When i push the start button the park lights just flash 4 times. I tried to enter reservation mode but nothing happened after i pushed the brake pedal twice.
I checked the brake connection and it does read 12 volts into the unit so that connection is good.
All wires are still connected to the starter, acc, & ign as listed above.
🆘
4 flashes means that it is not in reservation mode. Are you doing the procedure on page 29 to arm the starting?
Yes, I tried Auto reservation and when i pressed the brake pedal the lights did not flash.Originally Posted by CTScott ↑4 flashes means that it is not in reservation mode. Are you doing the procedure on page 29 to arm the starting?
I repeated again and got nothing.
Maybe it needs to see the transition from e-brake off to e-brake on before pressing the brake pedal?Originally Posted by bad_bwoy007 ↑Yes, I tried Auto reservation and when i pressed the brake pedal the lights did not flash.
I repeated again and got nothing.
Just tried that too, meaning disconnect from ground then reconnect. Still no luck.Originally Posted by CTScott ↑Maybe it needs to see the transition from e-brake off to e-brake on before pressing the brake pedal?
Since it needs to see it running, have you done the tach learning?Originally Posted by bad_bwoy007 ↑Just tried that too, meaning disconnect from ground then reconnect. Still no luck.
Let me go hook that up now.Originally Posted by CTScott ↑Since it needs to see it running, have you done the tach learning?
Still nothing, not able to enter into reservation mode.Originally Posted by CTScott ↑Since it needs to see it running, have you done the tach learning?
I'm really stumped, I tried both park brake wire grounded and the with the transition to ground.
I don't know what else could be causing the system not to advance into reservation mode.
I would check the voltages on the connectors for the remote starter to make sure your taps are goof for the e-brake, brake, tach (because it is a pulsed signal it will read as a voltage somewhere between 0 and 12 with the engine running {but should not read 0 or 12}). One of those not being good seems to be the most likely reason why it's not going in.Originally Posted by bad_bwoy007 ↑Still nothing, not able to enter into reservation mode.
I'm really stumped, I tried both park brake wire grounded and the with the transition to ground.
I don't know what else could be causing the system not to advance into reservation mode.
OK, I will actually hook up the e-brake connection, it's just hard to reach the the running relay connector to get it in.Originally Posted by CTScott ↑I would check the voltages on the connectors for the remote starter to make sure your taps are goof for the e-brake, brake, tach (because it is a pulsed signal it will read as a voltage somewhere between 0 and 12 with the engine running {but should not read 0 or 12}). One of those not being good seems to be the most likely reason why it's not going in.
I will also test the voltages on the e-brake once connected.
I know the brake connection works and the tach read (+) voltage after start.
😲 After a long day I got it working.
Not sure what the issue was, but I was finally able to enter reservation mode and finally continue on to my power door lock conversion which went pretty smooth.
Thank for the help CTScott.
👍
Not sure what the issue was, but I was finally able to enter reservation mode and finally continue on to my power door lock conversion which went pretty smooth.
Thank for the help CTScott.
👍
Very good.Originally Posted by bad_bwoy007 ↑😲 After a long day I got it working.
Not sure what the issue was, but I was finally able to enter reservation mode and finally continue on to my power door lock conversion which went pretty smooth.
Thank for the help CTScott.
👍
The UltraStart units are definitely a bit more finicky to get going than others. When I installed mine I kept trying to start it before going through the config menus, and an hour later realized that there were certain parameters that had to be set before it would try to start. I would definitely install one again though. Two and a half years later, mine has been flawless.
Yea, the unit functions well and the remote I have is nice and small. Thinking about it now after the install, I could have gotten away with just install a regular automatic starter and not one specific to a manual trans because I don't park in gear.Originally Posted by CTScott ↑Very good.
The UltraStart units are definitely a bit more finicky to get going than others. When I installed mine I kept trying to start it before going through the config menus, and an hour later realized that there were certain parameters that had to be set before it would try to start. I would definitely install one again though. Two and a half years later, mine has been flawless.
But it def. is alot safer to make sure you never have any freak accidents.
😁
Yea, the unit functions well and the remote I have is nice and small. Thinking about it now after the install, I could have gotten away with just install a regular automatic starter and not one specific to a manual trans because I don't park in gear.Originally Posted by CTScott ↑Very good.
The UltraStart units are definitely a bit more finicky to get going than others. When I installed mine I kept trying to start it before going through the config menus, and an hour later realized that there were certain parameters that had to be set before it would try to start. I would definitely install one again though. Two and a half years later, mine has been flawless.
But it def. is alot safer to make sure you never have any freak accidents.
😁
thank u ,ctscot ur d" man! this is my problem where can i find this illustration for my my toyota yaris (push start model) this is a sulution , many technician here in italy do not know how to installed remote starter . thanks a lot😁
I'll have to do a bit of research on that one. The biggest question is if any of the transponder key bypass modules can emulate the smart card used with the PTS system.Originally Posted by macky ↑thank u ,ctscot ur d" man! this is my problem where can i find this illustration for my my toyota yaris (push start model) this is a sulution , many technician here in italy do not know how to installed remote starter . thanks a lot😁
hi scott iwould to online order of bypass( NEW DEI XK05 DATA TRANSPONDER OVERRIDE INTERFACE BYPASS )or (Xpresskit DBALL DATABUS DB-ALL COMBO BYPASS ) WHICH ONE WHO WORK THE BEST FOR MY YARIS MODEL 2006 PUSH START ENGINE . HERE in ITALY MY REMOTE STARTER IS (PROSTART- O34-O743-4 ) , MY YARIS HAVE A FACTORY MOBILIZER , IDONT know THAT THE U.S HAVE SAME MODEL 2006 PUSHSTART , BUT IS THE SAME OF VENZA PUSH START. WHICH ONE YOU RECOMENDED PLS, email irenel_it@yahoo.it
Sorry to resurrect this thread, but what type of wire taps did you use CTScott? Scotchlok? I'm wondering because the heavy gauge starter wires are a lot larger than what I've seen available.
Actually, all of the wires you will connect to on the Yaris are low current, "control" wires, rather than high current ones, which is what the remote starters are setup to handle, hence their giant size.Originally Posted by devinlamothe ↑Sorry to resurrect this thread, but what type of wire taps did you use CTScott? Scotchlok? I'm wondering because the heavy gauge starter wires are a lot larger than what I've seen available.
So, the issue is seriously mismatched wire sizes for the tap splices. Since the car side is the important side, I actually use the tap splices sized for the car's wires (which are the red ones {24-18 AWG}). When you crimp them onto the small gauge car wire and large gauge remote starter wires, some of the strands of the remote starter wire will get cut off, but what remains will be at least the same gauge as the car wire.
I do use the Scotchlok ones and find them to be better quality than many of the other brands.
Thanks for the info Scott.Originally Posted by CTScott ↑Actually, all of the wires you will connect to on the Yaris are low current, "control" wires, rather than high current ones, which is what the remote starters are setup to handle, hence their giant size.
So, the issue is seriously mismatched wire sizes for the tap splices. Since the car side is the important side, I actually use the tap splices sized for the car's wires (which are the red ones {24-18 AWG}). When you crimp them onto the small gauge car wire and large gauge remote starter wires, some of the strands of the remote starter wire will get cut off, but what remains will be at least the same gauge as the car wire.
I do use the Scotchlok ones and find them to be better quality than many of the other brands.
So I finally did get the Scotchlok connectors as well as my remote start but I am having some issues getting it going.
This is a Viper 4203v unit (Responder One):
Starter wires -> car wires
Pink Ignition -> Green ignition
Pink/White Secondary ignition -> Pink ignition
Purple Starter -> Black starter
Orange Accessory -> White accessory
Red 12v - 12v on fuse panel (top)
Red 12v - 12v on fuse panel (top)
Black/White Neutral Switch -> to ground
Violet/White Tach wire -> L.Green on OBD2
Brown brake -> Green brake +12
Grey hoodswitch -> not connected
Everything looks like it is connected properly, but it seems the unit will not turn on. I would think if the unit was powering up I would see the red LED come on for at least a second but it does not.
I have checked my connections with a multi-meter and everything looks good.
Is there something I am missing here? I have never installed a remote start before and reading through this thread made me think it was easy, lol.
Originally Posted by devinlamothe ↑Thanks for the info Scott.
So I finally did get the Scotchlok connectors as well as my remote start but I am having some issues getting it going.
This is a Viper 4203v unit (Responder One):
Starter wires -> car wires
Pink Ignition -> Green ignition
Pink/White Secondary ignition -> Pink ignition
Purple Starter -> Black starter
Orange Accessory -> White accessory
Red 12v - 12v on fuse panel (top)
Red 12v - 12v on fuse panel (top)
Black/White Neutral Switch -> to ground
Violet/White Tach wire -> L.Green on OBD2
Brown brake -> Green brake +12
Grey hoodswitch -> not connected
Everything looks like it is connected properly, but it seems the unit will not turn on. I would think if the unit was powering up I would see the red LED come on for at least a second but it does not.
I have checked my connections with a multi-meter and everything looks good.
Is there something I am missing here? I have never installed a remote start before and reading through this thread made me think it was easy, lol.
I don't have the manual for the 4203v, but what you are connected to looks good. Check the install manual for a start-up or configuration process that may have to be done before it will work.
The only thing I can see that I didn't do is the 'tach learning' ... I'm going to try that and see if it works.Originally Posted by CTScott ↑I don't have the manual for the 4203v, but what you are connected to looks good. Check the install manual for a start-up or configuration process that may have to be done before it will work.
OK tried that still nothing.Originally Posted by devinlamothe ↑The only thing I can see that I didn't do is the 'tach learning' ... I'm going to try that and see if it works.
I am wondering if the hood safety switch needs to be connected to ground for the unit to operate. They don't really explain in the manual except saying it NEEDS to be connected (I've read you don't have to connect it but I guess it's worth a try).
The hood pins ground when the hood is open, so you leave them floating (i.e. not connected) to bypass.Originally Posted by devinlamothe ↑OK tried that still nothing.
I am wondering if the hood safety switch needs to be connected to ground for the unit to operate. They don't really explain in the manual except saying it NEEDS to be connected (I've read you don't have to connect it but I guess it's worth a try).
Hi everyone this is my first post in a long time >:D i'm getting ready to install the ultrastart u4296m next week while i'm on vacation! my only question is about the clutch. will i have to bypass the switch to remote start, if so how do i. thanks yarisworld and Scott for all the great information.
*Update*
Hi everyone well i was a fool. Looks like i missed the clutch relay pic in post #118 first time around lol got a relay and everything works awesome. Thanks again YW!! i love this site
*Update*
Hi everyone well i was a fool. Looks like i missed the clutch relay pic in post #118 first time around lol got a relay and everything works awesome. Thanks again YW!! i love this site
Alright well that eliminates that.Originally Posted by CTScott ↑The hood pins ground when the hood is open, so you leave them floating (i.e. not connected) to bypass.
I'm going to verify my ground point ... that's the only other thing I can think of.
Unplug the power connector from the remote starter and measure the voltage between the ground pin and the constant power pins. That will verify exactly what the unit is getting.Originally Posted by devinlamothe ↑Alright well that eliminates that.
I'm going to verify my ground point ... that's the only other thing I can think of.
OK ground is fine. I was able to get the shutdown code and it says "Transmitter shutdown (or push button)" (the LED on the unit flashes 4 times).Originally Posted by CTScott ↑Unplug the power connector from the remote starter and measure the voltage between the ground pin and the constant power pins. That will verify exactly what the unit is getting.
Car isn't even attempting to crank at all and remote errors out. I really wish these car starters had an LCD display, lol
So that means that it thinks that you are either hitting the button on the remote a second time to kill it, or the valet mode is activated. Go through the procedure to turn valet mode off.Originally Posted by devinlamothe ↑OK ground is fine. I was able to get the shutdown code and it says "Transmitter shutdown (or push button)" (the LED on the unit flashes 4 times).
Car isn't even attempting to crank at all and remote errors out. I really wish these car starters had an LCD display, lol
Is it better to solder or tap into the wires?
Does either void the warranty?
Thanks!
Does either void the warranty?
Thanks!
Nothing voids the warranty unless what you do leads to failure of it or something else.Originally Posted by yarisyeti ↑Is it better to solder or tap into the wires?
Does either void the warranty?
Thanks!
Soldering typically is better, but wire taps work fine and can be a bit safer to work with under the dash. I have used wire taps on the last 4 of my cars that I installed remote starters on and have driven 100K+ without an single issue.