Yarisworld Archive

DIY: Debadge/Black out Emblems

112 posts · 107,602 views · page 1 of 3

TinyGiantOriginal postRochester, NH · Oct 21, 2008#1
There was a Request for this today on the forum so i Figured i would make up a quick diy


Here is what I did..

1. park the car in the hot sun for a couple hours. Or Get a heat gun and heat the emblems up (be careful not to melt paint or something.)

2. Spray the emblems with wd40. let the wd40 saturate the sticky foam tape that holds the emblems on there.

3. Get pulling. For me.. i was able to just pull it off slowly with just my hands, leaving no residue. Some people use finishing line or fishing line and slowly and carfully saw it off the car (slip the line under one side and slowly lift the line up and down while you are separating the emblem from the car.

4. Use some soap and water and clean the back of all the wd40. so that you have a nice clean slate.


Painting:

1. Lightly sand the emblems with some 300 grit sand paper.. Try to get the whole emblem looking sanded.. not just the flat surface.

2. Use 2-3 Coats of Adhesion Promoter (helps the paint stick)

3. use 2-3 coats of Primer (get stuff that specifically states it can be used on metal or plastic)

4. Use 3-4 coats of Base Coat. I used a flat black for mine.

5. let the suckers dry for a couple hours.


Rebadging:

1. Get some 3m body tape (dont use anything but.. other stuff will be too thick and will look really crappy.

2. put the tap on the back of the emblem. I laid the tape horizontally along the back of the emblem so it covered the whole back. then I carefully razored the excess off so it looked like it was supposed to be there. Also make sure when its flipped over you cant see any tape.. if you can razor a little so the excess is gone.

3. Put it back on!


Front Badge Removal:

Reach your fingers in the fron at about 4 O'clock on the emblem and you should feel a little tab.. push it so that it releases.. there are two other tabs too.. if you get two out.. it usually just pops out .. you might have to borrow a girl or a kid if your fingers are husky.


if anyone has pictures of the process post them and i will put them in this post

The End Result
Picture lost · i40.photobucket.com


Husky Fingers Approach: (glad i have skinny fingers :) )

Originally Posted by Darb ↑
Here's the front emblem DIY, for those with "Husky fingers"

The Emblem!
Picture lost · lh5.ggpht.com

My husky fingers won't fit, and my pinkies aren't long enough... 😢
Picture lost · lh6.ggpht.com

First, we want to remove these 5 pins.
Picture lost · lh5.ggpht.com

They will start like this.
Picture lost · lh4.ggpht.com

Just push down the center.
Picture lost · lh6.ggpht.com

Pull them out. Don't lose these.
Picture lost · lh5.ggpht.com

Pull up the bumper cover, and look in front of the radiator, we want to pop these clips, one on each side, at 5 and 7 o'clock.
Picture lost · lh3.ggpht.com

The old emblem will literally pop out and land on the ground after you pop the second clip, you'll have this nice hole for your new emblem.
Picture lost · lh3.ggpht.com

Line up the top.
Picture lost · lh5.ggpht.com

And the bottom, and push in on either side, it will snap in place.
Picture lost · lh4.ggpht.com

Take your pins, and pop the center up through the middle.
Picture lost · lh5.ggpht.com

Realign your cover with the 5 holes again, and insert your pins, remember all 5.
Picture lost · lh4.ggpht.com

Push down the center so it's flush.
Picture lost · lh4.ggpht.com

Tada! Your emblem is installed!
Picture lost · lh5.ggpht.com

Only minor battle wounds were sustained, it's a tight fit under the bumper cover.
Picture lost · lh3.ggpht.com
And yet another method :)

Originally Posted by Chris07LB ↑
I know this is a rather easy "free mod" to do, but I remember a few asking how to do it.

Here is a super simple how-to, to get your rear end looking cleaner.. 😛

First step is to CAREFULLY warm up the emblems.. a few seconds is all it needs! A regular hair dryer works fine, but I had my heat gun close by, just be very careful if using one!
Work one side at a time.
Attached picture not available

Then get out some good 'ol fishing line. Dental floss will also work, but sometimes it's not strong enough, and will break easy.

Just get under an edge, and start "sawing" from top to bottom, all the way until you reach the other side.. simple! 🙂
Attached picture not available

There will be a little adhesive left behind from the emblem.
Attached picture not available

It comes off very easy with your finger nail. 🙂
Attached picture not available

Clean up whatever little bits are left behind, with WD40... Simple. 🙂

Repeat steps for other side.
Attached picture not available

FINISHED LOOK Shine provided by Turtle Wax ICE.
Attached picture not available

Enjoy. 🍻
If you plan on using something like goo gone to remove any left over residue here is some advice on technique
Originally Posted by RedHatch08 ↑
It's quite easy. Here's what I did:

Just get your Goo Gone and a a paper towel (or cloth). Take 1 sheet and fold it up a few times to make a small square.

Apply some Goo Gone to the paper towel. Wipe it generously across the foam/tape that's left on the car. Coat it well and let it sink in for a minute or two.

Pick an edge to start from, and just use your fingers to start peeling the foam off.

Feel free to re-apply the Goo Gone periodically as you go. It does work better if you give it time to sink in and loosen the adhesive.

Also you may want to do this step at a car wash, like I did.

If you're anything like me, your car will end up with WD-40 and Goo Gone all over the place. After I was done I just gave it a car wash, and it was all nice and clean and debadged.

Replies 111

KCALB SIRAYVirginia · Oct 21, 2008#2
Nice and very detailed....sticky for this one
BettyWoohooFort Worth, TX · Oct 22, 2008#3
Thanks for helping me and for the awesome details!
TinyGiantThread starterRochester, NH · Oct 22, 2008#4
any time :)
pixiedixie862G-Hills, So Cal · Oct 22, 2008#5
to take off the emblems you can also use dental floss :)
DFAPanama City, Panama · Oct 22, 2008#6
Originally Posted by TinyGiant ↑
.. you might have to borrow a girl or a kid if your fingers are husky.
😆
Benggolf2Richmond, B.C., Canada · Nov 1, 2008#7
Most helpful post TinyGiant!
Any tip[s on the removal of the rear badge (center one)? TIA.
TinyGiantThread starterRochester, NH · Nov 2, 2008#8
do the same as the yaris and toyota emblems.. same exact process :)
Stargate YARlantISSaint Petersburg, FL · Nov 2, 2008#9
A hair dryer is just as good, not as much heat as a heat gun, so you don't have to worry about the paint bubblin'

B
TinyGiantThread starterRochester, NH · Nov 2, 2008#10
Originally Posted by Stargate YARlantIS ↑
A hair dryer is just as good, not as much heat as a heat gun, so you don't have to worry about the paint bubblin'

B
+1

parking in the sun works just as good too :)
custom LftbackHouston, TX · Nov 2, 2008#11
except now it is getting cold so I choose hair dryer for now. :)
yarisugiハワイ · Nov 5, 2008#12
Is it possible to remove the Toyota LOGO emblem (in center of hatch) or will it leave holes after removal?
LatkaHawaii · Nov 6, 2008#13
From the OP - it sounds like there are some tabs that hold it in. I would imagine that means there are some little holes / slots in the body.
TinyGiantThread starterRochester, NH · Nov 6, 2008#14
there are two tiny holes that allow for proper alignment so there would be two tiny holes
DerKaiZeRsPerth WA · Nov 12, 2008#15
nice information....👍👍
Paul MacLeanRochester, NY · Nov 24, 2008#17
Debadging / black-out emblems doesn't affect the car warranty, does it?
TinyGiantThread starterRochester, NH · Nov 25, 2008#18
I dont think they would cover the finish on the emblems..lol but who cares..

shoudn't affect anything.

for them to void a warranty they have to directly relate the problem to the modification.. i dont forsee any ill affects from debadging
Sodium DuckWestern Mass. · Nov 25, 2008#20
Ahhh, thank you. "Molding tape"
TinyGiantThread starterRochester, NH · Nov 25, 2008#21
:)
kelevraEmpire State · Dec 15, 2008#22
The ones that come off without the remaining holes, I'm just removing, period. I wish I could do a total debadge, but those little holes remain.
CtrlAltDefeatIndianapolis IN · Jan 21, 2009#23
In the process of debadging my yaris, the yaris badge broke in half and dug into the paint, causing a scratch that I assume would not be covered by the rust coverage if they realize the badge used to be there... BTW, anyone know the best way to fix a deep scratch like that? 😳
Danish YarisCopenhagen, Denmark · Feb 7, 2009#24
Hi

Use a paint stick from Toyota, if your car is black it would be PZ448 W2090 09, but first use a little primer so it won´t rust.

Regards Steven.
BLAZINBLUEVITZNEW YORK · Feb 7, 2009#25
Originally Posted by Danish Yaris ↑
Hi

Use a paint stick from Toyota, if your car is black it would be PZ448 W2090 09, but first use a little primer so it won´t rust.

Regards Steven.
NUMBER IS DIFFERENT HERE IN THE STATES. 00258-00___-21
Danish YarisCopenhagen, Denmark · Feb 7, 2009#26
Hi

Ok, thought it was the same. They have just changed for this number in Europe as it now is water based paint and the color match is now very close to the color of the cars.

Regards Steven.
TinyGiantThread starterRochester, NH · Mar 6, 2009#27
posted some pics
CtrlAltDefeatIndianapolis IN · Mar 7, 2009#28
Originally Posted by TinyGiant ↑
posted some pics
where?
TinyGiantThread starterRochester, NH · Mar 7, 2009#29
Originally Posted by CtrlAltDefeat ↑
where?
1st post
CtrlAltDefeatIndianapolis IN · Mar 8, 2009#30
ahhh ok lookin' good!
SaerinRhoeDallas, Texas · Mar 19, 2009#31
Has anyone done the emblem black-out with a black yaris? I'm curious to see what it looks like and if it will look as good as I think it will.

Thanks in advance,

S.R.
tonygtoronto · Mar 19, 2009#32
i did a total debadging today including both Toyota decals front and back. Looks great!

The rear 3 came off easy and the front toyota badge snapped off with the plastic insert. I took the front badge off by prying with a flat head screwdriver, and put the insert back in which is a black toyota outline.

The front 2 little holes dont matter because they dont go through the plastic insert, and the rear holes are very shallow i just put a bit of electrical tape over them temporarily. You could probably even leave them open without any issues.

Also, the front badge just snaps off with a bit of pressure. Just push down and out. You dont need to fish behind the gril for the tabs.
CtrlAltDefeatIndianapolis IN · Mar 20, 2009#33
Originally Posted by tonyg ↑
i did a total debadging today including both Toyota decals front and back. Looks great!

The rear 3 came off easy and the front toyota badge snapped off with the plastic insert. I took the front badge off by prying with a flat head screwdriver, and put the insert back in which is a black toyota outline.

The front 2 little holes dont matter because they dont go through the plastic insert, and the rear holes are very shallow i just put a bit of electrical tape over them temporarily. You could probably even leave them open without any issues.

Also, the front badge just snaps off with a bit of pressure. Just push down and out. You dont need to fish behind the gril for the tabs.
the chrome part on the front is held on with foam tape, right?
tonygtoronto · Mar 20, 2009#34
Originally Posted by CtrlAltDefeat ↑
the chrome part on the front is held on with foam tape, right?
its held on with the same adhesive as the rear badges
KRAZGRLOrange County, CA · Mar 20, 2009#35
I just took some pliers and pulled the badges off. Whatever tape was left I was able to pick off and used goo-gone for the stubborn parts. Really easy.
CtrlAltDefeatIndianapolis IN · Mar 20, 2009#36
I want to paint my badges "black chrome" but I'm not quite sure where to get the paint from...
33OHDover, Ohio · Mar 20, 2009#37
Originally Posted by CtrlAltDefeat ↑
I want to paint my badges "black chrome" but I'm not quite sure where to get the paint from...
I just did a few days ago, paint was from AutoZone. They're already chipping though. 😢
SaerinRhoeDallas, Texas · Mar 20, 2009#38
RyanK,

Did you take the badges off to paint them or leave them on and mask around them?

Thanks,

S.R.
33OHDover, Ohio · Mar 20, 2009#39
Took them off.
CtrlAltDefeatIndianapolis IN · Mar 20, 2009#40
Originally Posted by ryank ↑
I just did a few days ago, paint was from AutoZone. They're already chipping though. 😢
Did you sand and prime them first?
TinyGiantThread starterRochester, NH · Mar 20, 2009#41
i sanded, adhesion promotered, and primed and did 4 coats of the top coat and still no match for highway sand
33OHDover, Ohio · Mar 20, 2009#42
Originally Posted by CtrlAltDefeat ↑
Did you sand and prime them first?
You weren't supposed to have to. It was a 'Chrome effect' spraypaint that said to spray directly to the chrome surface.

I cleaned them really well, but I guess that's no good. 😠
CtrlAltDefeatIndianapolis IN · Mar 21, 2009#43
Originally Posted by TinyGiant ↑
i sanded, adhesion promotered, and primed and did 4 coats of the top coat and still no match for highway sand
Originally Posted by ryank ↑
You weren't supposed to have to. It was a 'Chrome effect' spraypaint that said to spray directly to the chrome surface.

I cleaned them really well, but I guess that's no good. 😠
great... now I'm having second thoughts about painting mine...
TinyGiantThread starterRochester, NH · Mar 21, 2009#44
do it.. its easy to touch up.. i just sprayed on a cue tip now that the winter season is done and dabbed the spots.. looks sweet still.
CtrlAltDefeatIndianapolis IN · Mar 21, 2009#45
Originally Posted by ryank ↑
You weren't supposed to have to. It was a 'Chrome effect' spraypaint that said to spray directly to the chrome surface.

I cleaned them really well, but I guess that's no good. 😠
Wait... chrome effect? Is that paint for metal chrome? Because I think the metal wouldn't work for these since they're plastic (Aren't they? I haven't taken mine off yet)
DarbPittsburgh, PA · Apr 4, 2009#46
Here's the front emblem DIY, for those with "Husky fingers"

http://picasaweb.google.com/lh/photo...eat=directlink
The Emblem!
Picture lost · lh5.ggpht.com

My husky fingers won't fit, and my pinkies aren't long enough... 😢
Picture lost · lh6.ggpht.com

First, we want to remove these 5 pins.
Picture lost · lh5.ggpht.com

They will start like this.
Picture lost · lh4.ggpht.com

Just push down the center.
Picture lost · lh6.ggpht.com

Pull them out. Don't lose these.
Picture lost · lh5.ggpht.com

Pull up the bumper cover, and look in front of the radiator, we want to pop these clips, one on each side, at 5 and 7 o'clock.
Picture lost · lh3.ggpht.com

The old emblem will literally pop out and land on the ground after you pop the second clip, you'll have this nice hole for your new emblem.
Picture lost · lh3.ggpht.com

Line up the top.
Picture lost · lh5.ggpht.com

And the bottom, and push in on either side, it will snap in place.
Picture lost · lh4.ggpht.com

Take your pins, and pop the center up through the middle.
Picture lost · lh5.ggpht.com

Realign your cover with the 5 holes again, and insert your pins, remember all 5.
Picture lost · lh4.ggpht.com

Push down the center so it's flush.
Picture lost · lh4.ggpht.com

Tada! Your emblem is installed!
Picture lost · lh5.ggpht.com

Only minor battle wounds were sustained, it's a tight fit under the bumper cover.
Picture lost · lh3.ggpht.com
DarbPittsburgh, PA · Apr 6, 2009#47
Huh, I can't see the pictures, do they work for anyone else?
33OHDover, Ohio · Apr 6, 2009#48
Originally Posted by CtrlAltDefeat ↑
Wait... chrome effect? Is that paint for metal chrome? Because I think the metal wouldn't work for these since they're plastic (Aren't they? I haven't taken mine off yet)
It said for metals or plastics.

I'm just leaving my next one regular chrome. I drive too much highway to paint them methinks.
33OHDover, Ohio · Apr 6, 2009#49
And yes Darryl, I see the pics.
YarisPRMayaWest, Puerto Rico · Apr 18, 2009#50
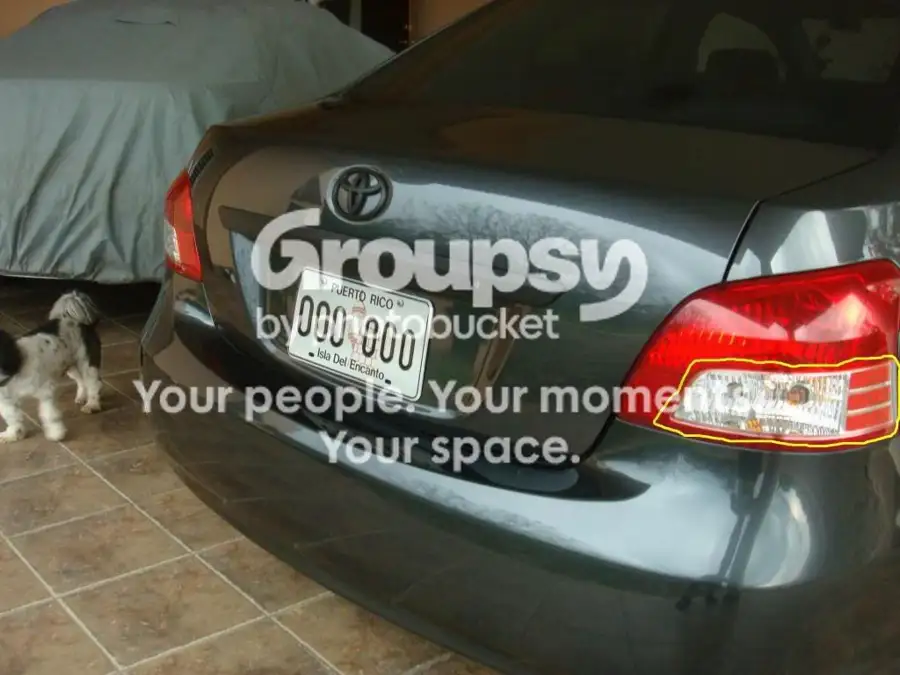
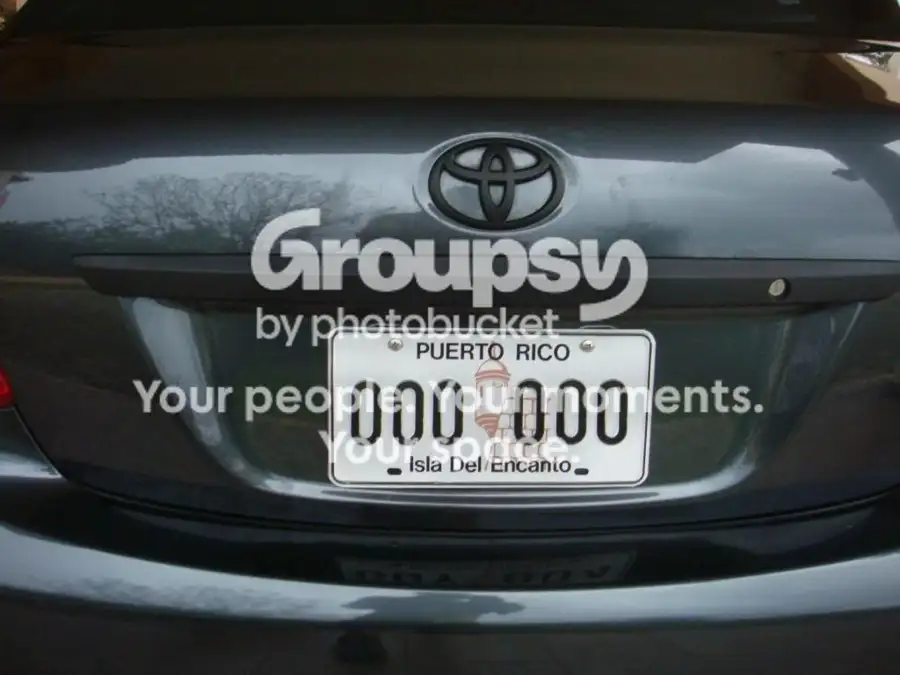
I've always wanted to do this cause I hate the chrome detailing in the car. I did it and it was pretty simple and I like it 👍 I've began Proyect Anti-Chrome 🤣

Front


Back Logo and trunk chrome thingy (don't even know whats called)


I've circle (in yellow) the next thing I'm painting black.


And thaks guys for the DIY🎉