Yarisworld
ORIGINALLY POSTED BY revnull PRE THE GREAT HACK OF '08
Survived through Google cache
This one was a pain in the ass to repost. Soooo mannnyyy picturessss!!! >.<
But at least it was saved so it could be reposted.
-----------------------------------------------------------------
First of all, I’d like to thank PK198105 for pointing me to Clowncar’s original post outlining this method of installation. It is far easier that the former method of running a wire through the firewall. In addition to the aftermarket fog light kit, you will need butt splice connectors, wire tap connectors, and the Toyota Denso fog light relay (Part# 90080-87026). The relay is very pricy from the dealer. I found one on ebay for $13 USD shipped. I have no way of knowing if this method will work on all models/years/geos of yari/vitz. If it doesn’t, see my other DIY.
Disclaimer: I'm not an electrician or an authorized Toyota installer. This is what worked for me. I am in no way responsible for you breaking, burning or otherwise destroying your car. If corrections need to be made to this guide, I will do so in my spare time. Feel free to PM me with suggestions/corrections/questions.
Note: While the stock Toyota instructions or not completely accurate for all generic installations, it was very helpful much of the wiring locations and bumper removal. Please use it as a reference.
The Toyota Guide
This is the box that arrived from an EBay seller in California. It's a respectable Taiwanese brand with a great OEM fit.
Picture lost · img212.imageshack.us
Picture lost · img340.imageshack.us
Picture lost · img260.imageshack.us
Picture lost · img266.imageshack.us
Picture lost · img266.imageshack.us
Remove the front bumper by following the Toyota factory instructions:
Picture lost · img211.imageshack.us
Layout the fog light harness:
Picture lost · img266.imageshack.us
Remove the factory inserts:
Picture lost · img340.imageshack.us
My bumper had some paint over spray that I had to peel off:
Picture lost · img341.imageshack.us
Slide the fog light assembly into the bumper slots:
Picture lost · img266.imageshack.us
Use the included screws to secure the other side of the assembly:
Picture lost · img185.imageshack.us
Plug in the passenger's side fog light:
Picture lost · img442.imageshack.us
Route the harness along the front bumper zip tying it to the factory harness along the way:
Picture lost · img259.imageshack.us
Secure the harness to the factory harness and plug in the driver's side fog light:
Picture lost · img50.imageshack.us
With a 10mm wrench, loosen the grounding bolt on the driver's side near the head light:
Picture lost · img185.imageshack.us
Attach the fog harness ground wire to the frame and retighten:
Picture lost · img259.imageshack.us
Just behind the driver’s side headlight, remove the cover to the fuse box. Route the harness from the bottom up alongside the stock harness:
Picture lost · img180.imageshack.us
Once the harness pokes through, pull all of the slack up. Don’t worry we are going to trim it to size:
Picture lost · img228.imageshack.us
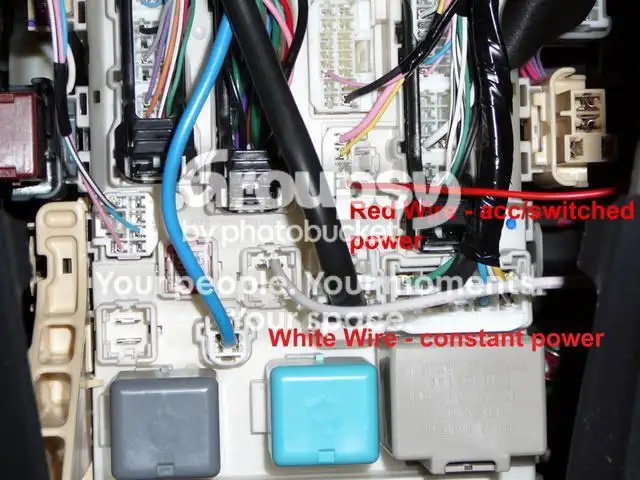
The switch harness needs to be modified to function with the stock wiring. For the next step we have to cut out the red wire from relay connector. Clip the red wire close connector and pull it out:
Picture lost · img260.imageshack.us
Picture lost · img402.imageshack.us
I don’t know the “right” way to remove the white plastic connector. I just use a pair of diagonal cutters to snip off pieces until it fell off. When everything is said and done it should look like this:
Picture lost · img402.imageshack.us
Cut off the slack from the harness and use a butt splice to attach the new connector. Slide the metal end into either pin1 or pin2 of the connector shown below:
Picture lost · img252.imageshack.us
Put the cover back on the fuse box and reattach the front bumper:
Picture lost · img237.imageshack.us
OEM fit, gotta love it:
Picture lost · img182.imageshack.us
Pull down the hinged panel directly below the steering coulomb:
Picture lost · img260.imageshack.us
Remove the 2 screws that hold the panel on:
Picture lost · img260.imageshack.us
Remove the 2 screws that hold the kick plate:
Picture lost · img242.imageshack.us
Remove the screw near the steering wheel tilt lock lever:
[Picture Not Uploaded]
With the car turned on (power steering make this much easier) turn the wheel to the left and remove the screw:
[Picture Not Uploaded]
Now turn the wheel to the right remove the other screw:
[Picture Not Uploaded]
Turn off the car and pull the lower steering coulomb cover off:
[Picture Not Uploaded]
You will find the “D4” connector on the bottom left of the steering coulomb:
Picture lost · img120.imageshack.us
Pull the change cup out by pushing on the side. This will expose the fuse box:
Picture lost · img242.imageshack.us
Pull up the driver's side door rail and kick panel:
Picture lost · img153.imageshack.us
Unscrew the shift knob:
Picture lost · img237.imageshack.us
Pull up the parking brake and lift out the center switch plate. Push out the upper left blank:
Picture lost · img237.imageshack.us
Insert the new fog light switch and set the plate aside for later:
Picture lost · img266.imageshack.us
Use a 10mm socket to remove the bolt in the cup holder in the center console:
Picture lost · img266.imageshack.us
Lifting from the back of the console, remove the center console assembly exposing the factory harnesses underneath:
Picture lost · img402.imageshack.us
Now we must finish modifying the aftermarket harness. Cut the 2 black and 1 solid blue wire as well. The blue/green wire will not be used. Remove the electrical tape holding the end of the harness together. Once everything is pulled apart you should have black, solid blue and solid green wires left in the harness. Use a butt splice to reconnect the 2 black wires. (sorry I forgot to take pictures of the final modified harness):
Picture lost · img260.imageshack.us
On the switch side, pull down the harness cover to expose the internal splice of the 2 green wires. Cut the green wire closest to the black wire. You may need to elongate this wire with some scrap wire so it can reach it’s connecting point:
Picture lost · img260.imageshack.us
It should look something like this (except the black wire should still be in the harness):
Picture lost · img257.imageshack.us
Route the harness alongside the shifter:
Picture lost · img263.imageshack.us
Under the carpet and up the dash on the driver’s side.
Picture lost · img340.imageshack.us
Along the stock steering wheel harness up to the “D4” connector:
Picture lost · img248.imageshack.us
Connect the blue and green wires to pin3 (yellow) and pin4 (white) of the “D4” connector:
Picture lost · img258.imageshack.us
Run the remaining black wire to the left most wall and down to the kick panel. I coiled the slack and strapped it to the ODBII port harness in front of the fuse box.
Picture lost · img208.imageshack.us
Using a 10mm wrench, loosen the grounding bolt and attach the black ground connector:
Picture lost · img340.imageshack.us
Install the relay in the empty socket to the right of the fuse box:
[Picture Not Uploaded]
Disconnect the green/white cable from the automatic shifter assembly:
Picture lost · img263.imageshack.us
Attach the green wire (closest to the black wire) that we cut out earlier from the fog switch harness to the green wire in the factory harness:
Picture lost · img85.imageshack.us
That’s it! Now that our wiring is done we can test your new fog lights for proper operation and reinstall all of the interior panels. After reassembling the center console, plug all of the harnesses back in:
Picture lost · img263.imageshack.us
Push the switch plate back into the center console to complete the job:
Picture lost · img263.imageshack.us
Picture lost · img148.imageshack.us
We now have fully functional OEM fit fog lights:
Picture lost · img242.imageshack.us
Night shots:
Picture lost · img235.imageshack.us
Picture lost · img182.imageshack.us
Fog indicator light in the instrument cluster:
Picture lost · img338.imageshack.us
Green LEDs replaced with white:
Picture lost · img123.imageshack.us
-----------------------------------------------------------------
The following is a shortened converation later in the post regarding a fog light OEM switch LED issue that was discovered.
Survived through Google cache
This one was a pain in the ass to repost. Soooo mannnyyy picturessss!!! >.<
But at least it was saved so it could be reposted.
-----------------------------------------------------------------
First of all, I’d like to thank PK198105 for pointing me to Clowncar’s original post outlining this method of installation. It is far easier that the former method of running a wire through the firewall. In addition to the aftermarket fog light kit, you will need butt splice connectors, wire tap connectors, and the Toyota Denso fog light relay (Part# 90080-87026). The relay is very pricy from the dealer. I found one on ebay for $13 USD shipped. I have no way of knowing if this method will work on all models/years/geos of yari/vitz. If it doesn’t, see my other DIY.
Disclaimer: I'm not an electrician or an authorized Toyota installer. This is what worked for me. I am in no way responsible for you breaking, burning or otherwise destroying your car. If corrections need to be made to this guide, I will do so in my spare time. Feel free to PM me with suggestions/corrections/questions.
Note: While the stock Toyota instructions or not completely accurate for all generic installations, it was very helpful much of the wiring locations and bumper removal. Please use it as a reference.
The Toyota Guide
This is the box that arrived from an EBay seller in California. It's a respectable Taiwanese brand with a great OEM fit.
Picture lost · img212.imageshack.us
Picture lost · img340.imageshack.us
Picture lost · img260.imageshack.us
Picture lost · img266.imageshack.us
Picture lost · img266.imageshack.us
Remove the front bumper by following the Toyota factory instructions:
Picture lost · img211.imageshack.us
Layout the fog light harness:
Picture lost · img266.imageshack.us
Remove the factory inserts:
Picture lost · img340.imageshack.us
My bumper had some paint over spray that I had to peel off:
Picture lost · img341.imageshack.us
Slide the fog light assembly into the bumper slots:
Picture lost · img266.imageshack.us
Use the included screws to secure the other side of the assembly:
Picture lost · img185.imageshack.us
Plug in the passenger's side fog light:
Picture lost · img442.imageshack.us
Route the harness along the front bumper zip tying it to the factory harness along the way:
Picture lost · img259.imageshack.us
Secure the harness to the factory harness and plug in the driver's side fog light:
Picture lost · img50.imageshack.us
With a 10mm wrench, loosen the grounding bolt on the driver's side near the head light:
Picture lost · img185.imageshack.us
Attach the fog harness ground wire to the frame and retighten:
Picture lost · img259.imageshack.us
Just behind the driver’s side headlight, remove the cover to the fuse box. Route the harness from the bottom up alongside the stock harness:
Picture lost · img180.imageshack.us
Once the harness pokes through, pull all of the slack up. Don’t worry we are going to trim it to size:
Picture lost · img228.imageshack.us
The switch harness needs to be modified to function with the stock wiring. For the next step we have to cut out the red wire from relay connector. Clip the red wire close connector and pull it out:
Picture lost · img260.imageshack.us
Picture lost · img402.imageshack.us
I don’t know the “right” way to remove the white plastic connector. I just use a pair of diagonal cutters to snip off pieces until it fell off. When everything is said and done it should look like this:
Picture lost · img402.imageshack.us
Cut off the slack from the harness and use a butt splice to attach the new connector. Slide the metal end into either pin1 or pin2 of the connector shown below:
Picture lost · img252.imageshack.us
Put the cover back on the fuse box and reattach the front bumper:
Picture lost · img237.imageshack.us
OEM fit, gotta love it:
Picture lost · img182.imageshack.us
Pull down the hinged panel directly below the steering coulomb:
Picture lost · img260.imageshack.us
Remove the 2 screws that hold the panel on:
Picture lost · img260.imageshack.us
Remove the 2 screws that hold the kick plate:
Picture lost · img242.imageshack.us
Remove the screw near the steering wheel tilt lock lever:
[Picture Not Uploaded]
With the car turned on (power steering make this much easier) turn the wheel to the left and remove the screw:
[Picture Not Uploaded]
Now turn the wheel to the right remove the other screw:
[Picture Not Uploaded]
Turn off the car and pull the lower steering coulomb cover off:
[Picture Not Uploaded]
You will find the “D4” connector on the bottom left of the steering coulomb:
Picture lost · img120.imageshack.us
Pull the change cup out by pushing on the side. This will expose the fuse box:
Picture lost · img242.imageshack.us
Pull up the driver's side door rail and kick panel:
Picture lost · img153.imageshack.us
Unscrew the shift knob:
Picture lost · img237.imageshack.us
Pull up the parking brake and lift out the center switch plate. Push out the upper left blank:
Picture lost · img237.imageshack.us
Insert the new fog light switch and set the plate aside for later:
Picture lost · img266.imageshack.us
Use a 10mm socket to remove the bolt in the cup holder in the center console:
Picture lost · img266.imageshack.us
Lifting from the back of the console, remove the center console assembly exposing the factory harnesses underneath:
Picture lost · img402.imageshack.us
Now we must finish modifying the aftermarket harness. Cut the 2 black and 1 solid blue wire as well. The blue/green wire will not be used. Remove the electrical tape holding the end of the harness together. Once everything is pulled apart you should have black, solid blue and solid green wires left in the harness. Use a butt splice to reconnect the 2 black wires. (sorry I forgot to take pictures of the final modified harness):
Picture lost · img260.imageshack.us
On the switch side, pull down the harness cover to expose the internal splice of the 2 green wires. Cut the green wire closest to the black wire. You may need to elongate this wire with some scrap wire so it can reach it’s connecting point:
Picture lost · img260.imageshack.us
It should look something like this (except the black wire should still be in the harness):
Picture lost · img257.imageshack.us
Route the harness alongside the shifter:
Picture lost · img263.imageshack.us
Under the carpet and up the dash on the driver’s side.
Picture lost · img340.imageshack.us
Along the stock steering wheel harness up to the “D4” connector:
Picture lost · img248.imageshack.us
Connect the blue and green wires to pin3 (yellow) and pin4 (white) of the “D4” connector:
Picture lost · img258.imageshack.us
Run the remaining black wire to the left most wall and down to the kick panel. I coiled the slack and strapped it to the ODBII port harness in front of the fuse box.
Picture lost · img208.imageshack.us
Using a 10mm wrench, loosen the grounding bolt and attach the black ground connector:
Picture lost · img340.imageshack.us
Install the relay in the empty socket to the right of the fuse box:
[Picture Not Uploaded]
Disconnect the green/white cable from the automatic shifter assembly:
Picture lost · img263.imageshack.us
Attach the green wire (closest to the black wire) that we cut out earlier from the fog switch harness to the green wire in the factory harness:
Picture lost · img85.imageshack.us
That’s it! Now that our wiring is done we can test your new fog lights for proper operation and reinstall all of the interior panels. After reassembling the center console, plug all of the harnesses back in:
Picture lost · img263.imageshack.us
Push the switch plate back into the center console to complete the job:
Picture lost · img263.imageshack.us
Picture lost · img148.imageshack.us
We now have fully functional OEM fit fog lights:
Picture lost · img242.imageshack.us
Night shots:
Picture lost · img235.imageshack.us
Picture lost · img182.imageshack.us
Fog indicator light in the instrument cluster:
Picture lost · img338.imageshack.us
Green LEDs replaced with white:
Picture lost · img123.imageshack.us
-----------------------------------------------------------------
The following is a shortened converation later in the post regarding a fog light OEM switch LED issue that was discovered.
Originally Posted by revnull
I found a problem. I don’t know how I missed it. Basically, the aftermarket switch that came with my ESUSE kit has 2 internal LEDs. One for the backlight (fog light symbol) and one for the switch on an off indicator (square light). The problem is the square light stays on all the time, even when the car is off. It looks like I need to modify the switch internals for it to function properly. Any Ideas?
Aftermarket Switch Internals:
Picture lost · img181.imageshack.us
Originally Posted by tk-421
I wired my lights using this image as a reference, and the switch turns off when the car is off. Hope this helps!