 Yarisworld
I'm guessing not a whole lot since schools are now back in session. That, and the past few days no doubt prepping for the arrival of Teddy.Originally Posted by kimona ↑What's going on with the RS Restoration saga?
2007 "Red Yaris" RS Restoration
95 posts · 41,589 views · page 2 of 2
Replies continued
Hello gents! It is true...school is back in session. However, enthusiasm remains high, while time is sparse. Next job is to drop the rear axle and replace the bushings. I can't for the life of me find the second bush that I'd bought way back, so I'm awaiting the arrival of the second. After that, I'll attack the few bubbles on the rear quarter panels as well as a few small door dings. The full repaint will happen during this upcoming summer, but I hope to have a good chunk of the bodywork done before the snow flies. I think I'm going to go with a single stage Urethane this time as it's a solid color paint - not metallic. Other than that, I believe, all that remains is the seat slider fix and the cleaning, freeing up and greasing of the rear hatch key lock. Oh yes, and the passenger side axle (or just boot) replacement. I'll do an estimate of costs so far below.
Car $1000.00
ebrake cable $80.00
rear drums and pads, hardware kit ~$90.00
door catch $10.00
axle $50.00
Bushings 2 x $40.00 $80.00
Various shop supplies ~$60.00
Anticipated costs:
Driver's seat track assembly $35.00
Paint, primer and supplies ~$300.00
I'm not even going to think about the number of hours that will ultimately be spent rebuilding this little buggy. It's been really fun so far.
Car $1000.00
ebrake cable $80.00
rear drums and pads, hardware kit ~$90.00
door catch $10.00
axle $50.00
Bushings 2 x $40.00 $80.00
Various shop supplies ~$60.00
Anticipated costs:
Driver's seat track assembly $35.00
Paint, primer and supplies ~$300.00
I'm not even going to think about the number of hours that will ultimately be spent rebuilding this little buggy. It's been really fun so far.
Another Issue
I checked behind the engine as I thought I heard a very slight exhaust noise. Well, indeed the exhaust manifold needs replacing. Fortunately, I have one. Getting the manifold off is going to be quite a job.
Check out the gobs of muffler cement or epoxy whomever repaired this used. Shameful! This is after I pulled great chunks off.
Picture lost · i.imgur.com
Wiper tray removed. Glad to say that I'm a pro at doing this as I did it during my swap, my turbo build and during my coilover installation.
Picture lost · i.imgur.com
Thr right upper stud came out fairly easily with several applications of penetrant and then some heat applied.
Picture lost · i.imgur.com
Picture lost · i.imgur.com
Upper center bolt came out with the same process.
Picture lost · i.imgur.com
Picture lost · i.imgur.com
Upper left stud came out fairly easily as well.
Here is where the fun begins...
The two lower bolts are going to be very difficult. I got a socket on the lower right bolt nice and tight but the socket just spun.
I attempted to weld first a nut, then a bolt to the manifold bolt. Because of the limited space and the curvature of the welder gun, I couldn't get good contact. First I tried grinding to bare metal to weld to. I used my pneumatic die grinder.
Picture lost · i.imgur.com
Hopefully there is enough bolt head left to get an extractor on. I ordered a set of socket bolt extractors which I will pick up this week. If that fails, then I'll grind off the bolt head flush and drill and use a splined or spiral fluted extractor. I also picked up a new bi-metal recip saw blade. I'm going to cut the manifold runners off to make room to work.
Picture lost · i.imgur.com
Picture lost · i.imgur.com
I checked behind the engine as I thought I heard a very slight exhaust noise. Well, indeed the exhaust manifold needs replacing. Fortunately, I have one. Getting the manifold off is going to be quite a job.
Check out the gobs of muffler cement or epoxy whomever repaired this used. Shameful! This is after I pulled great chunks off.
Picture lost · i.imgur.com
Wiper tray removed. Glad to say that I'm a pro at doing this as I did it during my swap, my turbo build and during my coilover installation.
Picture lost · i.imgur.com
Thr right upper stud came out fairly easily with several applications of penetrant and then some heat applied.
Picture lost · i.imgur.com
Picture lost · i.imgur.com
Upper center bolt came out with the same process.
Picture lost · i.imgur.com
Picture lost · i.imgur.com
Upper left stud came out fairly easily as well.
Here is where the fun begins...
The two lower bolts are going to be very difficult. I got a socket on the lower right bolt nice and tight but the socket just spun.
I attempted to weld first a nut, then a bolt to the manifold bolt. Because of the limited space and the curvature of the welder gun, I couldn't get good contact. First I tried grinding to bare metal to weld to. I used my pneumatic die grinder.
Picture lost · i.imgur.com
Hopefully there is enough bolt head left to get an extractor on. I ordered a set of socket bolt extractors which I will pick up this week. If that fails, then I'll grind off the bolt head flush and drill and use a splined or spiral fluted extractor. I also picked up a new bi-metal recip saw blade. I'm going to cut the manifold runners off to make room to work.
Picture lost · i.imgur.com
Picture lost · i.imgur.com
Holy smokes, cars in your neck of the woods sure do rust up good!
My engine bay looks nearly the way it did off the line, 13 years ago.
You're right, that was a shameful repair attempt by the previous owner.
My engine bay looks nearly the way it did off the line, 13 years ago.
You're right, that was a shameful repair attempt by the previous owner.
Oh, for sure. It's the god awful road salt they dump by the ton. With rustproofing, they can look like new after years and years. I had a Dodge Grand Caravan, which are notorious for rotting out in the rear rockers and dogleg area. I rustproofed mine from day one and after 10 years it looked new, even inside the rockers when I check it out with my inspection camera. Other than that manifold, the engine bay in this '07 is in pristine condition as, at least in the bay, they sprayed a lot of rustproofing goop. Those manifolds though do rust out. I had to replace the one on my 2006 RS when I bought it, but that car doesn't see winter. I expect that the '07, when done will also be a 3 season car. Cars around here that aren't driven in the winter last a very, very long time.Originally Posted by ern-diz ↑Holy smokes, cars in your neck of the woods sure do rust up good!
My engine bay looks nearly the way it did off the line, 13 years ago.
You're right, that was a shameful repair attempt by the previous owner.
Yup, using muffler cement is a piss poor way to fix something. I'm paying the price now as they didn't do the correct repair and replace the manifold. Pretty sure I'm going to be looking at a difficult job extracting what is likely going to be a snapped off bolt. I'm prepared, though, as I have a variety of extractors and drill bits as well as the welder if I can move the engine forward and get the right angle to weld a nut on. It ain't gonna be fun, though. lol
Bolt extraction decisions
I'm applying my limited knowledge of physics to this problem. First, I will try the socket extractor. I ordered these and will pick them up this week.
Picture lost · i.imgur.com
If the socket extractor fails, I'll try the drill and extract tools. Since my bench vise is broken and I have to buy a new one, I used it to test the strength of the various extractors I might use. Surprisingly, I think that the tool of choice will be a Torx T25 socket bit. I drilled a hole in my vise, pounded in the torx bit, attached the ratchet. I was really surprised at how much pressure it could withstand. I figured it would snap the bit off, but it actually shredded the cast iron inside the hole. I know that cast is softer than the actual bolt but I was really pushing hard on the ratchet. Although a Torx T30 would be stronger, I feel that the expansion force in the drilled hole in the bolt might bind it tighter. The advantage, I believe of using the Torx bit, is that it should provide a better grip on the bolt as it's not tapered or cone shaped like the 'actual' extractors, so should have deeper and more consistent grip. Regardless of approach, I'll heat the bolt and cool it a few cycles as well as apply lots of penetrant over a period of time.
Picture lost · i.imgur.com
Picture lost · i.imgur.com
Picture lost · i.imgur.com
Picture lost · i.imgur.com
I plan to cut the manifold runner pipes off as close to the head flange as possible. I will try removing the other bolt first (the one I haven't attempted yet). If unsuccessful, I'll grind both bolts off level with the manifold and remove the manifold. This may give me a bit of bolt poking out of the head (due to the thickness of the manifold) to attempt to weld a nut to it. I'm not optimistic that I'll be able to weld inside the nut and I could probably only do this if I release the lower dogbone engine mount and/or remove the passenger side axle. This is an option as I have to replace that axle anyway.
There were some deep discounts at Princess Auto, so I picked up a few other items including a 5pc pry bar set, 5pc center punch set, telescoping inspection mirror, telescoping magnet, a torch and a few other odds and ends. Here's the compact impact gun I picked up. I won't actually use this in the extraction process, but rather I'll use a ratchet as it will give me more control.
Picture lost · i.imgur.com
I'm applying my limited knowledge of physics to this problem. First, I will try the socket extractor. I ordered these and will pick them up this week.
Picture lost · i.imgur.com
If the socket extractor fails, I'll try the drill and extract tools. Since my bench vise is broken and I have to buy a new one, I used it to test the strength of the various extractors I might use. Surprisingly, I think that the tool of choice will be a Torx T25 socket bit. I drilled a hole in my vise, pounded in the torx bit, attached the ratchet. I was really surprised at how much pressure it could withstand. I figured it would snap the bit off, but it actually shredded the cast iron inside the hole. I know that cast is softer than the actual bolt but I was really pushing hard on the ratchet. Although a Torx T30 would be stronger, I feel that the expansion force in the drilled hole in the bolt might bind it tighter. The advantage, I believe of using the Torx bit, is that it should provide a better grip on the bolt as it's not tapered or cone shaped like the 'actual' extractors, so should have deeper and more consistent grip. Regardless of approach, I'll heat the bolt and cool it a few cycles as well as apply lots of penetrant over a period of time.
Picture lost · i.imgur.com
Picture lost · i.imgur.com
Picture lost · i.imgur.com
Picture lost · i.imgur.com
I plan to cut the manifold runner pipes off as close to the head flange as possible. I will try removing the other bolt first (the one I haven't attempted yet). If unsuccessful, I'll grind both bolts off level with the manifold and remove the manifold. This may give me a bit of bolt poking out of the head (due to the thickness of the manifold) to attempt to weld a nut to it. I'm not optimistic that I'll be able to weld inside the nut and I could probably only do this if I release the lower dogbone engine mount and/or remove the passenger side axle. This is an option as I have to replace that axle anyway.
There were some deep discounts at Princess Auto, so I picked up a few other items including a 5pc pry bar set, 5pc center punch set, telescoping inspection mirror, telescoping magnet, a torch and a few other odds and ends. Here's the compact impact gun I picked up. I won't actually use this in the extraction process, but rather I'll use a ratchet as it will give me more control.
Picture lost · i.imgur.com
Literally a nightmare scenario for me with the exhaust manifold. I'm very fortunate on my 1 litre engined Yaris that the exhaust manifold is on the front of the engine facing the radiator. I literally just replaced my exhaust manifold last weekend. It had a very large crack in it which was causing it to set P0420. I also replaced both the Oxygen sensors with new Denso sensors. I have also had to replace the water pump (leaking and rattling) and the radiator as I think it has a pin hole leak or two which is why I was losing coolant.
In my case all the bolts came out without too much of a fight.
From what I have seen your best bet would probably be to weld a nut onto whats left of that bolt and use as much heat as possible. Hopefully it has the effect of freeing the bolt. Using a torx isn't such a bad idea either - unlike other kinds of extractors it doesn't have such an "expansive" force on the fastener which might increase the friction you're trying to overcome by getting it out. Those other extractors you have which have teeth inside the socket are fairly decent. I have a set and I have used them as well a few times successfully.
Best of luck mate - you will need it.
In my case all the bolts came out without too much of a fight.
From what I have seen your best bet would probably be to weld a nut onto whats left of that bolt and use as much heat as possible. Hopefully it has the effect of freeing the bolt. Using a torx isn't such a bad idea either - unlike other kinds of extractors it doesn't have such an "expansive" force on the fastener which might increase the friction you're trying to overcome by getting it out. Those other extractors you have which have teeth inside the socket are fairly decent. I have a set and I have used them as well a few times successfully.
Best of luck mate - you will need it.
Yes, I am quite apprehensive about this operation. My intention is to tackle it on the weekend. I have been worrying about the 'expansive' force on the bolt that you mention. I see it as a bit of a catch 22 in that using too large of a drilled hole and extraction tool would likely increase the friction, yet using too small an extraction tool could result in it snapping off inside the hole. I really think that the bolt head and washer are the parts that are rusted to the manifold flange and attempting to break them free is what might cause the head to either strip or shear off. The threads of the bolts themselves - the ones that I already removed - don't appear to be rusty. I am considering grinding the head and washer off and just tackling the shank. Welding a nut on would be my preferred approach and I may yet do that. If I can grind the bolts flush to the manifold flange, theoretically I could remove the manifold and have a stub of shank to weld to. Regardless, it would require leaning the engine forward quite a bit. I simply couldn't get the welder perpendicular enough to the head to get down inside the nut due to space constraints. I do intend to let heat be my friend. I have a propane torch and in testing, have managed, quite easily, to get a bolt head glowing cherry red. I just put a similar sized bolt in my bench vice and heated it. I'm not sure if I have enough BTUs to get the shank of the bolt red hot as it's sitting in quite a heat sink (the head). If I'm applying heat for a period, should I worry about melting the aluminum head? Then again, I doubt I could do it as there is likely water in the water jacket surrounding the bolt. The other option, I suppose, is to drill out the bolt completely and tap for a larger bolt. However, I don't have any info on how thin the aluminum is and if it poses a risk to entering a water jacket. I can put a slightly shorter bolt in but not knowing how much wall thickness I have to work with would concern me.Originally Posted by zoidberg444 ↑Literally a nightmare scenario for me with the exhaust manifold. I'm very fortunate on my 1 litre engined Yaris that the exhaust manifold is on the front of the engine facing the radiator. I literally just replaced my exhaust manifold last weekend. It had a very large crack in it which was causing it to set P0420. I also replaced both the Oxygen sensors with new Denso sensors. I have also had to replace the water pump (leaking and rattling) and the radiator as I think it has a pin hole leak or two which is why I was losing coolant.
In my case all the bolts came out without too much of a fight.
From what I have seen your best bet would probably be to weld a nut onto whats left of that bolt and use as much heat as possible. Hopefully it has the effect of freeing the bolt. Using a torx isn't such a bad idea either - unlike other kinds of extractors it doesn't have such an "expansive" force on the fastener which might increase the friction you're trying to overcome by getting it out. Those other extractors you have which have teeth inside the socket are fairly decent. I have a set and I have used them as well a few times successfully.
Best of luck mate - you will need it.
I really appreciate the feedback and am open to additional suggestions.
Good news and bad news...
Good: I got the 5th bolt out with the socket extractor. It was touchy going, but it came out.
Picture lost · i.imgur.com
I cut the runners off the manifold to have better access to the bolts.
Bad: I keep making mistakes. I had no luck with the socket extractor on the last bolt. The head was too badly damaged. I ground the bolt and washer flat to the manifold flange. This is where I screwed up. I should have removed the manifold flange at that point. Had I done that, I probably would have had enough poking out to grab on with some vise grips. But, figuring that with the bolt and washer gone, I could drill a hole and use the extractor. The torque needed to remove the other bolt was well within the strength of the extractor. So, I used a center punch and then drilled into the bolt.
Picture lost · i.imgur.com
The actual was drilled a little deeper - deeper than the depth of the extractor.
Picture lost · i.imgur.com
I got it centered well. Unfortunately, despite setting the extractor well, it just stripped and tore the bolt, leaving it in the head. Heat didn't help, sadly. I decided to drill a little deeper and try a slightly larger extractor. Then, the unthinkable happened...the drill bit broke off in the bolt.
Picture lost · i.imgur.com
Tomorrow, I will weld the hole closed, build up a good nub and try using vise grips to get this dang thing out. If that fails, I'll pick up a diamond bit, bore it out slowly and try using a thread chase or pick to remove the last bit of the bolt. If that fails, I'll drill larger and tap new theads for a larger bolt.
Not giving up yet! I don't want to pull the engine, but I will if I have to. If I do pull the engine, I'll put my other lower mileage 1NZ in in its place.
Good: I got the 5th bolt out with the socket extractor. It was touchy going, but it came out.
Picture lost · i.imgur.com
I cut the runners off the manifold to have better access to the bolts.
Bad: I keep making mistakes. I had no luck with the socket extractor on the last bolt. The head was too badly damaged. I ground the bolt and washer flat to the manifold flange. This is where I screwed up. I should have removed the manifold flange at that point. Had I done that, I probably would have had enough poking out to grab on with some vise grips. But, figuring that with the bolt and washer gone, I could drill a hole and use the extractor. The torque needed to remove the other bolt was well within the strength of the extractor. So, I used a center punch and then drilled into the bolt.
Picture lost · i.imgur.com
The actual was drilled a little deeper - deeper than the depth of the extractor.
Picture lost · i.imgur.com
I got it centered well. Unfortunately, despite setting the extractor well, it just stripped and tore the bolt, leaving it in the head. Heat didn't help, sadly. I decided to drill a little deeper and try a slightly larger extractor. Then, the unthinkable happened...the drill bit broke off in the bolt.
Picture lost · i.imgur.com
Tomorrow, I will weld the hole closed, build up a good nub and try using vise grips to get this dang thing out. If that fails, I'll pick up a diamond bit, bore it out slowly and try using a thread chase or pick to remove the last bit of the bolt. If that fails, I'll drill larger and tap new theads for a larger bolt.
Not giving up yet! I don't want to pull the engine, but I will if I have to. If I do pull the engine, I'll put my other lower mileage 1NZ in in its place.
Fail...
I got prepped a large washer by drilling it out the exact size of the manifold bolt, then ground down both sides to shiny metal for good contact. I built up the inside of the hole drilled in the bolt the best I could, then welded the washer to the base of the bolt stub. Finally, I built up a big nub of weld. I shaped it enough so that I could get a socket extractor on it. The bolt shank went through several heat and cooling cycles during the welding; glowing red then cooling. I applied a lot of force with my ratchet; much more that was required to remove the other 4 bolts. It seemed to start turning, then the washer and weld nub snapped off, leaving the bolt shank flush with the block. I tried drilling and using an extractor, which, of course, snapped off inside the bolt shank. 😢
I will not give up! I am consider a few more options:
1) get a diamond or carbide tungsten bit and drill the whole shank out, then tap new threads for a slightly larger bolt. Or, use progressively increasing sized bits and try to remove the bolt shank while preserving the threads. I would use a pick to pull out the remaining material and run thread chase through.
2) Build up a nub of weld on the top of the flush broken stud. Install the manifold with the metal gasket, weld a washer to manifold over the weld nub and then weld the nub to the washer.
3) Carefully weld (so as not to warp the manifold) a stiffening brace around the missing manifold bolt. The manifold is pretty thick metal and quite stiff. There may not be a leak with the 5th bolt missing.
Picture lost · i.imgur.com
My gut tells me to go with option 1; continue to try removing the broken bolt shank. Then installing a new fastener.
I got prepped a large washer by drilling it out the exact size of the manifold bolt, then ground down both sides to shiny metal for good contact. I built up the inside of the hole drilled in the bolt the best I could, then welded the washer to the base of the bolt stub. Finally, I built up a big nub of weld. I shaped it enough so that I could get a socket extractor on it. The bolt shank went through several heat and cooling cycles during the welding; glowing red then cooling. I applied a lot of force with my ratchet; much more that was required to remove the other 4 bolts. It seemed to start turning, then the washer and weld nub snapped off, leaving the bolt shank flush with the block. I tried drilling and using an extractor, which, of course, snapped off inside the bolt shank. 😢
I will not give up! I am consider a few more options:
1) get a diamond or carbide tungsten bit and drill the whole shank out, then tap new threads for a slightly larger bolt. Or, use progressively increasing sized bits and try to remove the bolt shank while preserving the threads. I would use a pick to pull out the remaining material and run thread chase through.
2) Build up a nub of weld on the top of the flush broken stud. Install the manifold with the metal gasket, weld a washer to manifold over the weld nub and then weld the nub to the washer.
3) Carefully weld (so as not to warp the manifold) a stiffening brace around the missing manifold bolt. The manifold is pretty thick metal and quite stiff. There may not be a leak with the 5th bolt missing.
Picture lost · i.imgur.com
My gut tells me to go with option 1; continue to try removing the broken bolt shank. Then installing a new fastener.
Some pics from yesterday
This is the washer I welded on. I don't have a pic of the massive nub I piled up in the center. Sadly, the bolt's shank is still in the block. I'm amazed how badly stuck it is. I put some serious force on the ratchet before it sheared off. The washer looks like it was welded to the head on the top, but it wasn't.
Picture lost · i.imgur.com
Here's the old manifold. The flange that attaches to the cat pipe rotted off so only one spring bolt kit was holding it in place. Also, the support bracket attachment point was completely gone. Nice extra OE wideband, though. 😁
Picture lost · i.imgur.com
The manifold from my swapped out 1NZ. This manifold is in pristine condition despite the flaking ceramic paint. Note to self...not even high temp ceramic paint will withstand exhaust temps. I even had a relatively new, yet used spring bolt kit and a new donut gasket that I bought on a closeout ages ago.
Picture lost · i.imgur.com
Got bored waiting to pick up my diamond bit and tungsten carbide burring tools (to drill out the broken extractor in the manifold bolt), so I sanded, primed and painted the manifold support. I will have to take the support in to source a bolt. The old one had to be sawed off as the nut was rust welded to it and completely corroded.
Picture lost · i.imgur.com
Picture lost · i.imgur.com
In the next few days, I'll remove the 1/4" chunk of hardened steel extractor from the bolt shank with my diamond tip bit and or tungsten carbide pointed and round deburring tools. Then, I'll either drill it out to 10M (original bolt is 8M) and try tapping for the larger bolt. Or, I'll install a helicoil and use another 8M bolt. I do not know how thick the water jacket walls are, so a bit apprehensive about upsizing the bolt hole.
This is the washer I welded on. I don't have a pic of the massive nub I piled up in the center. Sadly, the bolt's shank is still in the block. I'm amazed how badly stuck it is. I put some serious force on the ratchet before it sheared off. The washer looks like it was welded to the head on the top, but it wasn't.
Picture lost · i.imgur.com
Here's the old manifold. The flange that attaches to the cat pipe rotted off so only one spring bolt kit was holding it in place. Also, the support bracket attachment point was completely gone. Nice extra OE wideband, though. 😁
Picture lost · i.imgur.com
The manifold from my swapped out 1NZ. This manifold is in pristine condition despite the flaking ceramic paint. Note to self...not even high temp ceramic paint will withstand exhaust temps. I even had a relatively new, yet used spring bolt kit and a new donut gasket that I bought on a closeout ages ago.
Picture lost · i.imgur.com
Got bored waiting to pick up my diamond bit and tungsten carbide burring tools (to drill out the broken extractor in the manifold bolt), so I sanded, primed and painted the manifold support. I will have to take the support in to source a bolt. The old one had to be sawed off as the nut was rust welded to it and completely corroded.
Picture lost · i.imgur.com
Picture lost · i.imgur.com
In the next few days, I'll remove the 1/4" chunk of hardened steel extractor from the bolt shank with my diamond tip bit and or tungsten carbide pointed and round deburring tools. Then, I'll either drill it out to 10M (original bolt is 8M) and try tapping for the larger bolt. Or, I'll install a helicoil and use another 8M bolt. I do not know how thick the water jacket walls are, so a bit apprehensive about upsizing the bolt hole.
Oh, man, you've been through the ringer with this one. Enjoying the persistence!
Yeah, it's been a rough one. I worked on it a bit tonight and managed to grind the extractor out with the tungsten carbide dremel bit. It wasn't easy going as the bit wanted to keep slipping off the hardened steel extractor piece in the hole and dig away at the softer aluminum. I'm sure that if I had had the engine out of the car things would have gone differently. It's very hard bending over the engine and using mirrors to see what I'm doing. I started drilling a new hole which I will tap and use a different bolt. I need to go get better sharper bits as mine are pretty worn. I hope to have this wrapped up in the next few days. I don't get much time in the evenings - maybe an hour or two.Originally Posted by ern-diz ↑Oh, man, you've been through the ringer with this one. Enjoying the persistence!
Success...finally!
Most people know this, but I can't underscore the importance of a good drill bit. I picked up a new gold oxide bit and it cut into the block clean and straight with almost no pressure needed on my pneumatic angle drill. Tapping was fairly easy as the aluminum is soft. I was a little nervous drilling deep enough to have adequate threads, but I didn't break through into any water jackets or anything else. Although a bolt turns in nicely and tightly, I've decided to use a stud and nut instead. I will probably use a stud in place of the other manifold bolt too. I think it will make future repairs, if needed, easier.
Long end of stud in block. Before final installation, I'll apply some copper RTV sealant. There are probably better high temp sealants, but the copper RTV has done a great job of holding my turbo studs in and those get a heck of a lot hotter than any head stud/bolt.
Picture lost · i.imgur.com
Nut on stud
Picture lost · i.imgur.com
Most people know this, but I can't underscore the importance of a good drill bit. I picked up a new gold oxide bit and it cut into the block clean and straight with almost no pressure needed on my pneumatic angle drill. Tapping was fairly easy as the aluminum is soft. I was a little nervous drilling deep enough to have adequate threads, but I didn't break through into any water jackets or anything else. Although a bolt turns in nicely and tightly, I've decided to use a stud and nut instead. I will probably use a stud in place of the other manifold bolt too. I think it will make future repairs, if needed, easier.
Long end of stud in block. Before final installation, I'll apply some copper RTV sealant. There are probably better high temp sealants, but the copper RTV has done a great job of holding my turbo studs in and those get a heck of a lot hotter than any head stud/bolt.
Picture lost · i.imgur.com
Nut on stud
Picture lost · i.imgur.com
Success! I've been following your struggle and admiring your tenacity. Congratulations. Carry on, mate.
Thanks! Haha, yeah, it feels good finally getting it sorted. I know where I went wrong and have definitely learned from the experience.Originally Posted by kimona ↑Success! I've been following your struggle and admiring your tenacity. Congratulations. Carry on, mate.
Exhaust work done...
Got the manifold on. I applied a bead of Permatex copper RTV on both sides of the steel gasket. It squeezed out nicely on both sides. Hopefully it seals. I'll start the car later today after the RTV sets up a bit. Then, final torquing of the bolts after that.
Picture lost · i.imgur.com
Brace remounted
Picture lost · i.imgur.com
New exhaust donut and used but fairly new spring bolt kit installed.
Picture lost · i.imgur.com
Got the manifold on. I applied a bead of Permatex copper RTV on both sides of the steel gasket. It squeezed out nicely on both sides. Hopefully it seals. I'll start the car later today after the RTV sets up a bit. Then, final torquing of the bolts after that.
Picture lost · i.imgur.com
Brace remounted
Picture lost · i.imgur.com
New exhaust donut and used but fairly new spring bolt kit installed.
Picture lost · i.imgur.com
Bet it felt great when you finally got that bolt out.
Oh man, you know it! If I ever have to do this again, any bolts/studs that won't come out, I'll grind flush with the manifold. Then, remove the manifold, weld nuts onto the bit of stud/bolts that's sticking out. I think my welding nub failed because I'd already compromised the bolt shank by drilling it out. No more male extractor type tools for me! I think I got lucky after the extractor broke off in the bolt shank. Those carbide dremel burring bits saved the day. They chewed up that hardened steel extractor like it was nothing, and it did no damage to the bits. I also got lucky drilling and tapping.Originally Posted by mitch9521 ↑Bet it felt great when you finally got that bolt out.
BTW, started the car and it's dead silent up front now. I do need to install an exhaust donut between the cat pipe and muffler at the back. Otherwise, the exhaust system is in excellent shape.
Wow, that was intense! You, sir, have patience and perseverance!
Haha, yeah, it was a demanding job. Oddly enough, I've wanted for some time the experience of removing a frozen, broken bolt. I'm sure the experience and what I learned will come in handy again!Originally Posted by Kaotic Lazagna ↑Wow, that was intense! You, sir, have patience and perseverance!
Originally Posted by 06YarisRS ↑Oh man, you know it! If I ever have to do this again, any bolts/studs that won't come out, I'll grind flush with the manifold. Then, remove the manifold, weld nuts onto the bit of stud/bolts that's sticking out. I think my welding nub failed because I'd already compromised the bolt shank by drilling it out. No more male extractor type tools for me! I think I got lucky after the extractor broke off in the bolt shank. Those carbide dremel burring bits saved the day. They chewed up that hardened steel extractor like it was nothing, and it did no damage to the bits. I also got lucky drilling and tapping.
BTW, started the car and it's dead silent up front now. I do need to install an exhaust donut between the cat pipe and muffler at the back. Otherwise, the exhaust system is in excellent shape.
In my experience it’s best to heat rusted fasteners with a torch before trying to remove them. Heated up cherry red. Not often necessary to resort to EZ Out with that approach.🙇
Yes, I agree. In this case it was nearly impossible to get anything on it as it was pretty corroded. My mechanic heats them up red hot, then uses an ice cube on the fastener and immediately removes it. Due to the difficult position and the fact that I had to become a contortionist just to get something on to turn the bolt shank, I couldn't coordinate heat, a removal tool attached while holding an inspection mirror in the other hand. Much of this job was done 'blind'. I feel thankful that I managed to drill and tap straight and the nut ended up flush to the manifold. If the engine had been out of the car, it would have been a quick job, I suspect. Live and learn. The next time, I'll know exactly what to do and hopefully it won't be in such an awkward and cramped position.Originally Posted by bronsin ↑In my experience it’s best to heat rusted fasteners with a torch before trying to remove them. Heated up cherry red. Not often necessary to resort to EZ Out with that approach.🙇
Yes things are a lot tighter these days when working on a car! I’m kind of thankful the car is I got to work on have a lot more space to do so. I would have a difficult time changing a water pump on my 09 Yaris. Even 10 years ago!
Missed this. Yeah, I remember the old boats I drove; 69 Olds Cutlass, 70s Buick Century, 80s Crown Vic. You could practically stand in the bay beside the engine. Some day I might buy a classic car and work on it. I can only imagine how much easier it would be, space-wise.Originally Posted by bronsin ↑Yes things are a lot tighter these days when working on a car! I’m kind of thankful the car is I got to work on have a lot more space to do so. I would have a difficult time changing a water pump on my 09 Yaris. Even 10 years ago!
More exhaust work...
I knew I had to replace the little donut at the back of the exhaust system. I got it unbolted and the old deteriorated donut removed. Man, it was stuck on there and it took a while to pry off all the little bits.
Picture lost · i.imgur.com
Picture lost · i.imgur.com
I started up the car and still...exhaust leak! I plugged the exhaust with my hand and could hear exhaust coming out just above the flange. Dang...the little welded on shield had rusted through at the weld. Seen this before. I got it ground down. The rest of the metal around the hole is very thick and solid.
Picture lost · i.imgur.com
Picture lost · i.imgur.com
I just slowly bent a small rectangular piece of old car hood into a curve in my vise. Got the patch welded on.
Picture lost · i.imgur.com
Picture lost · i.imgur.com
When I bent the small shield over to have good welding access, I noticed that the other weld had also rusted through. I figured I'd weld that, then weld the shield back on after both patches were done. Ultimately, gave up on that idea. There's a large aluminum shield between that and the gas tank anyway.
Picture lost · i.imgur.com
Picture lost · i.imgur.com
Painted with VHT flameproof ceramic paint.
Picture lost · i.imgur.com
This should hold up for a good while. I would have just put the relatively new muffler I had on my '06 before the swap, but then recalled that I'd put that on my '08 LE before I sold it. Eventually, I'll pick up a Walker SS muffler from RockAuto, or, I'll keep my eyes open for a Megan or other performance muffler, if I can find a cheap one for sale.
Car is coming along nicely. Went out for a nice drive in it today. Still have a few jobs left to do.
Picture lost · i.imgur.com
I knew I had to replace the little donut at the back of the exhaust system. I got it unbolted and the old deteriorated donut removed. Man, it was stuck on there and it took a while to pry off all the little bits.
Picture lost · i.imgur.com
Picture lost · i.imgur.com
I started up the car and still...exhaust leak! I plugged the exhaust with my hand and could hear exhaust coming out just above the flange. Dang...the little welded on shield had rusted through at the weld. Seen this before. I got it ground down. The rest of the metal around the hole is very thick and solid.
Picture lost · i.imgur.com
Picture lost · i.imgur.com
I just slowly bent a small rectangular piece of old car hood into a curve in my vise. Got the patch welded on.
Picture lost · i.imgur.com
Picture lost · i.imgur.com
When I bent the small shield over to have good welding access, I noticed that the other weld had also rusted through. I figured I'd weld that, then weld the shield back on after both patches were done. Ultimately, gave up on that idea. There's a large aluminum shield between that and the gas tank anyway.
Picture lost · i.imgur.com
Picture lost · i.imgur.com
Painted with VHT flameproof ceramic paint.
Picture lost · i.imgur.com
This should hold up for a good while. I would have just put the relatively new muffler I had on my '06 before the swap, but then recalled that I'd put that on my '08 LE before I sold it. Eventually, I'll pick up a Walker SS muffler from RockAuto, or, I'll keep my eyes open for a Megan or other performance muffler, if I can find a cheap one for sale.
Car is coming along nicely. Went out for a nice drive in it today. Still have a few jobs left to do.
Picture lost · i.imgur.com
Impressive job so far. Glad you managed to deal with that bolt. I just can't believe it was seized so bad. It's an aluminium block - I just don't understand what was holding it in like that. If anything it should have just removed the threads from the block.
What jobs are left to do on her?
What jobs are left to do on her?
Salt makes everything metal-wise an absolute nightmare to do on an older car.Originally Posted by zoidberg444 ↑Impressive job so far. Glad you managed to deal with that bolt. I just can't believe it was seized so bad. It's an aluminium block - I just don't understand what was holding it in like that. If anything it should have just removed the threads from the block.
What jobs are left to do on her?
Thanks man! I have theory on why that whole job went so badly and it involved compounding errors on my part. First, I should not have attempted to use a socket on it as the bolt head was corroded somewhat. This rounded off what was remaining to some degree. Had I used the socket bolt extractor in the first place, I think it would have come out. Three of the other bolts/studs came out with relative ease using a standard socket, the forth with the male socket extractor and I wasn't in possession of the socket style extractor for the stubborn bolt at the time. My next error was drilling and trying to use a male extractor. I think this just expanded the bolt shank diameter, clamping it to the block. I may have drilled too large a hole. When I initially drilled and used the male extractor, the bolt head and washer was still present and I think the washer was corroded and adhered to the block, which didn't help either. Then, I ground the damaged bolt head flat and pulled the manifold off, which left a decent sized nub. I should have done this first, before any drilling attempts. I would have had an undamaged nub to crank on. I couldn't effectively fill the damaged bolt shank with weld making it strong enough to withstand twisting. A broken extractor tip in the bolt shank fiasco didn't help either.Originally Posted by zoidberg444 ↑Impressive job so far. Glad you managed to deal with that bolt. I just can't believe it was seized so bad. It's an aluminium block - I just don't understand what was holding it in like that. If anything it should have just removed the threads from the block.
What jobs are left to do on her?
Although every situation in unique, if I again ran into the same conditions, I would try in this order: 1) Try socket style bolt extractor. If that failed, 2) grind bolt flat and remove manifold. If the nub of shank wasn't enough, 3) weld a larger nub onto the protruding bolt shank, roughly shape to take a socket style extractor.
What remains to be done:
- passenger side axle boot, or axle replacement. I have a whole axle and may just do that.
- Driver's seat slider assembly
- Stuck hatch lock tumbler
- despite having replaced an ebrake cable, rear brake job and and topping up fluid, I have a brake warning light on. Will have to troubleshoot that. I think the car has ABS, but no ABS light. I was thinking rear wheel ABS sensor plug corrosion, but not sure what the root cause is. I suppose I should check the ebrake switch. Ebrake and braking system function flawlessly with great pedal pressure etc.
- Optional (as they're not that bad), rear axle to frame bushings. I have 2 new ones. I expect that will be a tough job getting them out. I have an air hammer and will attempt to walk them out. I know you bought a bushing remover and I may end up having to do that too.
- Full repaint, though this will not happen this year.
Plugging along slowly, but the car is coming along nicely. It will be pretty nice, solid and reliable when done. A lot of work! I undertook this for a few reasons: 1) it's an RS and 2) I've always wanted to buy a cheap (though good quality car) and tackle such jobs as welding/structural repair, and one that involved more than just simply bolting on parts that obviously needed to be replaced. This car, provided both! 3) everything from the rear axle forward is in pristine condition from a rust perspective. The owner had it rustproofed really well from the axle forward. A true learning experience and one that's honing my 'rebuild skills' to some degree. I would say that a car that needs this many repairs is on the far edge of projects that I'd be willing to take on again, though. Haha.
Believe me mate - we have rust in spades in England and I have never encountered something that was seized that bad.Originally Posted by mitch9521 ↑Salt makes everything metal-wise an absolute nightmare to do on an older car.
In regards to rear axle bushes - I replaced them on Betty.Originally Posted by 06YarisRS ↑What remains to be done:
- passenger side axle boot, or axle replacement. I have a whole axle and may just do that.
- Driver's seat slider assembly
- Stuck hatch lock tumbler
- despite having replaced an ebrake cable, rear brake job and and topping up fluid, I have a brake warning light on. Will have to troubleshoot that. I think the car has ABS, but no ABS light. I was thinking rear wheel ABS sensor plug corrosion, but not sure what the root cause is. I suppose I should check the ebrake switch. Ebrake and braking system function flawlessly with great pedal pressure etc.
- Optional (as they're not that bad), rear axle to frame bushings. I have 2 new ones. I expect that will be a tough job getting them out. I have an air hammer and will attempt to walk them out. I know you bought a bushing remover and I may end up having to do that too.
- Full repaint, though this will not happen this year.
Plugging along slowly, but the car is coming along nicely. It will be pretty nice, solid and reliable when done. A lot of work! I undertook this for a few reasons: 1) it's an RS and 2) I've always wanted to buy a cheap (though good quality car) and tackle such jobs as welding/structural repair, and one that involved more than just simply bolting on parts that obviously needed to be replaced. This car, provided both! 3) everything from the rear axle forward is in pristine condition from a rust perspective. The owner had it rustproofed really well from the axle forward. A true learning experience and one that's honing my 'rebuild skills' to some degree. I would say that a car that needs this many repairs is on the far edge of projects that I'd be willing to take on again, though. Haha.
Picture lost · i.imgur.com
I used the air hammer to fold the lip out and then cut the lip off with the grinder.
Picture lost · i.imgur.com
That meant I could get my bushing extractor on. It took an enormous amount of force. I actually damaged the M12 forcing screw in the kit. I would suggest adding heat to the metal sleeve with a propane torch. It might help them come out.
Picture lost · i.imgur.com
Mine weren't in great condition. They were causing a "clunking" from the rear when I was braking. It was quite annoying. My rear shocks were dead as well. Also my rear axle was very rusty so I needle scaled, sand blasted it and painted it with Jotun 87. The amount of rust scale the air hammer and needle scaler chipped off it was shocking. It may well have rusted through somewhere if I hadn't treated it at the rate it was going. Seen as you have to drop the rear axle to do it you might as well clean it up.
As for your brake light being on - I would sometimes get this if I was driving on a wet night when the roads had been salted. Near as I could figure out salt water was getting into and shorting out a connector somewhere because it would go away when the car dried out. The main culprit on mine was one of the rear ABS sensors. So I stuffed the connectors with vaseline to keep the water out and it seemed to cure the problem.
This post has been great to follow! And the basic car you are working with looked great to begin with as well. But as a US-living guy, a couple things about your car surprise me, the fact that it has black mirrors (not body-colored,) and manual windows. I thought CDN RS spec cars came with upgrades to both these items? (Power Windows and Colored Mirrors.) And only CE/LE cars might have not?😕 But your door panels look like they are original RS ones, the place where window switches go is correctly dark colored... I even wondered if a previous owner had "combined" an crunched RS interior with a LE pkg 3 door in good shape? I have an old online CDN 08 HB brochure that shows the original equipment for these cars, and thought that the 07 range was the same. Or am I totally wrong? Many years ago I bought some Canadian parts from a BC dealership and looked closely at a couple LE models (no RS on site,) and always thought that in Canada, I would quickly replace the mirror covers of an LE with US-sourced colored covers...
In any case, thanks for a fantastic post about rebuilding your car! And I hope you don't mind my intrusion. Again, Great Work so far!
In any case, thanks for a fantastic post about rebuilding your car! And I hope you don't mind my intrusion. Again, Great Work so far!
I wish I had your press. haha. I picked up an air hammer and will give that a try. I'll definitely apply some heat. If the air hammer doesn't cut it, I'll bore a hole through, slide a bi-metal hacksaw blade through, reattach it to the frame and saw through the metal part of the bushing. I have already loosened and tightened the bolts, so at least that part went well. Having those gaping holes there - before the repair - allowed me to liberally soak the captive nuts many times over many days. I'm sure that helped.Originally Posted by zoidberg444 ↑Believe me mate - we have rust in spades in England and I have never encountered something that was seized that bad.
In regards to rear axle bushes - I replaced them on Betty.
Picture lost · i.imgur.com
I used the air hammer to fold the lip out and then cut the lip off with the grinder.
Picture lost · i.imgur.com
That meant I could get my bushing extractor on. It took an enormous amount of force. I actually damaged the M12 forcing screw in the kit. I would suggest adding heat to the metal sleeve with a propane torch. It might help them come out.
Picture lost · i.imgur.com
Mine weren't in great condition. They were causing a "clunking" from the rear when I was braking. It was quite annoying. My rear shocks were dead as well. Also my rear axle was very rusty so I needle scaled, sand blasted it and painted it with Jotun 87. The amount of rust scale the air hammer and needle scaler chipped off it was shocking. It may well have rusted through somewhere if I hadn't treated it at the rate it was going. Seen as you have to drop the rear axle to do it you might as well clean it up.
As for your brake light being on - I would sometimes get this if I was driving on a wet night when the roads had been salted. Near as I could figure out salt water was getting into and shorting out a connector somewhere because it would go away when the car dried out. The main culprit on mine was one of the rear ABS sensors. So I stuffed the connectors with vaseline to keep the water out and it seemed to cure the problem.
My 2008 had the ABS light issued as well. A pin had actually corroded off. I clipped the ends off a sewing needle plugged it in, like you, applied grease and plugged the connector back in. Never had a problem again. I have a jumper for the OBD2 port, so I'll bridge the appropriate pins and get the code. If the pin or pins on the wheel speed sensor are gone, I'll order a wss and install it.
Thanks for the insight and guidance!
Thanks! No intrusion. Always great to have lots of input. Not sure what options came with the RS in Canada. I think the VIN number brings the car up as an RS. I suppose it's possible that someone changed the interior out, but the entire interior, seats, trim, headliner and all are the same as my silver RS. Another feature that suggests that it's an RS is the factory holes drilled for the side skirt pins. However, you have me intrigued now! Haha. I'll do some more digging. Thanks! Oh, and if the mirror surfaces are prep-able, I'll paint them the body color when I paint the car. BTW, I'd love to see the brochure if you're willing to share. I love that stuff.Originally Posted by Snappy ↑This post has been great to follow! And the basic car you are working with looked great to begin with as well. But as a US-living guy, a couple things about your car surprise me, the fact that it has black mirrors (not body-colored,) and manual windows. I thought CDN RS spec cars came with upgrades to both these items? (Power Windows and Colored Mirrors.) And only CE/LE cars might have not?😕 But your door panels look like they are original RS ones, the place where window switches go is correctly dark colored... I even wondered if a previous owner had "combined" an crunched RS interior with a LE pkg 3 door in good shape? I have an old online CDN 08 HB brochure that shows the original equipment for these cars, and thought that the 07 range was the same. Or am I totally wrong? Many years ago I bought some Canadian parts from a BC dealership and looked closely at a couple LE models (no RS on site,) and always thought that in Canada, I would quickly replace the mirror covers of an LE with US-sourced colored covers...
In any case, thanks for a fantastic post about rebuilding your car! And I hope you don't mind my intrusion. Again, Great Work so far!
EDIT: I found this:
https://www.autotrader.ca/research/t...power%20locks.
Then there's this (though USA, I believe). It shows power locks, windows, A/C and a few other things as options. It does look like body colored mirrors were standard equipment. I wonder if the mirrors were replaced on my car. It had definitely been in a few fender benders. Both front fenders look like aftermarket ones. I was planning to pick up two at the U-Pull before painting the car. Or, what I have here is really a CE done up like an RS. I'm going to look on my insurance card. The policy links the VIN to a model and trim automatically. I'll post up the result after I check. Again, very intriguing.
https://www.auto123.com/en/new-cars/.../2007/3-dr/rs/
I think I downloaded this from Toyota.ca back in 08.
(Split into 3 PDFs for size posting limits.)
First Part:
(Split into 3 PDFs for size posting limits.)
First Part:
Second Part:
Third Part:
Those are awesome! Thanks a lot. I downloaded them to my Yaris folder. I didn't know about those optional wheels and the performance exhaust. I love the slightly retro font. Haha.
There's too much RS in that car to be a lesser model converted with RS bits. I have the '07 brochure and it is not quite the same as '08.
The mirrors however are supposed to be body colour regardless of whatever option package the car was delivered with. Body colour mirrors is achieved by snapping coloured caps over base black mirrors is it not? Could be a factory oversight, or caps have been removed.
The mirrors however are supposed to be body colour regardless of whatever option package the car was delivered with. Body colour mirrors is achieved by snapping coloured caps over base black mirrors is it not? Could be a factory oversight, or caps have been removed.
Yeah, I'm thinking it's an RS. I can't imagine someone going to the trouble. Even if someone was flipping it, it wouldn't be worth the effort. I suppose you could replace all those parts, but the 'definitive proof' for me was the side skirt pin holes in the rocker area.Originally Posted by WeeYari ↑There's too much RS in that car to be a lesser model converted with RS bits. I have the '07 brochure and it is not quite the same as '08.
The mirrors however are supposed to be body colour regardless of whatever option package the car was delivered with. Body colour mirrors is achieved by snapping coloured caps over base black mirrors is it not? Could be a factory oversight, or caps have been removed.
Features page from the 2007 brochure. You can see how the standard and optional features differ from 2008.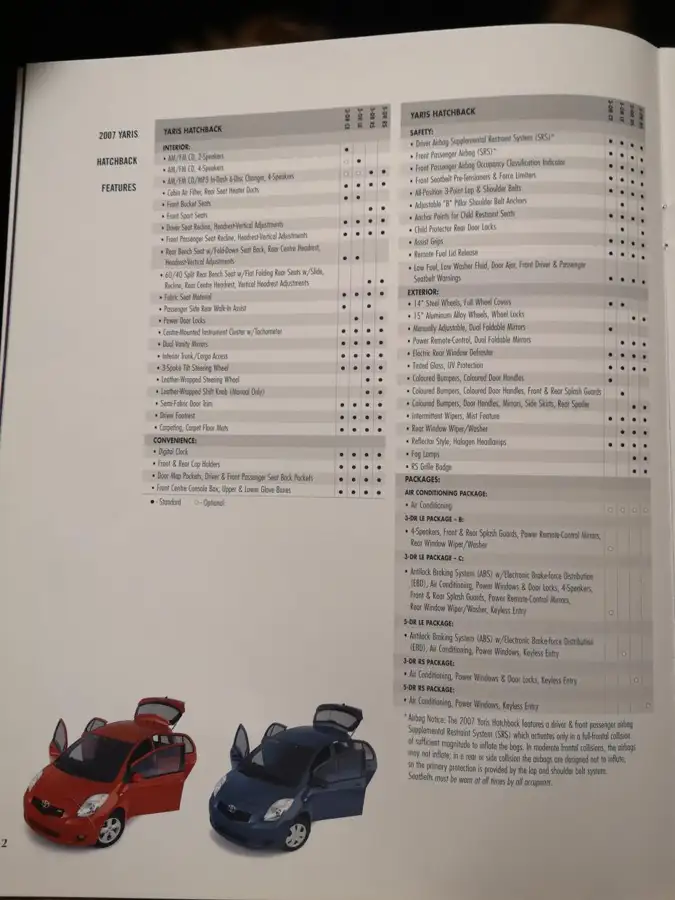
Interesting! I see though that even my 3-door RS should have body colored mirrors. I'm going to guess they were replaced. I wondered about the car not having A/C since it's an RS. My '06 does. I see now that it was an option. Thanks for posting the pic.Originally Posted by WeeYari ↑Features page from the 2007 brochure. You can see how the standard and optional features differ from 2008.
You're welcome. Reread my earlier comment about the mirrors. I would like confirmation that body colour mirrors are just snap on caps.
I'll check out my silver RS. I though the mirror was one solid piece - not a cap - but I'll confirm and post back.Originally Posted by WeeYari ↑You're welcome. Reread my earlier comment about the mirrors. I would like confirmation that body colour mirrors are just snap on caps.
My apologies for reviving an old thread. It was linked from another thread I was looking at. What's the difference between the RS and non-RS seats? I believe I have an LE since I have four speakers. Since I didn't want to mess with the weight sensor for the passenger seat, I thought about replacing my seat with one from a Scion tC to give it more bolster in hopes that it'd work. Does the RS have more bolster than the non-RS?
Yes.Originally Posted by Neinris ↑Does the RS have more bolster than the non-RS?