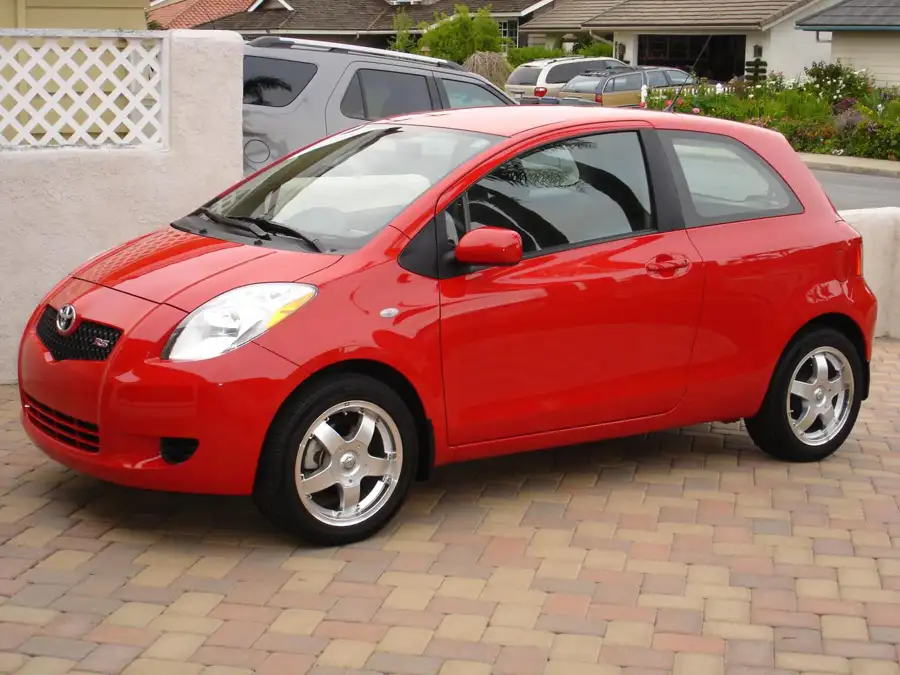
06YarisRSOriginal postFredericton, New Brunswick, Canada · Aug 29, 2020#1This thread will be dedicated to a major restoration I will be doing on a 2007 RS 3-door that I recently picked up.
The bad:
The car failed inspection for a the following reasons:
- Rotted rear subframe where the axle arms attach
- rear brakes (both sides)
- rear right side e-brake cable
- right front axle torn boot (I have a good used axle, but will try to just swap the boots)
There are a few other things that need fixing which include:
- driver's side door catch is missing (I pulled one from a local junkyard)
- driver's seat track is locked in position and will need fixing or replacement.
- some bubbling around the rear fender wells where it looks like it was repaired before. The car will get complete bodywork and a full repaint.
- missing springbolt on manifold-to-midpipe connection.
- back hatch latch button sticking (remove from car, disassemble, clean, degrease, relubricate tumbler, reinstall).
The good:
- drives perfectly, smooth and no creaks or noises.
- immaculate interior! I have never seen a car in such good shape for its age. The seats from this car are going in my 06 turbo Yaris. The ones in my turbo Yaris are in great shape, but these are immaculate. The interior trim pieces are also perfect and I'll be scavanging the center console bezel pieces for my '06 as well.
- $1000.00 Canadian purchase price.
Pics of the car on date of purchase:
Picture lost · i.imgur.com
Picture lost · i.imgur.com
Picture lost · i.imgur.com
Picture lost · i.imgur.com
Picture lost · i.imgur.com
Picture lost · i.imgur.com
Replies 94
06YarisRSThread starterFredericton, New Brunswick, Canada · Aug 29, 2020#2Repairs begin
I can't guarantee that the sequence of repairs will be documented in a logical order as I may work a little bit on this job, then a little on that job. I will edit posts though, adding pictures of each job as I go.
Car lifted on jackstands
Picture lost · i.imgur.com
Picture lost · i.imgur.com
Picture lost · i.imgur.com
06YarisRSThread starterFredericton, New Brunswick, Canada · Aug 29, 2020#3Rear Brakes
I have one side done. I removed everything except the wheel cylinders, cleaned up the rust, sanded the nubs that the shoes sit/slide on, painted the backing plates and greased the nubs with silicone brake lube. I disassembled, cleaned and lubricated the star adjuster assembly, installed new shoes, hardware kit and drums.
Picture lost · i.imgur.com
Drums were primed and painted with ceramic aluminum-colored paint
Picture lost · i.imgur.com
E-brake Cable
Picture lost · i.imgur.com
Picture lost · i.imgur.com
Picture lost · i.imgur.com
Picture lost · i.imgur.com
01 Sept, 2020 Update: E-brake cable installed
Picture lost · i.imgur.com
kimonaHuntington Bch, CA · Aug 29, 2020#4I'll be watching with enthusiasm. I have a soft spot for a 2007 Red 2-door. Lots of good memories. Loved that car!
Subframe Rust Repair - Disclaimer - shocking images:
A 'design flaw' in these cars allows a lot of sand, dirt and debris to build up inside the cavity onto which the supports for the rear axle bushing are molded. Any water is absorbed by the crud and it sits there like a wet sponge. I've already seen several Yari that have failed inspection as a result. I expect that most of them will end up in the scrapyard well before the powertrain is ready to give up.
Before I decided to buy this car, I spent some time under it with a pry bar, flash light and a small collection of tools. Thankfully, the seller was amenable to that. Because of the gaping holes, I was able to confirm my suspicion that Toyota used heavily reinforced steel at the axle mounts and thinner steel surrounding those areas. I have yet to determine all the locations that water, dirt and debris enters these cavities and sits there doing its insidious work, but I do know how to access these areas and saturate them with oil. I think I saved my '06 in the nick of time as I drenched all these rust-prone areas well as soon as I got the car and have done so a couple times a year.
Picture lost · i.imgur.com
Picture lost · i.imgur.com
Picture lost · i.imgur.com
Getting these bolts out was a time-consuming process, but they came out intact. The threads above the captive nuts were very rusted. Lots of repeated doses of ReleasAll and wire brushing over a couple of days and lots of back and forth with the ratchet and they came out. I was prepared to use new bolts and weld new captive nuts in but it turned out to be unnecessary. The nuts were wire bushed, coated in antiseize and reinstalled.
I notice that my rear axle bushings are cracked. They are solid in the main part of the bushing. I actually have 2 new ones in boxes that I bought a while back as they were on clearance. If I need to, I will remove the axle and take it somewhere and have those new bushings pressed in. But, for now, it's very tight and no noise.
Picture lost · i.imgur.com
Body brace degreased, sanded and primed. Will paint this in satin black.
Picture lost · i.imgur.com
Picture lost · i.imgur.com
Update 01 Sept, 2020: 2nd brace degreased, sanded and primed:
The second brace bolts came out using the same procedure of wire brushing, multiple applications of penetrant and back and forth with the ratchet.
Picture lost · i.imgur.com
06YarisRSThread starterFredericton, New Brunswick, Canada · Aug 29, 2020#6 Originally Posted by
kimona ↑ I'll be watching with enthusiasm. I have a soft spot for a 2007 Red 2-door. Lots of good memories. Loved that car!
My goal is to have my car look like yours, Kimona. Gorgeous!!! 👏
It’s always distressing to see what Canadian winters due to cars! 😢
I grew up in upstate New York 80 miles from Lake Ontario so I have some experience with that problem.
Now that I live in New Jersey cars fare much better. My wife’s 2005 Camry with 185,000 miles is like brand new underneath! 🤘
06YarisRSThread starterFredericton, New Brunswick, Canada · Sep 1, 2020#8Door Check Install
The driver's side door check on this car was sheered off. To replace it, the door panel needs to be removed. Thanks to another post here on YW, I learned how to use a cloth to remove the window crank retaining clip. YARISWORLD MUST NOT DIE!!!
So, it appears that I will need a new door gasket as it's swollen from rust proofing. A blessing in disguise as the doors are 100% rust free. I'll be hitting the U-Pull again, so I'll grab a door gasket, or, remove a section of this one and weld it back together.
Picture lost · i.imgur.com
I got a lot of grey anti-seize on the door using the wrong rag, duh! It cleaned up pretty well though. Car will need a thorough detailing when I'm done for sure!
Picture lost · i.imgur.com
Picture lost · i.imgur.com
Somebody was in here before. Painter's tape???
Picture lost · i.imgur.com
Junkyard door check, $10.00 at U-Pull.
Picture lost · i.imgur.com
All re-sealed. I love Tuck Tape!
Picture lost · i.imgur.com
Door back together:
Picture lost · i.imgur.com
komichalCZ · Sep 2, 2020#9I personally find a lot more attractive if somebody restores a "normal car" rather than some rare "piece of art" that needs to sit in a museum after the successful restoration.
I wish I had time, space, money and knowledge to do that as well. :) Nice work!
bronsinnj · Sep 2, 2020#10🙇🙇🙇
06YarisRSThread starterFredericton, New Brunswick, Canada · Sep 2, 2020#11 Originally Posted by
komichal ↑ I personally find a lot more attractive if somebody restores a "normal car" rather than some rare "piece of art" that needs to sit in a museum after the successful restoration.
I wish I had time, space, money and knowledge to do that as well. :) Nice work!
Thank you, komichal! All of this is such a great learning experience. Some day, maybe in retirement, I will attempt the restoration of a more 'classic' automobile. Not like a true classic, but something interesting and sporty. That said, anything I fix up/restore, will get driven regularly. I agree. What's the point in putting in lots of effort and time if you can't enjoy it, other than staring at it? For the time being, my hope is to find more Yari that are seemingly destined for the scrapyard (aka, fail inspection due to the rear rust) or other minor issues, fix them up and put them back on the road. Who knows, maybe it could net me a little supplemental income in retirement.
Originally Posted by
bronsin ↑ 🙇🙇🙇
Thanks bronsin!
Preparing to weld
Didn't get to go out to the car until almost dark tonight, so only had time to do a little poking around and plan my welding. I did discover more about the internal structure of the rear subframe/unibody area.
The oblong plug just in front of the rear wheel on each size does provide access to the cavity that forms part of the rear axle support structure. Spraying oil into the oblong plug holes will not actually get oil/rustproofing into the larger inboard cavity. But...there are holes a few inches up into which a short wand could be placed. Possibly even the straw on a spray can of rustproofing could reach. A flexible wand would definitely work better. No matter how you access the inner cavity, I would load it with a very large amount of oil or rustproofing. When my repairs are done, I will be using a flexible wand and blast close to 1/2 a liter or more of stuff in there. I plan to use a thin product so that it will soak through any additional debris and stuff that accumulates in there.
Here is the hole to access the inner cavity.
Picture lost · i.imgur.com
Another look inside
Picture lost · i.imgur.com
DesircustomsOttawa, Ontario, Canada · Sep 3, 2020#14 Originally Posted by
06YarisRS ↑ Preparing to weld
Didn't get to go out to the car until almost dark tonight, so only had time to do a little poking around and plan my welding. I did discover more about the internal structure of the rear subframe/unibody area.
The oblong plug just in front of the rear wheel on each size does provide access to the cavity that forms part of the rear axle support structure. Spraying oil into the oblong plug holes will not actually get oil/rustproofing into the larger inboard cavity. But...there are holes a few inches up into which a short wand could be placed. Possibly even the straw on a spray can of rustproofing could reach. A flexible wand would definitely work better. No matter how you access the inner cavity, I would load it with a very large amount of oil or rustproofing. When my repairs are done, I will be using a flexible wand and blast close to 1/2 a liter or more of stuff in there. I plan to use a thin product so that it will soak through any additional debris and stuff that accumulates in there.
Here is the hole to access the inner cavity.
Picture lost · i.imgur.com
Another look inside
Picture lost · i.imgur.com
Great job and great find!
Was telling my friends I feel like scrapping my Yaris because of the holes on the subframe, and they were laughing at me. I have to admit that I'd be spending as much or more time swapping the turbo setup into another Yaris than patching these holes...
I'll be following this closely as I plan on doing this before the winter.
Originally Posted by
Desircustoms ↑ Great job and great find!
Was telling my friends I feel like scrapping my Yaris because of the holes on the subframe, and they were laughing at me. I have to admit that I'd be spending as much or more time swapping the turbo setup into another Yaris than patching these holes...
I'll be following this closely as I plan on doing this before the winter.
Yeah, it's a shame this happens. It's going to involve quite a bit of cutting and shaping metal to properly rebuild the area. I was toying with the idea of welding in some reinforcement patches and then using a heavy fiberglass mat and epoxy resin to just fill the thin metal hole. But, that will be a last resort if I can't mold up nice metal pieces to 'rebuild' it close to the same shape as original. I wouldn't worry about the fiberglass as it's both thick and won't let go if the surfaces are well prepped. Also, the cavity will be filled with oil, so should stay in good shape. Hope to start digging deep into this on the weekend.
Originally Posted by Konstantin88 ↑
Good to know, thank you for the new information! It would be nice if you could take a picture of the access hole as seen from the inside of the corroded cavity. I am thinking of feeding a thin vinyl tube into the access hole until it reaches the bottom of the cavity and spraying the rust inhibitor through the tube.
On the other hand, it might be unnecessary to use the tube if the rust inhibitor readily spreads over metal surfaces by itself (similarly to, say, kerosene or WD-40).
I will try to grab you a pic from the inside later today or tomorrow. Pretty wet out there today. I like the flexible tube as it would cover all areas, but, yes, if you dumped tons of stuff in there, it should fill up a bit and soak everything. I guess you just never know how much debris/dirt is in there, so you want enough oil to thoroughly soak through that to the metal.
Originally Posted by
06YarisRS ↑ Yeah, it's a shame this happens. It's going to involve quite a bit of cutting and shaping metal to properly rebuild the area. I was toying with the idea of welding in some reinforcement patches and then using a heavy fiberglass mat and epoxy resin to just fill the thin metal hole. But, that will be a last resort if I can't mold up nice metal pieces to 'rebuild' it close to the same shape as original. I wouldn't worry about the fiberglass as it's both thick and won't let go if the surfaces are well prepped. Also, the cavity will be filled with oil, so should stay in good shape. Hope to start digging deep into this on the weekend.
Last time I looked at it, I got discouraged because it's so close to the fuel tank on the driver side...
Your thread is motivating!
I had the same idea, if I can't fully patch the holes, I'll weld some braces at least.
Originally Posted by
Desircustoms ↑ Last time I looked at it, I got discouraged because it's so close to the fuel tank on the driver side...
Your thread is motivating!
I had the same idea, if I can't fully patch the holes, I'll weld some braces at least.
Yes, I think some metal strips bridging the hole would provide a good foundation for fiberglass. I would use the mat material as it's very strong - almost like steel when the resin cures. The added advantages, of course, is that it doesn't rust, it's very easy to conform to any shape and primer and bedliner sticks to it like crazy. I might drill some holes in the metal strips to poke the fiberglass into. Then, maybe apply a second layer of fiberglass. Everything will ultimately be drenched in oil, so no further corrosion should occur. I did a quick bit of research as I was concerned that the oil rustproofing might destroy the bond between the fiberglass and metal. Apparently both the polyester and epoxy resins are tolerant of many fossil fuel based products. Now I just have to find some epoxy resin. Shouldn't be too hard as I live in a fishing community. LOL.
First Welding Attempt
It turned out ok, I guess. The metal will not come off. I tugged on it as hard as I could. I am no welder, though things were complicated by a number of factors including poor lighting, poor grounding for the welder and about 1/2 way through it started to rain. I had to rush my welder back into the garage. However, the repair is very solid. I will see how it turns out with the other pieces. If I can't get it sealed with weld, I'll cover the whole repair with epoxy resin soaked fiberglass mat. If I use the fiberglass, it will be sanded and boxliner coating applied. Again, noce the repair is done, I'm dumping in a 1/2 L of thin rust proofing, probably followed by some thicker stuff. This will work its way down and saturate everything, including my weld points under the fiberglass. Hope to have this side (driver's side) done (the welding part) tomorrow evening. I found a source for epoxy resin at a local boat repair place.
Template and shaped metal:
Picture lost · i.imgur.com
Piece held in place by body brace bolt:
Picture lost · i.imgur.com
Welded (sort of, lol) in place:
Picture lost · i.imgur.com
A little paint as temporary rust protection:
Picture lost · i.imgur.com
Hole drilled through metal piece for body brace bolt:
Picture lost · i.imgur.com
DesircustomsOttawa, Ontario, Canada · Sep 3, 2020#20 Originally Posted by
06YarisRS ↑ First Welding Attempt
It turned out ok, I guess. The metal will not come off. I tugged on it as hard as I could. I am no welder, though things were complicated by a number of factors including poor lighting, poor grounding for the welder and about 1/2 way through it started to rain. I had to rush my welder back into the garage. However, the repair is very solid. I will see how it turns out with the other pieces. If I can't get it sealed with weld, I'll cover the whole repair with epoxy resin soaked fiberglass mat. If I use the fiberglass, it will be sanded and boxliner coating applied. Again, noce the repair is done, I'm dumping in a 1/2 L of thin rust proofing, probably followed by some thicker stuff. This will work its way down and saturate everything, including my weld points under the fiberglass. Hope to have this side (driver's side) done (the welding part) tomorrow evening. I found a source for epoxy resin at a local boat repair place.
Template and shaped metal:
Picture lost · i.imgur.com
Piece held in place by body brace bolt:
Picture lost · i.imgur.com
Welded (sort of, lol) in place:
Picture lost · i.imgur.com
A little paint as temporary rust protection:
Picture lost · i.imgur.com
Hole drilled through metal piece for body brace bolt:
Picture lost · i.imgur.com
Nice work! With enough patience, I'm sure you can seal it with metal only.
I'm hoping to be able to seal only with metal and then add a thin coat of epoxy primer, undercoating paint, then rust proof the whole car.
More welding
A tiny bit of progress. Didn't have long to spend tonight. The metal that I'm welding to is very thin so I got a little burn through. I managed to fill the holes though. These welded plates are very strongly attached. I literally try to pull them off and if the come off, they get ground back down to fresh metal and rewelded. I did have to do this once with my third piece.
Tonight's welds, although strong, are marginally better than last night's welds. It is very difficult to do this under the car and getting everything ground to bare metal can be challenging, especially lying on my back with my face close to the chassis.
Picture lost · i.imgur.com
I put two pieces on tonight. The lower piece is pretty heavy gauge steel and I welded it to the rear axle support mount. Unnecessary for strength, but every bit helps.
Picture lost · i.imgur.com
It's doubtful that I will be able to make this area water tight with welding alone, so I do plan to do the epoxy impregnated fiberglass, or, if there a just pin holes to fill, I may use 2 part epoxy (like JB Weld) to fill the holes. As mentioned numerous times, I'll cover completely degrease, sand and cover the entire repair with bed liner, then a heavy film of gel rustproofing as well as filling the interior cavity with old ATF.
I have great respect for welders. This is not easy under ideal conditions. I did bump the power up on my welder a bit and slowed down the wire feed and it did give me a little more control. Hopefully by the time I'm done this side and practice a bit more, the other side will turn out better. At least, it's a much smaller hole!
As a bonus tonight, I discovered there is another small access hole into the cavity from the back. This way rustproofing can be sprayed in at opposite angles, allowing better coverage. I'll post up a pic of that hole later.
06YarisRSThread starterFredericton, New Brunswick, Canada · Sep 5, 2020#22Another piece added...two small patches left to go...
My welding seems to have improved over night. 😆
I think turning down the wire speed, upping the amperage and ensuring a good ground has really helped. I'm almost thinking that I can grind down all the welds, maybe smear some JB Weld on the seams, sand and apply bed liner. I'm surprised I got a shape that actually might look OE when finished.
I have the paper template cut for next piece. Once cut to shape, it will need to be ground and bent for a perfect fit to the non-uniform existing body metal.
This repair, so far is rock solid. I bet I could almost jack the car from this point!
Picture lost · i.imgur.com
Another piece added...one left!
Picture lost · i.imgur.com
Picture lost · i.imgur.com
Applied a thick layer of JB Weld. Tomorrow, I'll sand the repair and some of the surrounding area, prime and apply bedliner.
Picture lost · i.imgur.com
zoidberg444Birmingham, UK · Sep 5, 2020#23Damn dude - Haven't been on the forum much the last few months so I didn't see this.
The rust is going to get a lot of these vehicles and I think the area where the rear axle beam mounts is going to be the main culprit. Last November I was getting a clunking from my rear suspension and when I crawled under there I was rather alarmed by how rusty it all was so I dropped the rear axle beam and did a lot of grinding and sandblasting and then painted this nightmarish epoxymastic called "Jotun 87" over a lot of the metal. Initially I was just going to replace the shocks.
I'm going to put some cavity wax in all the cavities when I do my service in a few weeks.
In the UK if you know the registration of a vehicle you can actually look up its MOT history and see what faults have been flagged up by the tester every year. I have noticed many of the Yaris's in the scrapyard or some of the ones you see on the road were flagged up for corrosion within 30CM of a critical suspension mounting in the rear. I think this is what is going to kill most of these cars.
I'm very impressed with your repairs.
Welding near the tank is a bit risky but there isn't much choice.
I don't know if you saw my thread - the pictures towards the end show some of the corrosion on the car:
Adventures Of Betty Originally Posted by
zoidberg444 ↑ Damn dude - Haven't been on the forum much the last few months so I didn't see this.
The rust is going to get a lot of these vehicles and I think the area where the rear axle beam mounts is going to be the main culprit. Last November I was getting a clunking from my rear suspension and when I crawled under there I was rather alarmed by how rusty it all was so I dropped the rear axle beam and did a lot of grinding and sandblasting and then painted this nightmarish epoxymastic called "Jotun 87" over a lot of the metal. Initially I was just going to replace the shocks.
I'm going to put some cavity wax in all the cavities when I do my service in a few weeks.
In the UK if you know the registration of a vehicle you can actually look up its MOT history and see what faults have been flagged up by the tester every year. I have noticed many of the Yaris's in the scrapyard or some of the ones you see on the road were flagged up for corrosion within 30CM of a critical suspension mounting in the rear. I think this is what is going to kill most of these cars.
I'm very impressed with your repairs.
Welding near the tank is a bit risky but there isn't much choice.
I don't know if you saw my thread - the pictures towards the end show some of the corrosion on the car:
Adventures Of Betty
Yes! I had read your post but just read it again. Great info there and excellent documentation! I too have to replace an axle boot. I picked up a used axle from a 120000 km ish Yaris while we were away in vacation. I'd rather not pull the axle out of the diff, so will try to disassemble the outboard end and replace.
I totally agree that this rear rust will be the demise of many Yari. That said, in many cases, the structural integrity is not threatened. Toyota just seems to skin over with very light gauge metal, but the supporting structure for the axle bushing is thick metal. The 'thin skin' obviously can be replaced. I intend to watch for Yari that fail, buy them up cheap, fix them and try to put them back on the road.
Waxing the cavities is a necessary evil for these cars I believe. I discovered how to access this inner cavity via the outboard oblong plug. There is a large hole inside that that leads right into the cavity. There is also a square hole toward the back of the cavity and maybe a foot up.
And, yeah, I was a little nervous welding and grinding by the tank. When I do the other side, I think I'll drop a sheet of metal between the tank and what I'm welding/grinding. Being a total welding newb, I left my cell phone too close and the case and screen tool a bit of slag. The screen didn't break but it looks like it may have burned through the tempered screen protector. Duh!
Driver's side done and on to passenger side...
I applied 3 coats of bed liner after sanding, degreasing, adhesion promoter and priming. When the bedliner cures, I'll saturate the whole area in thick, wax-based undercoating.
Picture lost · i.imgur.com
And, on to the next side... The hole is smaller, but it extends upwards at the back a bit farther. I
Picture lost · i.imgur.com
Still deciding if I'll drop the rear axle and replace the bushings.
Here's a pic of the rest of the underbody. It was well undercoated and in great shape. It's really too bad that the rustproofing companies actually did study the internal structures of cars as all of this could have been avoided. Rust Check company claims that they have schematics of all cars, and they may, but I think it's bully pucky that they actually look at them. This was all avoidable, simply by removing one rubber plug and spraying some stuff in there.
Picture lost · i.imgur.com
06YarisRSThread starterFredericton, New Brunswick, Canada · Sep 6, 2020#26Cleaning up wheel wells
A previous owner of this car sprayed the wheel wells with rubberized compound. I hate this stuff unless an amazing prep job has been done. I scraped away the sprayed on crap to reveal rust underneath. It's just very superficial rust which did no damage. Here I have ground off all the rubberized undercoating, wire wheeled it, degreased and applied phosphoric acid gel (rust converter). I will leave alone any areas that still have the factory undercoating. The whole thing will get a thick coating of gel undercoating.
Picture lost · i.imgur.com
I found another access hole for the large cavity. The upper bolt hole (unused mystery hole) for the axle leads right into the cavity and up high for good pumping of fluid. I will use my 12V extractor pump to inject the rustproofing liquid. Then at the school shop, I'll blast in some thicker goo.
Picture lost · i.imgur.com
Pumping in the ATF. I ran close to a gallon of used ATF through the rockers, cavities and other unibody rails. To make sure I got everything soaked, I cycled the fluid through, collecting it in another bucket.
Picture lost · i.imgur.com
Then I blasted everything underneath with ATF. Once this stuff wicks in everywhere, I'll coat it with a more durable wax-based product.
Picture lost · i.imgur.com
DesircustomsOttawa, Ontario, Canada · Sep 7, 2020#27 Originally Posted by
06YarisRS ↑ Driver's side done and on to passenger side...
I applied 3 coats of bed liner after sanding, degreasing, adhesion promoter and priming. When the bedliner cures, I'll saturate the whole area in thick, wax-based undercoating.
Picture lost · i.imgur.com
And, on to the next side... The hole is smaller, but it extends upwards at the back a bit farther. I
Picture lost · i.imgur.com
Still deciding if I'll drop the rear axle and replace the bushings.
Here's a pic of the rest of the underbody. It was well undercoated and in great shape. It's really too bed the rustproofing companies actually did study the internal structures of cars as all of this could have been avoided. Rust Check company claims that they have schematics of all cars, and they may, but I think it's bully pucky that they actually look at them. This was all avoidable, simply by removing one rubber plug and spraying some stuff in there.
Picture lost · i.imgur.com
Amazing! Welding in this position, especially laying on the ground, is not an easy task. I hate having sparks flying overhead, wear a hoodie and ear protection so the sparks don't fly inside your helmet and burn your ears/eyes. Never got burned but I've seen sparks/spatter fly inside my helmet, and I've heard stories...
Originally Posted by
Desircustoms ↑ Amazing! Welding in this position, especially laying on the ground, is not an easy task. I hate having sparks flying overhead, wear a hoodie and ear protection so the sparks don't fly inside your helmet and burn your ears/eyes. Never got burned but I've seen sparks/spatter fly inside my helmet, and I've heard stories...
Thanks man!
Yeah, not ideal conditions, for sure. I have a few small burns. About two small pin burns on my arm. It burned through both my coveralls and shirt. Also got a burn on the tip of my thumb. Some slag landed right in the top of the thumb of my leather welding glove and burned through. When doing my brakes and trying to get that god awful spring on, my hand slipped and I took a chunk off the tip of my thumb. You can see the two little burn spots. I can tell you that I got the glove off in a hurry. LOL
Picture lost · i.imgur.com I'm going to invest in better and longer gloves and likely a hoodie. We have nice heavy leather welding jackets at the school, but they are so bulky, I bet I couldn't even get under the car with one on.
As an update, I think I am going to drop the rear axle and replace the bushings. They're still solid, though cracked on the outer part, so I may drive it a bit and see. I actually have two new bushings already. Not looking forward to this job as I don't have a bushing press. I also want the bushing bolt to soak in rustproofing for a while as I expect it's going to be a bear to get out. I did soak it repeatedly in Releasall. Thinking about it now, I probably should have put a big wrench on the captive nut when it was all open. Oh well.
Thank you for sharing 06... I screen captured that photo of access hole above bolt, precious info THX
06YarisRSThread starterFredericton, New Brunswick, Canada · Sep 7, 2020#30 Originally Posted by
3rdSEman ↑ Thank you for sharing 06... I screen captured that photo of access hole above bolt, precious info THX
Mon plaisir!
I wonder if rust converter would be useful to you? Are used it to save the power steering lines on my 2002. Eco. And also extensively on a 99 Miata I bought that I didn’t realize it was a flood case.
06YarisRSThread starterFredericton, New Brunswick, Canada · Sep 7, 2020#32 Originally Posted by
bronsin ↑ I wonder if rust converter would be useful to you? Are used it to save the power steering lines on my 2002. Eco. And also extensively on a 99 Miata I bought that I didn’t realize it was a flood case.
Yes, I use rust converter on all metal before I prime and paint it. It's great stuff. I love watching it slowly turn the rust from red to black. I use the Permatex brand.
Passenger side axle mount
I welded most of the hole closed. There was one small opening left but it was in a position that would have been virtually impossible to weld due to space constraints and proximity to the gas tank. I manually sanded about an inch all around the opening down to bare metal. I spread a thin coat of JB Weld around the hole. I then mixed up a batch of JB Weld and saturated a thick piece of fiberglass mat, pasted it on and shaped it. Finally, I coated the whole repair with another layer of JB Weld. This should be a long lasting repair. After the JB Weld cures, it gets a coat of epoxy primer and a couple coats of bedliner. Like the driver's side, I'll pump in lots of ATF.
Picture lost · i.imgur.com
06YarisRSThread starterFredericton, New Brunswick, Canada · Sep 8, 2020#34The plot thickens...
I found more rust damage. Fortunately it's only on one side - the passenger side. Although the inner and outer structures are solid, one of the inner support plates has rusted away from the bottom plate and the bottom pinch weld crumbled away. The damage is about 12" - 14" in length. This will require removing a section of the outer quarter panel skin to gain access to the inside. I will use two pieces of angle iron, one welded to the bottom plate and one to the outer quarter panel skin after I reweld the cut out piece of skin back on. Then, weld the two pieces of angle iron together for from the pinch weld/jack point.
I spent about and hour thoroughly inspecting the car and feel confident that this is the extent of the rust damage. The driver's side is in great shape with no additional corrosion. These cars seem afflicted with corrosion damage just around the rear axle area of the car. Everything else seems to hold up well.
Picture lost · i.imgur.com
Picture lost · i.imgur.com
06YarisRSThread starterFredericton, New Brunswick, Canada · Sep 11, 2020#35New toy...
Always keeping my eyes open for tools to add to my shop. I picked up this metal brake at Princess Auto today. It's surprisingly heavy, robust and should easily handle the 18 gauge metal that I need to bend for my rocker area repair. I entertained - for a brief moment - making my own, but the materials alone would have cost me as much or more. This was $79.00 Canadian.
Picture lost · i.imgur.com
Picture lost · i.imgur.com
Picture lost · i.imgur.com
06YarisRSThread starterFredericton, New Brunswick, Canada · Sep 12, 2020#36Welding started
I discovered something interesting and probably explains why this rotted so badly. I pulled a large piece of foam (like mattress foam) out of the wheel well. This quarter panel had been impacted and repaired. Despite the holes drilled in the door jambs for rustproofing, the oil soaked into the upper part of the foam, none making it down to where it was really needed.
Picture lost · i.imgur.com
Picture lost · i.imgur.com
Picture lost · i.imgur.com
First brace
Picture lost · i.imgur.com
Heavy gauge strip welded underneath. Two more braces will be added toward the outer edge. They will be welded on to the two inner pieces of metal visible. All the factory supports that I'm welding on to are very strong. They just rotted at the very bottom where water pooled.
Picture lost · i.imgur.com
Second brace
Picture lost · i.imgur.com
Rebuilding pinch weld seam. The outer panel skin will form the outer edge of the rocker seam. I will mold in water drains.
Picture lost · i.imgur.com
Temporary primer. After the two additional braces are added, I am going to weld an approximate 3 ft long piece of heavy angle iron behind the rocker pinch weld seam. This will tie into just forward and aft of the repair area. In it's current state, it's already strong enough to support a jack under it. With the two addirional braces, the angle iron behind the pinch seam and the outer panel skin, I could probably lift the entire car from this point.
Picture lost · i.imgur.com
06YarisRSThread starterFredericton, New Brunswick, Canada · Sep 13, 2020#37Rebuilding continues
My welding has improved a lot. I now have 4 heavy gauge braces that connect the rocker pinch weld with the inner substructures. Shortly, I will be able to weld on the outer quarter panel skin that I cut out. I will weld tabs on the inside edges of the rectangular hole I cut out, then fill the gaps from the cut lines. Will add pics to this post as I make progress.
Picture lost · i.imgur.com
All welds will be ground down, primed and sprayed with bedliner.
Picture lost · i.imgur.com
Picture lost · i.imgur.com
scarsofcarmaTuscaloosa, AL · Sep 13, 2020#38This is an impressive level of rust repair. I commend you on your efforts. 👍
I'm not sure I would have gone ahead and bought the car knowing that. But on the positive side it was a great deal to be had if you could fix it. 😎
I plan to get more experience welding. It's was something I intended to get a degree for in school after I finished up automotive classes.
06YarisRSThread starterFredericton, New Brunswick, Canada · Sep 13, 2020#39 Originally Posted by
scarsofcarma ↑ This is an impressive level of rust repair. I commend you on your efforts. 👍
I'm not sure I would have gone ahead and bought the car knowing that. But on the positive side it was a great deal to be had if you could fix it. 😎
I plan to get more experience welding. It's was something I intended to get a degree for in school after I finished up automotive classes.
Thanks, man! Yeah, although I did a fairly thorough investigation, the extent of the damage wasn't readily apparent. I really had to start busting pieces off to see what was involved. I might just have passed on it too, had I known. Had I been able to demonstrate the extent of the damage, I probably could have had it for considerably less. That said, I have always wanted to do this kind of repair and now I am learning. I like the challenge of figuring out how to go about providing an adequate support structure. Kind of like a low grade engineering. 😆 In one way, it's almost been worth it as now I have a very thorough understanding of the inner construction of this generation of Yaris.
The power train and suspension etc seems in pretty good shape. I don't think I'd make a dime on it if I was going to flip it. I do have to replace the rear axle bushings and that will be a bit of a job for sure. But, when this job is done, most of the major stuff will be complete. Next summer, likely, the car will get a repaint.
I don't regret the purchase, especially since it's an RS trim. I am partial to those and they are pretty rare around here.
Almost ready to re-weld outer quarter panel skin
Final outer support strip. Each end just past the support strip will serve as a water drain. The areas will be ground and filed smooth, treated with phosphoric acid, primed and painted. I did a little mockup of the 'drain caps' that I will fabricate and weld on. This will keep water and crap from entering underneath but allow easy draining from inside. There is another support strip welded behind what you see in this pic. There will be about 3/16" of jacking thickness when this is done. I may even weld another strip behind at the jack point. Overkill, but I have the metal and it only takes a few minutes.
Picture lost · i.imgur.com
Out panel attachment plate. I have two options when re-installing the panel piece that I cut out:
Option 1: Tack weld it to the support piece, then apply seam sealer on the outside.
Option 2: weld a strip to the quarter panel piece and drill holes in it, then apply a bead of seam sealer between it and the support plate and rivet it together. The upper portions of the panel piece will be tack welded, welds ground down and then a thin layer of body filler applied. I think I may go with option 2.
Picture lost · i.imgur.com
Just to check the integrity of the repair, I jacked the car on the repair. It is solid as a rock. The entire inner area will be saturated in Fluid Film or similar before I button it all up. This may be another reason to go with Option 2 above as I'd hate to start a fire in there welding the final quarter panel seam. The beauty of the RS is that the side skirts cover everything, so any painted rivets and seam sealer would be invisible anyway.
Some more bracing:
Picture lost · i.imgur.com
06YarisRSThread starterFredericton, New Brunswick, Canada · Sep 16, 2020#41Buttoning things up
This was a very difficult welding job due to the fairly large gap between the patch and the hole. I basically had to weld a small blob on each side of the crack (cut line) and then join the blobs. The patch is extremely solid. I ground the weld nubs down, degreased the metal thoroughly, then squished in and smoothed off some JB Weld. Unfortunately, I ran out of JB Weld, so will pick some more up tomorrow. The final job will be to attach the patch panel to a piece of angle iron which will be welded to the pinch weld. I think I'll put a bead of seam sealer on the angle iron and rivet the bottom of the patch panel to the angle iron. This part only needs to be securely attached and does not have to offer any structural support. When the JB Weld cures, I'll sand it down and decide whether or not I'll skim the repair with body filler. It may not need it since the car has the RS side skirts.
Picture lost · i.imgur.com
My rustproofing gun arrived today, so I will press that into service once all the repairs are done. I'll start with a liberal application of used ATF, then after it soaks in to all the cracks and crevices, I'll spray in some thicker stuff, probably Fluid Film.
Picture lost · i.imgur.com
ohmsnew york · Sep 18, 2020#42oh my god - i've seen guys let otherwise mint classic cars sit and rot because they needed LESS work done like this - but heres this yaris getting super-re-fortified and ressurected - pretty sure once you get it on the road its gonna come to life like herbie/christine cuz of all the love it got
LeegamerAshland, VA · Sep 18, 2020#43 Originally Posted by
ohms ↑ oh my god - i've seen guys let otherwise mint classic cars sit and rot because they needed LESS work done like this - but heres this yaris getting super-re-fortified and ressurected - pretty sure once you get it on the road its gonna come to life like herbie/christine cuz of all the love it got
Indeed. The time and effort put into this is nothing short of amazing.
It is red, like Christine.
Be sure to give us your impressions of that gun. I know you will. Does not review very well for applying higher viscosity material.
06YarisRSThread starterFredericton, New Brunswick, Canada · Sep 18, 2020#45 Originally Posted by
ohms ↑ oh my god - i've seen guys let otherwise mint classic cars sit and rot because they needed LESS work done like this - but heres this yaris getting super-re-fortified and ressurected - pretty sure once you get it on the road its gonna come to life like herbie/christine cuz of all the love it got
Haha! Yeah, I think I've gone a little overboard. This has been a great learning experience for me and should prove useful in the future in other projects. I guess this little car can't say it isn't loved. Lol.
Originally Posted by
Leegamer ↑ Indeed. The time and effort put into this is nothing short of amazing.
It is red, like Christine.
Thanks, Leegamer!
Originally Posted by
WeeYari ↑ Be sure to give us your impressions of that gun. I know you will. Does not review very well for applying higher viscosity material.
Will do. I too read that it didn't spray FF very well. If it doesn't, I'll either heat the FF or thin it down with - as recommended by Fluid Film - some vegetable oil.
Undercoating/Rustproofing Gun Review
One word review: Crap!
Ok, so I'll blither on a bit about it... My theory is that the hose diameter is too large. The gun gurgles and spits. We have the same kind of gun by a different manufacturer in our school shop and it has much narrower tubing. It sprays beautifully and uniformly. I think what's happening with this one is the air pushes past the oil/product and sort of airlocks. I'm going to downsize the fitting and see if it works, but I'm not optimistic that it will make a big improvement as I still have the tip that's designed for the larger tubing. If you cycle the trigger on and off, you can get a spray of product, but it's not uniform and it has a tendency to splatter. I only tried a mix of motor oil and transmission fluid on my neighbour's truck, so no experience yet with a thicker product. Oh well, I guess that's what I get for cheaping out. Should have spent the extra $30.00 - $40.00 and got the better one.
I'll have some pics of the final rocker repair soon. I'm getting close to priming it. I'll put some rockguard on it, let it cure and then start dumping in the rustproofing. I'll probably do a combination of spraying with the crap gun as well as a few cans of FF I have and maybe also my extractor pump (ATF).
06YarisRSThread starterFredericton, New Brunswick, Canada · Sep 19, 2020#49More grinding and JB Weld skimming
I am getting ready to sand everything, prime it and apply the bed liner.
Picture lost · i.imgur.com
kimonaHuntington Bch, CA · Sep 23, 2020#50What's going on with the RS Restoration saga?
 Yarisworld