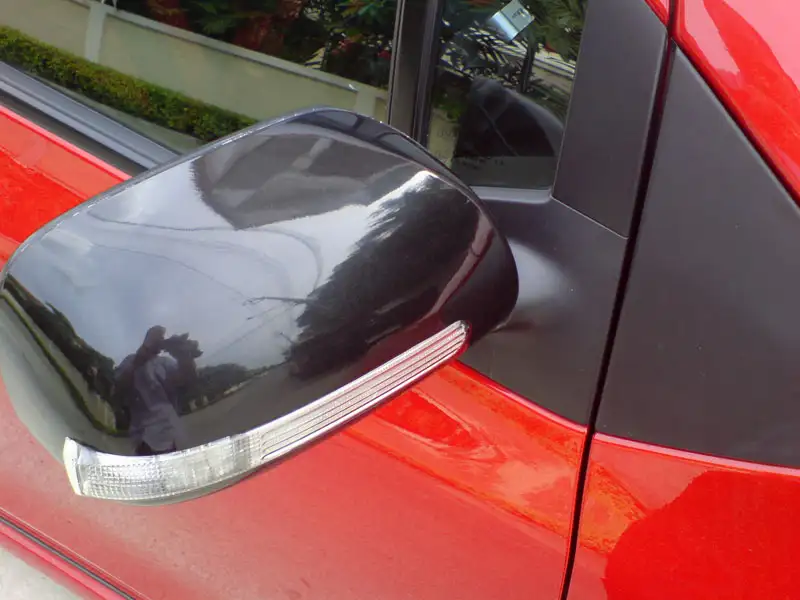
Yarisworld
*WARNING*
This is at the moment just a partial DIY, I have not yet gone around to do the wiring, this will just show you how to remove the original covers, and put in the replacement ones.
Tools Needed
For cover removal and installation, a smallish screwdriver will do, but even just your car key can do the job.
For the wiring, you will need some sort of portable soldering iron, but you could get away with just electrical tape.
Step 1: Remove Mirror Panel
This is quite easy, push the top part of the mirror, and hook your fingers under the bottom ledge. Pull the bottom toward you to undo the clips:
Picture lost · www.etimago.com
After this, rotate the mirror pane as high as possible, and pull it toward you:
Picture lost · www.etimago.com
Step 2: Remove cover
This is a little tricky, as the cover is quite tight. I found it easier to concentrate on the two in the upper corner, using one hand with a screwdriver (or just your car key) to push the tab, and using your other hand to pull the front of the cover outward, so that the tabs do no re-engage. Then work your way around. There is one more tab at the bottom which is not easily accessible, but it comes undone when you pull the cover off.
Picture lost · www.etimago.com
To pull the cover off, just pull it from the top and rotate it downward to disengage the last clip:
Picture lost · www.etimago.com
And there you go, a naked wing mirror! At this point you would take the replacement cover and sort out the wiring.
Step 3: Putting replacement cover on
As you can see, the tabs on the replacement cover are an exact match:
Picture lost · www.etimago.com
So, it's just a matter of aligning the cover, and pushing it until all the clips engage. I actually found some difficulty in doing this, especially with the bottom clip. Remember, take your time, make sure you have everything aligned, and push hard!
Step 4: Put mirror panel back in
Just the opposite of taking it out, you just hook in the top tabs, then press the bottom firmly until you hear the bottom tabs click.
The result
Firstly, keep in mind I chose black covers as an experiment to see how well they go with a different body color, I think it looks good, but I might just smoke the lens on it, it would look even better...
Picture lost · www.etimago.com
Picture lost · www.etimago.com
-------------------------------------------------------------
Part 2 (a year and a half later) - Wiring
So I finally got these wired up! I did it a lil' differently from the other DIYs that Violin and redyaris did, as I hooked up the indicator wires to the main relay/fuse box in the cabin (no need to drag cables into the engine bay)
So for the first wiring part I'll just steal pictures from others 😁
Step 1: Remove the door panels
This is actually a copy of FEINT's DIY (DIY : How to remove door panels)
Starting on the left hand door.
Remove the armrest piece. It just pops upwards.
Picture lost · www.mingriwa.com
This is just another illustration of the same piece that should pop up. On the other end of the door, use a small screwdriver to pop open a cover as shown in the photo.
Picture lost · www.mingriwa.com
This is what it will look like after taking off the piece.
Picture lost · www.mingriwa.com
Proceed to remove the power window switch panel and the other panel illustrated in the photo. These should both pop up as well. No tools required, just use your hands.
Picture lost · www.mingriwa.com
Remove the connector for the power window switch by pressing the tab and pulling.
Picture lost · www.mingriwa.com
This is what it looks like after removal of the above 2 pieces.
Picture lost · www.mingriwa.com
+ screwdriver required. Remove the 4 screws as shown in the photo.
Picture lost · www.mingriwa.com
To remove the door card, I pulled anywhere along the bottom of the door. It will come apart as shown.
Picture lost · www.mingriwa.com
It might require quite a yank to get it to come off. After it has seperated from the door, push the door card UPWARDS, it should come free after that.
Remove the door / lock wires from the latch.
These are where all the little grommets are located in order for you to re-attach them to the door card for installation. ***There is one more behind the hand.***.
Picture lost · www.mingriwa.com
Step 2: Taking apart the mirror base
Thanks to redyaris for these pics
Basically, there are 3 nuts holding the mirror base to the door:
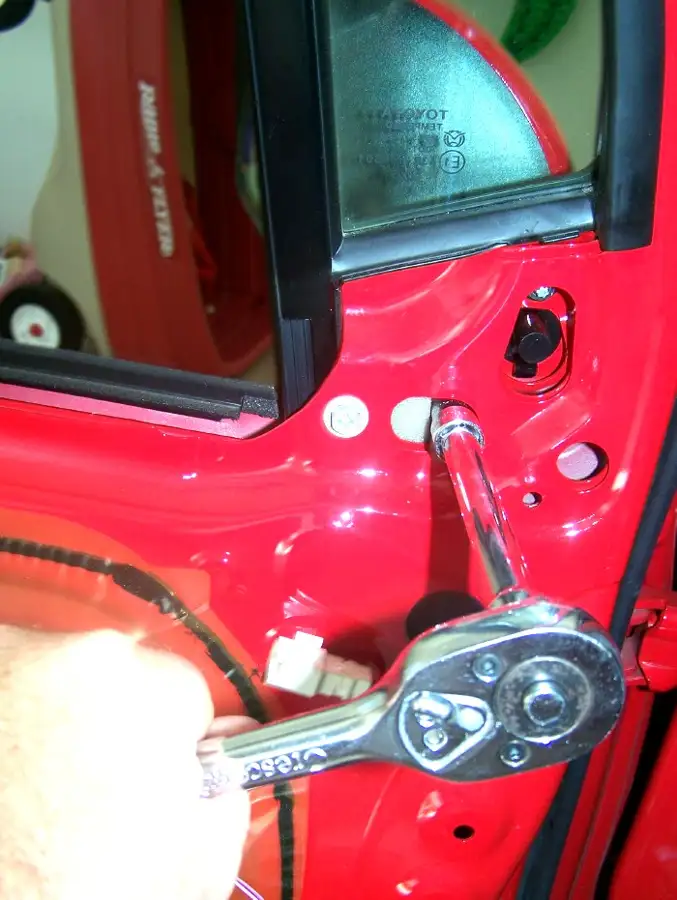
You can get those off with a 10mm socket wrench, but be careful not to drop them into the door!
The result:
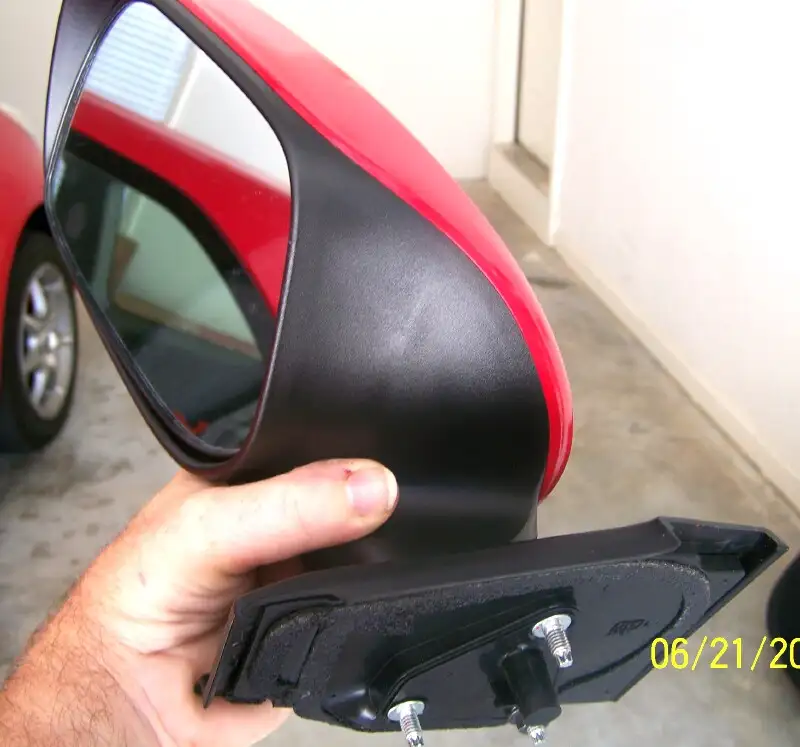
At this point I do not really have pictures, but here's what you need to do:
1) remove the mirror piece from the assembly if you had put it back (the very first step in this DIY)
2) Remove the 3 torx screws on the bottom of the mirror assembly, you need a T20 size driver for this:
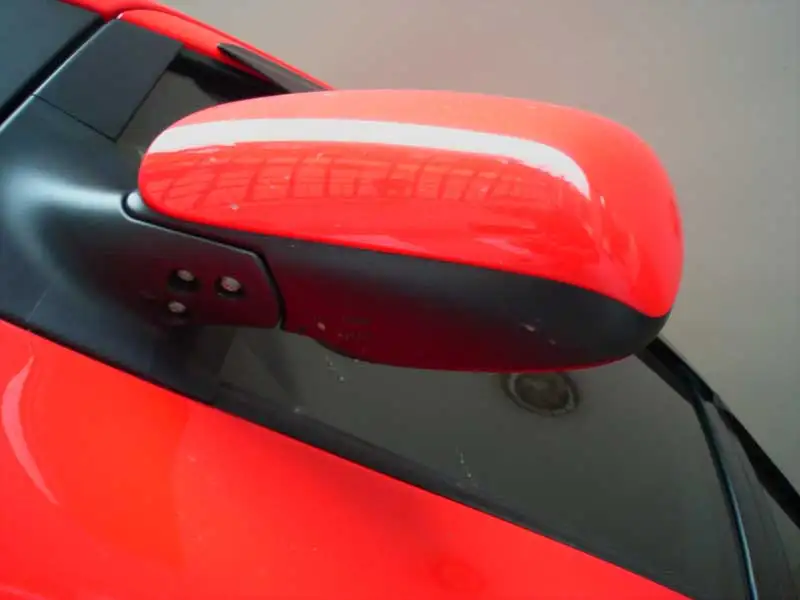
3) Once you have this all apart, it is easier to snake the wires through the narrow passageway between the mirror assembly and the inside of the door.
ALTERNATIVE!
This is from Violin's DIY, but I could not get this to work (I think my power mirror wires are shorter:
If you have power mirrors, use the existing wire to help you fish the new wires through. Pull the wire back toward the mirror all the way so the power mirror connector bumps tight:
Picture lost · img.photobucket.com
Tape your LED wires to this wire:
Picture lost · img.photobucket.com
Pull everything through:
Picture lost · img.photobucket.com
Unwrap the tape and you're in business:
Picture lost · img.photobucket.com
Step 3: Power source
Now we must run these cables to the inside of the car. If you look at your door jamb there is a corrugated rubber tube already there, housing your speaker cables and power lock/window/mirror wires if your car has those. So once again thanks to Violin for the DIY/pics:
I took my speakers out and ran the wires down through the door
Picture lost · img.photobucket.com
and fed it through the boot into the cabin
Picture lost · img.photobucket.com
Now this is the main difference with the other DIYs, I wired the mirror signals to the relay/fuse box in the cabin. US guys, you will find this box by removing the small rectangular panel below and to the left of your steering column (thanks LtNoogie for the pic):
Picture lost · i426.photobucket.com
People with the steering wheel on the right, just remove your lower passenger glovebox and you have much easier access 😁
Here are the wires we need to tap:
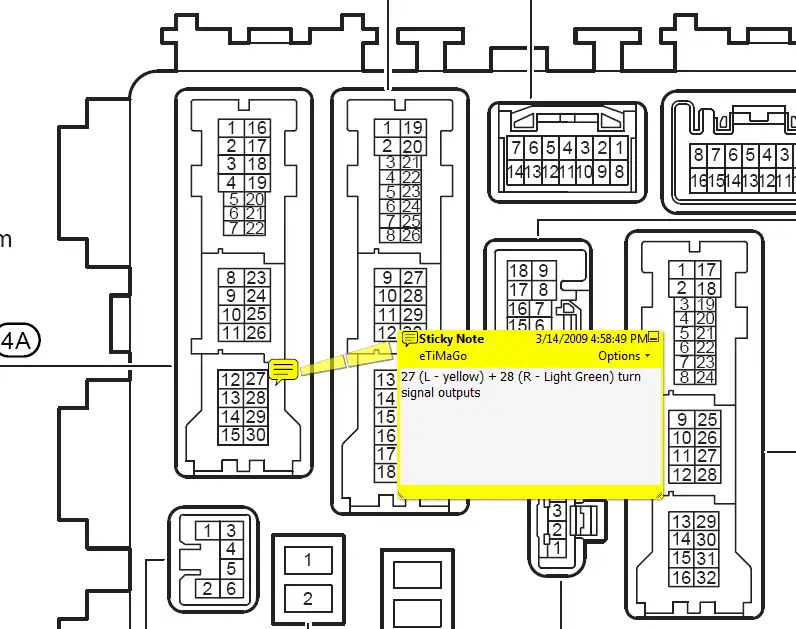
In my own car these already had some extra wires tapped to them, not quite sure what they are for 😆 :
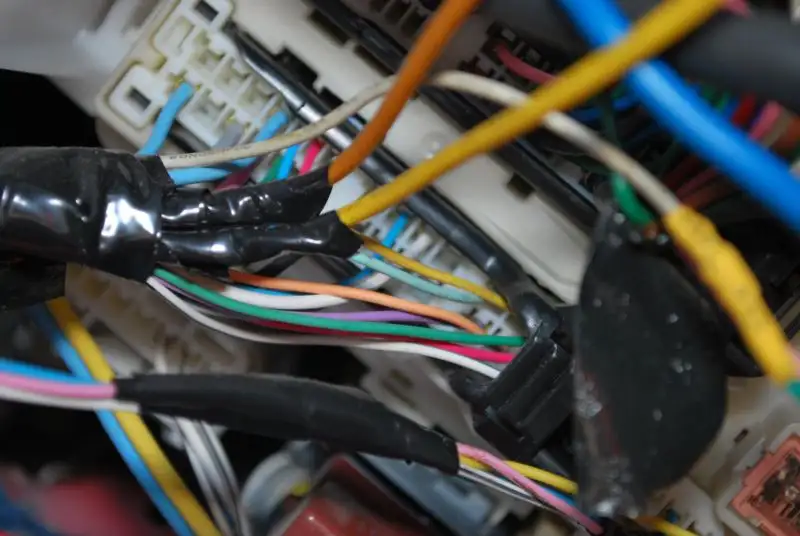
So, thankfully these mirror covers come with long wires, as for the other door you need to run the cables under your dash. One clean way to do this is to remove the dash and lay out the cable nicely, but I just passed it through whatever holes I could find on the way across and taped it in place so it does not get stuck in my feet when I drive 😆
Anyway the next step is thus to splice/crimp the wires. The older version of these mirror covers came with two sets of lights. One orange for the turn signals (red wire), and one white to be linked to the parking lamps (gray wire). I did not hook up the gray wires, but there'll also be a similar cable in that relay box that you can tap into. Once I figure out which one, I will add it here. And, I believe the newer versions of these covers don't even have those white lights, just all orange turn signals, and thus two wires only.
So, just crimp the red wires from the covers onto the appropriate wire on the plug in the relay box. Mine are attached to those extra wires I already had, easier to reach!
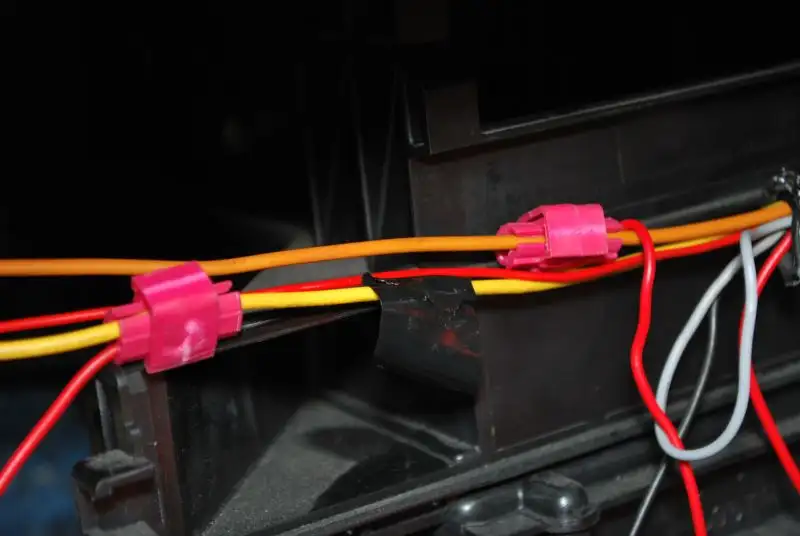
Then attach the black wires to a grounding point (not shown, just look for a big bolt attached to the car frame with a wire attached to it. Loosen it, wrap the stripped ends of your black wires around the stem, and tighten). Or, you can use another cable crimp to attach the wires to the ground wire there.
Best thing to do now is to test everything works, before you close it all up.. and you're done!
This is at the moment just a partial DIY, I have not yet gone around to do the wiring, this will just show you how to remove the original covers, and put in the replacement ones.
Tools Needed
For cover removal and installation, a smallish screwdriver will do, but even just your car key can do the job.
For the wiring, you will need some sort of portable soldering iron, but you could get away with just electrical tape.
Step 1: Remove Mirror Panel
This is quite easy, push the top part of the mirror, and hook your fingers under the bottom ledge. Pull the bottom toward you to undo the clips:
Picture lost · www.etimago.com
After this, rotate the mirror pane as high as possible, and pull it toward you:
Picture lost · www.etimago.com
Step 2: Remove cover
This is a little tricky, as the cover is quite tight. I found it easier to concentrate on the two in the upper corner, using one hand with a screwdriver (or just your car key) to push the tab, and using your other hand to pull the front of the cover outward, so that the tabs do no re-engage. Then work your way around. There is one more tab at the bottom which is not easily accessible, but it comes undone when you pull the cover off.
Picture lost · www.etimago.com
To pull the cover off, just pull it from the top and rotate it downward to disengage the last clip:
Picture lost · www.etimago.com
And there you go, a naked wing mirror! At this point you would take the replacement cover and sort out the wiring.
Step 3: Putting replacement cover on
As you can see, the tabs on the replacement cover are an exact match:
Picture lost · www.etimago.com
So, it's just a matter of aligning the cover, and pushing it until all the clips engage. I actually found some difficulty in doing this, especially with the bottom clip. Remember, take your time, make sure you have everything aligned, and push hard!
Step 4: Put mirror panel back in
Just the opposite of taking it out, you just hook in the top tabs, then press the bottom firmly until you hear the bottom tabs click.
The result
Firstly, keep in mind I chose black covers as an experiment to see how well they go with a different body color, I think it looks good, but I might just smoke the lens on it, it would look even better...
Picture lost · www.etimago.com
Picture lost · www.etimago.com
-------------------------------------------------------------
Part 2 (a year and a half later) - Wiring
So I finally got these wired up! I did it a lil' differently from the other DIYs that Violin and redyaris did, as I hooked up the indicator wires to the main relay/fuse box in the cabin (no need to drag cables into the engine bay)
So for the first wiring part I'll just steal pictures from others 😁
Step 1: Remove the door panels
This is actually a copy of FEINT's DIY (DIY : How to remove door panels)
Starting on the left hand door.
Remove the armrest piece. It just pops upwards.
Picture lost · www.mingriwa.com
This is just another illustration of the same piece that should pop up. On the other end of the door, use a small screwdriver to pop open a cover as shown in the photo.
Picture lost · www.mingriwa.com
This is what it will look like after taking off the piece.
Picture lost · www.mingriwa.com
Proceed to remove the power window switch panel and the other panel illustrated in the photo. These should both pop up as well. No tools required, just use your hands.
Picture lost · www.mingriwa.com
Remove the connector for the power window switch by pressing the tab and pulling.
Picture lost · www.mingriwa.com
This is what it looks like after removal of the above 2 pieces.
Picture lost · www.mingriwa.com
+ screwdriver required. Remove the 4 screws as shown in the photo.
Picture lost · www.mingriwa.com
To remove the door card, I pulled anywhere along the bottom of the door. It will come apart as shown.
Picture lost · www.mingriwa.com
It might require quite a yank to get it to come off. After it has seperated from the door, push the door card UPWARDS, it should come free after that.
Remove the door / lock wires from the latch.
These are where all the little grommets are located in order for you to re-attach them to the door card for installation. ***There is one more behind the hand.***.
Picture lost · www.mingriwa.com
Step 2: Taking apart the mirror base
Thanks to redyaris for these pics
Basically, there are 3 nuts holding the mirror base to the door:
You can get those off with a 10mm socket wrench, but be careful not to drop them into the door!
The result:
At this point I do not really have pictures, but here's what you need to do:
1) remove the mirror piece from the assembly if you had put it back (the very first step in this DIY)
2) Remove the 3 torx screws on the bottom of the mirror assembly, you need a T20 size driver for this:
3) Once you have this all apart, it is easier to snake the wires through the narrow passageway between the mirror assembly and the inside of the door.
ALTERNATIVE!
This is from Violin's DIY, but I could not get this to work (I think my power mirror wires are shorter:
If you have power mirrors, use the existing wire to help you fish the new wires through. Pull the wire back toward the mirror all the way so the power mirror connector bumps tight:
Picture lost · img.photobucket.com
Tape your LED wires to this wire:
Picture lost · img.photobucket.com
Pull everything through:
Picture lost · img.photobucket.com
Unwrap the tape and you're in business:
Picture lost · img.photobucket.com
Step 3: Power source
Now we must run these cables to the inside of the car. If you look at your door jamb there is a corrugated rubber tube already there, housing your speaker cables and power lock/window/mirror wires if your car has those. So once again thanks to Violin for the DIY/pics:
I took my speakers out and ran the wires down through the door
Picture lost · img.photobucket.com
and fed it through the boot into the cabin
Picture lost · img.photobucket.com
Now this is the main difference with the other DIYs, I wired the mirror signals to the relay/fuse box in the cabin. US guys, you will find this box by removing the small rectangular panel below and to the left of your steering column (thanks LtNoogie for the pic):
Picture lost · i426.photobucket.com
People with the steering wheel on the right, just remove your lower passenger glovebox and you have much easier access 😁
Here are the wires we need to tap:
In my own car these already had some extra wires tapped to them, not quite sure what they are for 😆 :
So, thankfully these mirror covers come with long wires, as for the other door you need to run the cables under your dash. One clean way to do this is to remove the dash and lay out the cable nicely, but I just passed it through whatever holes I could find on the way across and taped it in place so it does not get stuck in my feet when I drive 😆
Anyway the next step is thus to splice/crimp the wires. The older version of these mirror covers came with two sets of lights. One orange for the turn signals (red wire), and one white to be linked to the parking lamps (gray wire). I did not hook up the gray wires, but there'll also be a similar cable in that relay box that you can tap into. Once I figure out which one, I will add it here. And, I believe the newer versions of these covers don't even have those white lights, just all orange turn signals, and thus two wires only.
So, just crimp the red wires from the covers onto the appropriate wire on the plug in the relay box. Mine are attached to those extra wires I already had, easier to reach!
Then attach the black wires to a grounding point (not shown, just look for a big bolt attached to the car frame with a wire attached to it. Loosen it, wrap the stripped ends of your black wires around the stem, and tighten). Or, you can use another cable crimp to attach the wires to the ground wire there.
Best thing to do now is to test everything works, before you close it all up.. and you're done!