superfly78209Original postArkansas · Nov 26, 2011#1Ok so I have done everything with this cruise install except for the part that involves the brake switch. Here's the URL:
http://www.rostra.com/manuals/250-1873_Form5258B.pdf I'm finding the brake switch part difficult. Do I take apart the switch and try to solder the wires and then put it back together? Do I cut off the insulation and the blue and black wires and then try to solder directly on to those - soldering is difficult enough without having an end of a wire to solder onto but rather a mid piece and not a lot of room? I am not seeing the best way to go about this whole thing and I dont want to do something stupid and mess up my braking system. Thanks in advance.
Replies 18
CTScottUSA, CT · Nov 26, 2011#2Wow, installing the Rostra kit is a whole lot of more work than installing the OEM cruise control.
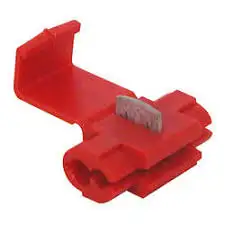
For your brake switch connections, you are basically tapping into the two wires, which feed the brake lights. For those connections in that tight space by the firewall, I would use tap splice connectors, rather than trying to solder under there. The pic below is an example of a tap splice (available at any auto parts or hardware store). You slip the tap splice over the wire, slide your wire to tap to it into the second groove, and squeeze the metal blade with a pair of pliers. The tap splice blade cuts through the two wires' insulation to make the connection.
Great Idea. I'll go buy two right now. Also, there are some wires left over from the first bank of the cruise box. I guess they don't go anywhere.
superfly78209Thread starterArkansas · Nov 26, 2011#4Also, there are two green wires on the brake switch going to the same pin on the connector. I'm assuming they both carry the same signal so I'll just try to tap one of them
CTScottUSA, CT · Nov 26, 2011#5 Originally Posted by
superfly78209 ↑ Also, there are two green wires on the brake switch going to the same pin on the connector. I'm assuming they both carry the same signal so I'll just try to tap one of them
Correct
Have another question. There's a black lever that must be released in order to insert wires into the small wire box thing. I released it but every time I insert a wire and close the lever, the wire still manages to come out. Maybe the lever comes all the way out? Or the wire isn't thick enough? what do you think?
CTScottUSA, CT · Nov 26, 2011#7 Originally Posted by
superfly78209 ↑ Have another question. There's a black lever that must be released in order to insert wires into the small wire box thing. I released it but every time I insert a wire and close the lever, the wire still manages to come out. Maybe the lever comes all the way out? Or the wire isn't thick enough? what do you think?
Make sure you are sticking the wire on the correct side of the piece of spring metal that the lever presses on. Depending on the type of spring terminal, some you stick the wire on the lever side, others on the opposite side.
Rostra sucks A$$. You know they didn't even include the spring connector. Luckily my dealership gave me some for free. All I had was bare wire to stick in the connector. I should be done here in an hour and have to solder on the connectors to the bare wire. Lets hope this damn thing actually works.
thepartsmancomethmidwest · Nov 26, 2011#9Mine came with everything needed, but that was a few years ago. our rostra unit has been flawless since 2008. (installed prior to seeing this site)
superfly78209Thread starterArkansas · Nov 26, 2011#10Ok so after visiting the dealership twice and getting free parts (pins) and some free help.. everything is hooked up. But, my unit does not have power for some reason. I have double checked all connections and everything is fine. I guess I will be calling them on Monday.
CTScottUSA, CT · Nov 26, 2011#11 Originally Posted by
superfly78209 ↑ Ok so after visiting the dealership twice and getting free parts (pins) and some free help.. everything is hooked up. But, my unit does not have power for some reason. I have double checked all connections and everything is fine. I guess I will be calling them on Monday.
Out of curiosity, what made you go for the Rostra aftermarket system instead of using the OEM cruise control?
Well I have an 07. There are a lot of parts I would have to buy (not able to just buy the cruise stick like the 08s) and I would also have to remove the air bag and etc. I figured it would have been easier to go with the Rostra. I've heard good things but the new "universal" kit they have put out for the 06-current Yaris cars doesn't seem to be too great.
mr_milesPortland, OR · Nov 27, 2011#13i didn't know for an 08 all you needed was the OEM cuise stalk....I should swap to it. My Rostra works, but occasionally it slows down instead of accelerating.
CTScottUSA, CT · Nov 27, 2011#14 Originally Posted by
superfly78209 ↑ Well I have an 07. There are a lot of parts I would have to buy (not able to just buy the cruise stick like the 08s) and I would also have to remove the air bag and etc. I figured it would have been easier to go with the Rostra. I've heard good things but the new "universal" kit they have put out for the 06-current Yaris cars doesn't seem to be too great.
For an 07 you would need:
Cruise Stalk with wire and mounting screws
ECM connector Pin
Two steering wheel connector D3 pins
Optional - My Cruise Control Indicator Module (which provides a visual indicator that cruise is on for pre-09 Yaris, which don't have the indicator in the cluster).
From the dealer the stalk, wire, mounting screws and pins would run about $150. I sell the stalk with wiring and screws for $40, The ECM pin for $5, The pair of connector D3 pins for $5, and my indicator module for $25. So, for an 06-08 Yaris, OEM cruise can be as little as $50.
You are correct on having to pop off the airbag, but that is really not as daunting as it sounds. My DIY shows all of the details of the OEM install:
DIY: 2006-2011 Yaris OEM Cruise Control Complete Installationlol.. well hindsight is 20/20. I guess I should maybe consider going with the $50 option.. If you go to the Rostra instructions for my car. It has me grab power out of a pin under the dash. Since I haven't been getting power to my cruise, I have been debating if there is power to that specific pin. I took my voltmeter to the pin today.. no power. Rostra's instructions direct me towards putting a pin in a hole that is unpowered by the stock wiring harness. WTF? Anyone have any ideas. thanks.
CTScottUSA, CT · Dec 1, 2011#16In connector 4B of the under hood fuse panel, Pin 9 (red wire) should be ignition switched power. Pin 27 (pink wire to the right of it), is also ignition switched power.
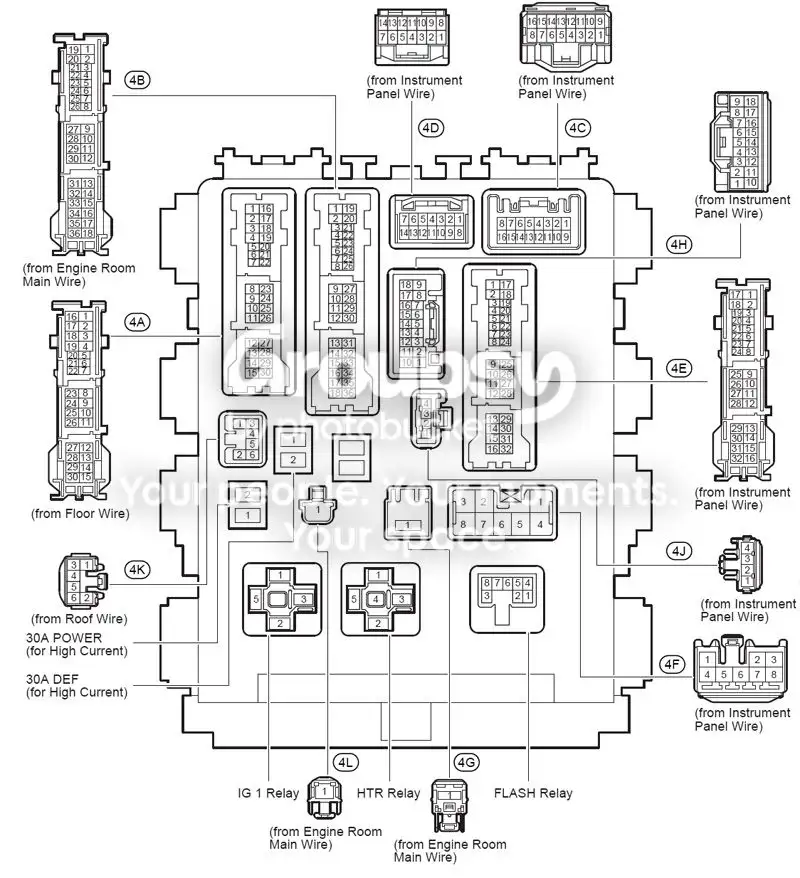
K, I'll go with the pink one.. Any suggestions on how to solder to the pink wire? The harness is very tight and I have no idea how I'm going to get the wire loose enough to actually be able to get my soldering iron up under there.
CTScottUSA, CT · Dec 2, 2011#18 Originally Posted by
superfly78209 ↑ K, I'll go with the pink one.. Any suggestions on how to solder to the pink wire? The harness is very tight and I have no idea how I'm going to get the wire loose enough to actually be able to get my soldering iron up under there.
I suggest using a tap splice. Unless you take the dash off, it is almost impossible to safely solder up there.
I can personaly attest to, not only the simplicity, but the elegance of the OEM solution as offered/opined by CTScott....I have installed it on my 2008 (with the optional CC indicator kit installed in the instrument panel) and it not only works perfectly, but it looks really good.....it's a *VERY* elegant solution and I can whole-heartedly recommend it!! Easy to
install (the airbag is a little scary, but not bad to do - just follow the instructions and dive in)....as I said, a ver yelegant solution and incredibly well documented!!!
You can't go wrong!! :-)
 Yarisworld