YarisSedanOriginal postCalifornia - Bay Area · Dec 31, 2008#1Picture lost · www.jasonlabar.com Make sure you have all the proper tools before you start. You can use your lug nut removal tool and floor jack
that came with your car but it makes more hassle removing everything from your car and putting it back plus its not
as efficient as using a real floor jack and breaker bar. Now that you have all your tools park your car on the most level surface you can find and leave the parking brake
off.
Picture lost · www.jasonlabar.com
Position the floor jack directly under the lift point. If you look under the car you will see 2 notches where the
jack can sit securely.
Picture lost · www.jasonlabar.com
Jack up the rear of the car whichever side you decide you want to start first. Make sure the tire is not completely
off the ground as the tire will spin when you try to remove the lug nuts.
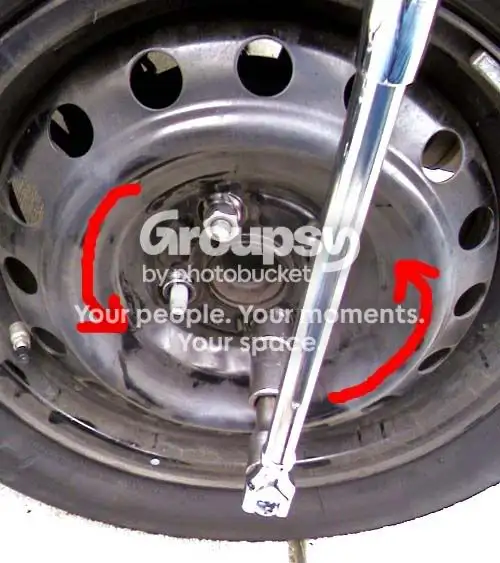
Using your breaking bar and socket turn it counter clock ways with a jerking motion and spin it about a full 360 turn
to make sure they are properly loose. Once this is done now you can jack up the car till the wheel is about 1 inch
off the ground.
Picture lost · www.jasonlabar.com
Now that the wheel is off you may have trouble removing the drum. This is where the screwdriver comes in. You can
utilize the 2 screw holes and insert 2 bolts and ratchet them in till the drum pops off. More than likely though
since the drum is loose and you are going to make it tighter this should not be necessary. Just take your
screwdriver and insert it in between the drum and backing plate and twist and it should pop off. If it dose not come
off try in opposing sides slowly till it comes out.
Picture lost · www.jasonlabar.com
Once the drum is removed clean out all the dust inside the drum and wash out dust on your brake parts with plain
water from a garden hose or spray bottle. I don't recommend any chemical cleaners as it will clean off the
lubrication grease between the backing plate and brake shoe and to re lube it will require another DIY. Simple water
and letting it air dry will suffice. Once everything has dried put the drum bake on securely and rotate it
clockwise. It should spin approx 360 degrees and stop. The more rotations will help you gage how much you will
need to adjust it till it rotates only 360.
Picture lost · www.jasonlabar.com
Now locate the star wheel. It is at the upper portion right below the wheel cylinder. Take your screwdriver again
and push it forward toward the backing plate 2 clicks. Put the drum back on and spin it. Take it off and adjust 2
clicks more. Keep doing this till you get satisfactory results. Perfect adjustment you should hear the brake shoe
ever so slightly rubbing against the inside of the drum as you spin it and it should fall short of a full spin.
Once you get this result you are done.
Put the drum back on and the wheel back in place. Screw on all the lug nuts hand tight. Then while the wheel is
off the ground still take your breaker bar and jerk it clockwise while holding the wheel. Making sure they are
decently snug. Then lower the vehicle down and use your torque wrench and torque all 4 nuts down to 76ft pounds.
Repeat same procedure on the other wheel. Once you are done test your parking brake. It should feel firm and go
up about 3 clicks. Now go out and enjoy your better feeling brake pedal, decreased stopping distance and properly
operating parking brake. Replies 70
PetersRedYarisThe Black Hills of South Dakota · Dec 31, 2008#2Nice... People should know that the "star wheel" easily clicks in only one direction. If you go to far it's a kind of PIA to get it back in. I suppose with the drum off it's easy, but if you do this without removing the wheels by going through the small rubber plug on the inside of the hub, you cannot back them off if you go to far. Just a FYI...
auxmikeLI, New Yawk · Dec 31, 2008#3Nice job, but might have missed a few things;
You should add to make sure the tranny is in "P" or in gear on a 5 speed to avoid the car rolling away.
Also,chock the wheels and use jackstands.
Twisting a screwdriver between the drum and backing plate is a good way to BEND up the plate.
I would'nt use water to clean the braking system components, never heard of that way.
PetersRedYarisThe Black Hills of South Dakota · Dec 31, 2008#4All good points...
YarisSedanThread starterCalifornia - Bay Area · Jan 1, 2009#5 Originally Posted by
auxmike ↑ Nice job, but might have missed a few things;
You should add to make sure the tranny is in "P" or in gear on a 5 speed to avoid the car rolling away.
Also,chock the wheels and use jackstands.
Twisting a screwdriver between the drum and backing plate is a good way to BEND up the plate.
I would'nt use water to clean the braking system components, never heard of that way.
Actually I would assume most people would know better than to leave the car in neutral while jacking up the car. If the car is automatic chocking the wheels is not nessisary if the vehicle is parked in a level surface and thus why i suggested to jack the car only a inch above the ground. Twisting the screwdriver between the backing plate wont bend the backing plate. You are prying on it ever so gently. Even if you used it as a pry bar and pryed it you still wont be able to bend it. That thing is solid. Maybe if it was the backing plate on a disk brake system then yeah you could bend it possibly. But still you could just bend it back by hand if it was that easy. And using water is a safe way to clean the brake dust off. its not very efficient but most shop professional brake cleaners that roll up to the car and run solvent over the brake system and collect it into the container is a mixture of part water and part solvent.
The reason i dont suggest a solvent is because it will clean off the grease that is lubricating the backing plate and you may have squeeking after the service is performed. My profession during the day is a mechanic so i woudlnt suggest anything that would be harmful to your car or what tricks mechanics do on a daily basis.
I am just providing my own DIY to help forum members. If you dont agree with it then you may post your own version. This is my first chance to give back to the community.
I still don't recommend prying anything against a stamped steel backing plate.
I've done it in the past and bent the plate so it rubbed the drum casting. A real PITA to bend back in proper shape too.
Heck, I've seen drums on so tight they required a torch to CUT them off!😈
AlexNet0Rockland, ME · Jan 1, 2009#7I guess I dont understand what this is supposed to do, tighten your rear brakes to take stress from the fronts?
auxmikeLI, New Yawk · Jan 1, 2009#8 Originally Posted by
AlexNet0 ↑ I guess I dont understand what this is supposed to do, tighten your rear brakes to take stress from the fronts?
Yessir, distribute the weight so as to not prematurely wear out pads or warp rotors.
This can be tricky to do for a first timer. Don't screw around with brakes unless you are real confident about what you are getting into.
I did this procedure myself after noticing my handbrake lever going up real high when pulled. As he said, go from the FRONT to adjust not from the rubber plug in the back. That way you'll know right away if the shoes are too open since the drum won't slide on.
I used compressed air to remove all the dust eaisily without wetting anything at all. You should NOT use compressed air because that dust is BAD and gets into your nostrils real easy. I only did it because I was outside in the open air.
After the adjustment the brakes felt much better.
I know these cars are supposed to have self adjusting brakes, but I've yet to see one of those systems that works as allegedly designed without a little "help" from a screwdriver.....🤷
Originally Posted by auxmike
I know these cars are supposed to have self adjusting brakes, but I've yet to see one of those systems that works as allegedly designed without a little "help" from a screwdriver.....
Okay, that clears it up, I replaced the pads on a friends civic, and it has the same 'type' of system and I adjusted from the back (PITA), but I never really understood what it did, I just did it untill it felt right.
Good thread. But I'm suppose to re-adjust/re-tighten the e-brake today, so how exactly would I take off the the drum housing without bending it? And also, what's the best way to clean-off the brake dust without removing any important grease? Thanks.
AlexNet0Rockland, ME · Jan 4, 2009#11I believe you can tighten just the e-brake inside the floor console between the seats under the brake handle.
jambo101Montreal Canada · Jan 4, 2009#12I thought everything adjusts when you apply the brakes when backing up.
SilverBackEl Monte, Ca · Jan 6, 2009#13This thread is golden. Just did mine over the weekend on my own with the help here. Thanks for starting this, YS👍
YarisSedanThread starterCalifornia - Bay Area · Jan 6, 2009#14 Originally Posted by
k r a y z e e . j o j o ↑ This thread is golden. Just did mine over the weekend on my own with the help here. Thanks for starting this, YS👍
Awsome. You should do this about every 6 months. Or whenever you rototate your tires. You will be amazed how much dust is in there every time you take the drum off.
Originally Posted by
YarisSedan ↑ You will be amazed how much dust is in there every time you take the drum off.
Was more than amazed. This was one of jobs that ended with a shower...
Originally Posted by
k r a y z e e . j o j o ↑ Was more than amazed. This was one of jobs that ended with a shower...
LOL this is why all auto shops are required to have a osha approved brake cleaner system. Which is a big drum that wheels under the brakes and a long brush that has a solvent that comes out of it. So you can gently brush away the dust without it going all over the place like into your lungs.
Originally Posted by
YarisSedan ↑ LOL this is why all auto shops are required to have a osha approved brake cleaner system. Which is a big drum that wheels under the brakes and a long brush that has a solvent that comes out of it. So you can gently brush away the dust without it going all over the place like into your lungs.
Now you tell me. Guess I wasted a wet face towel and a pair of goggles for nothing LOL
a ez way to just adjust the rear drum is drive in reverse and then press on the brakes. then you might notice the parking brake will click less. down to 4.
jamal1984Georgia, USA · Jan 16, 2009#19geez i wish i see this thread earlier so i don't have to pay Big 10 $40 bucks to adjust my handbrake, and clean my drums break... my hand brake now only click twice-max, i can't pull it up anymore. Before it's like 10 clicks.
yaris-meAnaheim, CA · Apr 13, 2009#20Sticky?👍
driftoNY/NJ · Apr 28, 2009#21 Originally Posted by
k r a y z e e . j o j o ↑ Good thread. But I'm suppose to re-adjust/re-tighten the e-brake today, so how exactly would I take off the the drum housing without bending it? And also, what's the best way to clean-off the brake dust without removing any important grease? Thanks.
there are if you notice two extra smaller holes in the face of the drum. they are threaded so you can use a bolt and tighten it inward against the hub to free the drum from the backing plate. as you tighten it the drum will slowly come off. this way your not prying anything at all. once its off, i personally use some "brakleen" type solution and spray off all the dust, except for the pad surfaces. dont get any solutions on the pads as they will swell or wear prematurely. as for the backing plate, pins, etc. i use some moly paste (molybdenum disulfide) to grease the backing plate areas where the shoes pivot and operate, as to prevent rust or binding. as before just dont get any grease on the pad surface or inner drum surface. and as a suggestion i also apply moly paste to the hub surface and in the center opening of the drum, this is usually where rust likes to live and grow and makes future removal a pain in the ass. the grease mentioned before is high temp rated and will prevent rust from building up in the area. well thats my 2 cents. hope this helps...
I do use the 2 smaller holes a lot of times when i have trouble removing brakes. Only thing is in the DIY i dont expect someone to have 2 spare bolts that are the correct size laying around. And usually if the drum is out of adjustment it should jsut come off very easily. Otherwise a large rubber mallet does wonders as well =).
As for lube if you have never done it before i dont reccomend it because if you get any on the brake pad it will create hotspots on the brake drum. Which is why i only reccomend water to clean out the dust cause any harsh chemical like brake cleaner has the possibility of removing the lube that is already there.
Although i use about 2 cans of brake cleaner on a daily basis. I always use brake clean to clean drums.
IllusionXBrossard, QC · Apr 29, 2009#23yarissedan: good writeup, i think i'll do it this afternoon when i get home hehe.
btw, did you ever reedit your post?
just do it for twwards :P
IllusionXBrossard, QC · Apr 29, 2009#24oh.. cleaned and adjusted the rear brakes. That was easy. Handbrake pulls ~5 clicks now :)
All i have to do next is fix the front calipers... take them apart, turn the discs, lub the calipers and put everything back...
robkayNW OH · Jun 5, 2009#25Very nice DIY. Thanks for the effort you went to!
blackgenius007Singapore · Jul 27, 2009#26Did it on yesterday, it was so exhausted man..haha.. Well now my e-brake only need 3-clicks but I have found my car now have more friction, engine performance dropped, means need more acceleration to move the car. Is that because the brake adjustment makes the car more frictions?
I have double checked the brake shoes have not rubbed with the drum after it adjusted, and the drum on both side with no overheating or burn smell after a day of driving..
pbuchaFt. Worth, TX · Aug 8, 2009#27Just performed this procedure. A rubber mallet works well to loosen the drum without any damage to the drum or backing plate. The primary objective is to loosen the light rust bond between the axle and center of the drum.
toastNappanee, IN · Aug 8, 2009#28Just wondering does anyone have the size for those "little bolts" to drive the drum off? I've always used the rubber mallet in the past but just wondering.
PaddyMacTucson · Aug 8, 2009#29You can apply some hi temp grease where the hub and drum meet that will make taking apart much easier the next time
1stToyotaOklahoma · Aug 8, 2009#30 Originally Posted by
toast ↑ Just wondering does anyone have the size for those "little bolts" to drive the drum off? I've always used the rubber mallet in the past but just wondering.
Don't quote me, but seems like the size I usually use is 8mm x 1.25
There are a few parts that are missing to this. When you adjust the brakes you're going to want to take out the actual adjuster and clean that with brake cleaner because alot of gunk builds up on it aswell. When you do this, it will free up the self adjusting process and when you back up and stomp on the brakes it will work to some extent. This doesn't have to be done, but its a good thing to do and only will take like 2 extra mins to clean up the adjuster.
hafeezBrampton, Ontario, Canada · Sep 6, 2009#32how often do you need to change brake shoes?
othaterSoCal, SanGabriel · Oct 18, 2009#33YarisSedan...What happen to the pictures? Was going to do this today. Can you please repost. Thanks.
Got it done. Thanks
YarisSedanThread starterCalifornia - Bay Area · Nov 16, 2009#34If anyone happens to have images for this in thier cache still could you please email them to me at
jasonlabar@gmail.com I switch servers for my web hosting and forgot to save some of the files. So all the files got whiped.
Well there were pictures up unfortunately they are lost thats why im hoping someone might have viewed it and still ahve images in thier cache before i changed server hosts. Otherwise i might have to redo the diy and take new pictures all over again.
YarisSedanThread starterCalifornia - Bay Area · Nov 26, 2009#37Okay i found the pics so everything is relinked and back up now.
rningonfumesSoCal · Apr 15, 2010#38Hey, Thanks for the write up. Just did it yesterday and you're right, the braking is entirely better.
skoolafishBaltimore · Aug 5, 2010#39i just had a 27 point inspection or something at a toyota dealer
they told me my rear brakes were out of alignment, and explained it like my brakes were not expanding enough to grab the sides of a bowl or something...
is this what i need to do to fix that?
TickleTimeTimArkansas · Feb 19, 2011#40HELP HELP HELP. in middle of doing this, only have 30 mins til i gotta be somewhere. i CAN NOT get off the brake drum. i see im slightly bending the backing plate when i try the screw driver method. any help??!!?
rningonfumesSoCal · Feb 20, 2011#41^I guess it's too late but... 1. Parking brakes off. 2. Whack it with hammer or mallet a few times. or.. 3. do the appropriate bolt size into the hole to force it off that way.
I just whack it with a hammer.
bankrobberCentral Florida · Feb 20, 2011#42Best way is using the bolts to ease it off 10 MM if I remember correct. I bent the crap out of my backing plate before trying the bolts.
TickleTimeTimArkansas · Feb 21, 2011#43thanks for clarifying the size of the bolts, i had a box of screws (including wood screws-i got desperate) but didn't have the right size and gave up. i tried to go through the rubber plug that everyone suggested not to go through (once again, desperate) but i had no idea what i was doing. guess ill go to hardware store, pick up 2 10mm bolts and try again next weekend. thank you
bronsinnj · Feb 22, 2011#44arent these brakes self adjusting? Dont they adjust when you back up? Or doesnt that setup work after a while?
rningonfumesSoCal · Feb 22, 2011#45Yes, they adjust as you back up. The adjustment allows you to apply the same amount of distance in the foot. The problem lies in the the cable/hand brake. I don't know the reason for this but you still have to adjust it every-so often in order to tighten that up. It is important to note that you should adjust at the brakes first, then see about tightening at the base of the hand brake.
746wattsMidlands, Ireland · Feb 22, 2011#46Thanks YarisSedan, I am soon going to be replacing my shoes which have 135,000kms on them. Knowledge sharing is appreciated.
Okay, did my oil & filter change this evening and checked the drums while I was at it........... new shoes have 4.6mm of braking material and the shoes after 135,000kms have 3.6mm of brake material left. So I'll leave them in for another 1mm of wear I reckon.
xhiferbay area · Apr 11, 2012#47Sorry for the bump. But OP can you please relink the pics? Thanks
NEexpatS.E. New England · Sep 19, 2012#48Ok, I am not seeing these pics.
Is it just me or are they gone? If they are gone from this thread does anybody have them?
Thanks.
YarisSedanThread starterCalifornia - Bay Area · Oct 12, 2012#49Sorry guys the account I used for Web hosting closed so some pictures are lost I have to adjust my rear brakes again soon so ill try to put some new pics up and put them on photo bucket with a link
NEexpatS.E. New England · Oct 13, 2012#50^Thanks.
Been wanting to do this.
cheers
 Yarisworld