 Yarisworld
I had both on my car done about 23k miles ago (so I probably won't need to again for quite a while) and I paid only a little bit less than Jamal1984 did. The pictures will help more than a few people whenever you are able to get pics to display and all will appreciate your gesture.Originally Posted by YarisSedan ↑Well there were pictures up unfortunately they are lost thats why im hoping someone might have viewed it and still ahve images in thier cache before i changed server hosts. Otherwise i might have to redo the diy and take new pictures all over again.
DIY Rear Drum Brake Adjustment/Parking Brake W/ PICS Inside
71 posts · 209,660 views · page 2 of 2
Replies continued
Yes,if someone could repost the pics, that would be a great help.So, you adjust the drum first,then adjust the parking brake?.Now the adjustment for the parking brake lever.....is this a different procedure? or is the lever adjusted when the drum brakes are adjusted/taken-up?.
I didn't like the sound coming from that area. The sound motivated me to have it checked. The local shop I went to (not a dealer) cleaned out all the dust and serviced the cable (I thought the sound might be signaling something more extensive). When I left, the cable was as tight as when the car was new and the sound that had motivated me to take the car in was gone. The miniscule cost was worth it to me. My brakes continue to work as new, had only 20% wear at approximately 208,000 miles, and I've never done anything else to the brakes (front or rear). Might not be what works for others, but has worked for me. Just my 2 cents 🙂.Originally Posted by Yarflana ↑At the end of all this, sounds better to service the entire rear brake assembly at one time vs. cleaning and messing with all the dust to just adjust the parking brake. I know it is rather comforting to have it adjusted where you only have to pull a couple clicks, but it doesn't hurt to have to pull it a few more clicks until you can get around to an entire "drum rotating, shoe changing, assembly cleaning" service.
Honestly, I wouldn't worry about cleaning it much if all I was doing was adjusting the parking brake. Likely not the best way to go, but cannot make it any worse than before getting in there.
Overall, however, thanks for the DIY. I know it takes a lot of effort to take pics and upload all those instructions.
Any photos yet yaris sedan??. TIA🙂Originally Posted by YarisSedan ↑Sorry guys the account I used for Web hosting closed so some pictures are lost I have to adjust my rear brakes again soon so ill try to put some new pics up and put them on photo bucket with a link
I just did mine two weeks ago. Like 7-8 clicks per side. You'll notice the handbrake lever will go up less clicks after adjusting too. I always clean and blow out all the dust in there with my air compressor *outside* only.
Are you advising to make adjustments through the rubber plug on the inboard side of the drum ?.Originally Posted by auxmike ↑I just did mine two weeks ago. Like 7-8 clicks per side. You'll notice the handbrake lever will go up less clicks after adjusting too. I always clean and blow out all the dust in there with my air compressor *outside* only.
You can do it that way but you have to be careful not to overadjust them removing the drum is the best way because you can clean out all the dust I adjust mine every six months and it ensures even brake wear my front brakes are at 80 percent life after close to 60k milesOriginally Posted by frog13 ↑Are you advising to make adjustments through the rubber plug on the inboard side of the drum ?.
To clean out brake dust,do you spray the interior with brake cleaner?... (I know that cleaner is quite harsh,but....). TIA
I use compressed air. Only do this outside, that dust is bad stuff.... That spray isn't heathy either and makes a drippy mess..
Will it be equally bad to cleanout brake dust if one use vacuum cleaner instead of compressed air?
Hey does this actually work? anybody tried it already? How fast do you go? how far? how hard do you apply the brakes?Originally Posted by PenquinZ111 ↑a ez way to just adjust the rear drum is drive in reverse and then press on the brakes. then you might notice the parking brake will click less. down to 4.
Unable to view photo's?.Originally Posted by YarisSedan ↑Picture lost · www.jasonlabar.com
Make sure you have all the proper tools before you start. You can use your lug nut removal tool and floor jack
that came with your car but it makes more hassle removing everything from your car and putting it back plus its not
as efficient as using a real floor jack and breaker bar.
Now that you have all your tools park your car on the most level surface you can find and leave the parking brake
off.
Picture lost · www.jasonlabar.com
Position the floor jack directly under the lift point. If you look under the car you will see 2 notches where the
jack can sit securely.
Picture lost · www.jasonlabar.com
Jack up the rear of the car whichever side you decide you want to start first. Make sure the tire is not completely
off the ground as the tire will spin when you try to remove the lug nuts.
Using your breaking bar and socket turn it counter clock ways with a jerking motion and spin it about a full 360 turn
to make sure they are properly loose. Once this is done now you can jack up the car till the wheel is about 1 inch
off the ground.
Picture lost · www.jasonlabar.com
Now that the wheel is off you may have trouble removing the drum. This is where the screwdriver comes in. You can
utilize the 2 screw holes and insert 2 bolts and ratchet them in till the drum pops off. More than likely though
since the drum is loose and you are going to make it tighter this should not be necessary. Just take your
screwdriver and insert it in between the drum and backing plate and twist and it should pop off. If it dose not come
off try in opposing sides slowly till it comes out.
Picture lost · www.jasonlabar.com
Once the drum is removed clean out all the dust inside the drum and wash out dust on your brake parts with plain
water from a garden hose or spray bottle. I don't recommend any chemical cleaners as it will clean off the
lubrication grease between the backing plate and brake shoe and to re lube it will require another DIY. Simple water
and letting it air dry will suffice. Once everything has dried put the drum bake on securely and rotate it
clockwise. It should spin approx 360 degrees and stop. The more rotations will help you gage how much you will
need to adjust it till it rotates only 360.
Picture lost · www.jasonlabar.com
Now locate the star wheel. It is at the upper portion right below the wheel cylinder. Take your screwdriver again
and push it forward toward the backing plate 2 clicks. Put the drum back on and spin it. Take it off and adjust 2
clicks more. Keep doing this till you get satisfactory results. Perfect adjustment you should hear the brake shoe
ever so slightly rubbing against the inside of the drum as you spin it and it should fall short of a full spin.
Once you get this result you are done.
Put the drum back on and the wheel back in place. Screw on all the lug nuts hand tight. Then while the wheel is
off the ground still take your breaker bar and jerk it clockwise while holding the wheel. Making sure they are
decently snug. Then lower the vehicle down and use your torque wrench and torque all 4 nuts down to 76ft pounds.
Repeat same procedure on the other wheel. Once you are done test your parking brake. It should feel firm and go
up about 3 clicks. Now go out and enjoy your better feeling brake pedal, decreased stopping distance and properly
operating parking brake.
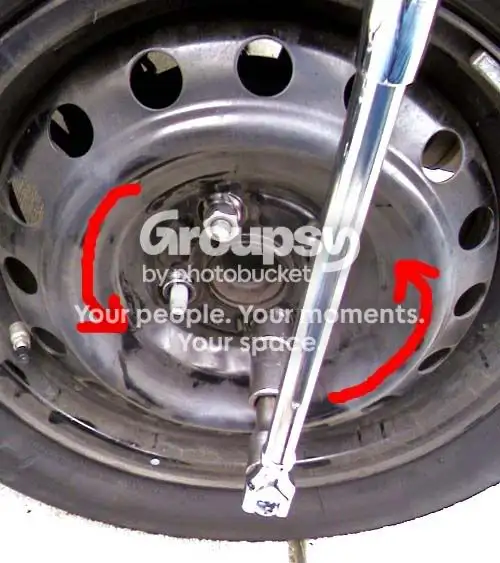
Originally Posted by MickZEL ↑To remove the brake drums fit the bolts on the hood mounting
??????????????🤷
"fit the bolts on the hood mounting"........any explanation?.Originally Posted by MickZEL ↑To remove the brake drums fit the bolts on the hood mounting
I think its because it super old. Happened to diy squeek fix for engine mount by engine bay also.
Sent from my Nexus 4 using Tapatalk
Sent from my Nexus 4 using Tapatalk
I think he means you can use two of the hood mounting bolts if you do not have the right size on hand.Originally Posted by MickZEL ↑To remove the brake drums fit the bolts on the hood mounting
Pics not showing up? Any chance someone can reupload?
I wrote the updated instructions below based on YarisSedan's original instructions and feedback from the community.
Remove the tire
If you're not sure how to do this, read How to change a tire first.
If the tire is stuck to brake drum, hit the tire with a rubber mallet on alternating sides until it separates from the brake drum.
Remove brake drum
Make sure car is in Park (automatic) or in 1st gear (manual) and parking brake is released (down position).
CAUTION! To avoid inhalation of brake dust which is hazardous to your health, it is recommended to put on a dust mask before removing the drum.
Pull the brake drum outward towards you.
WARNING! Don't take your screwdriver and insert it in between the drum and backing plate and twist. The backing plate bends easily and can rub against wheel.
If the drum is stuck to backing plate, you can utilize the 2 screw holes and insert 2 bolts and ratchet them in till the drum pops off. (You can use bolts from the hinge of the engine hood.) A rubber mallet also works well to loosen the drum without any damage to the drum or backing plate.
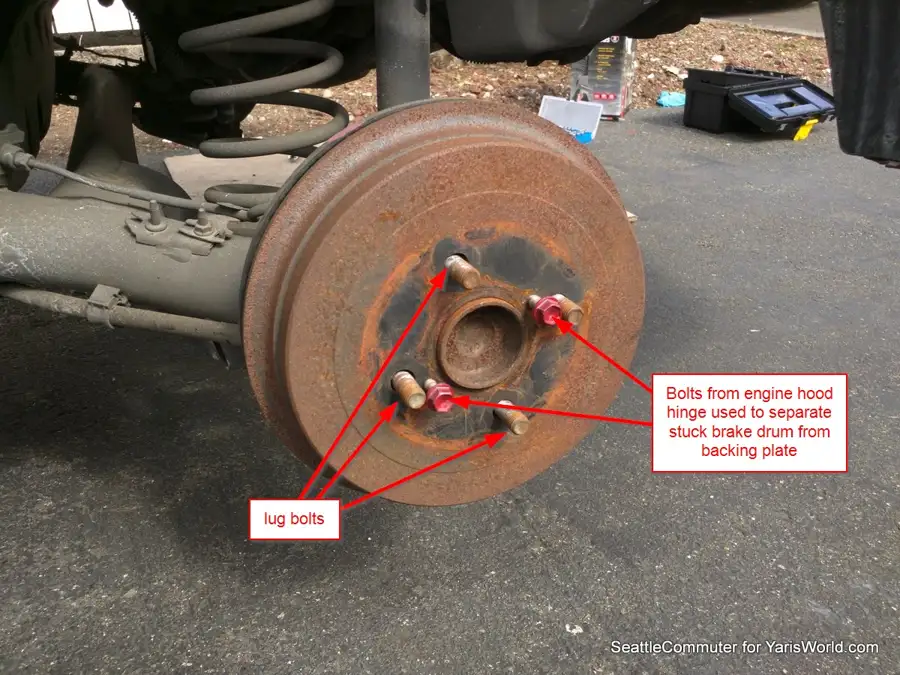
Wipe off brake dust
Once the drum is removed, gently wipe the dust off the brake parts with plain water. Chemical cleaners aren't recommended as it will remove the lubrication grease that's needed.
Check the wheel cylinder for hydraulic leaks. If you notice fluid inside the drum or on the brake shoes, get your car inspected by a mechanic. A leak in the hydraulic system, may result in decreased brake performance.
Adjust star wheel
Now locate the adjuster star wheel. It is at the upper portion right below the wheel cylinder. Take your screwdriver again and push it forward toward the backing plate 2 clicks. The star wheel ratchets and turns only in one direction unless the metal tab is pushed in. Test your parking brake. It should feel firm and go up about 3 or 4 clicks. If it goes up more, put the drum back on and try to spin it. It it spins freely, take the drum off and adjust the star wheel 2 more clicks.
Keep doing this till you get satisfactory results. Perfect adjustment you should hear the brake shoe ever so slightly rubbing against the inside of the drum as you spin it and it should fall short of a full spin.
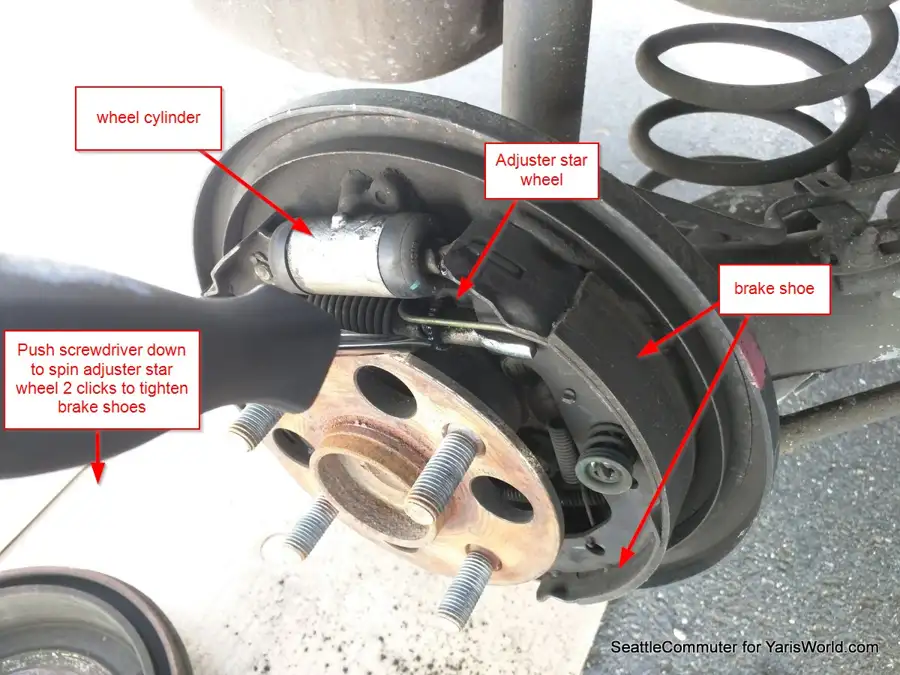
Put tire back on the car
If you're not sure how to do this, read How to change a tire first.
Use a torque wrench and torque all 4 lug nuts to 80 ft-pounds.
Testing parking brake
Your parking brake should feel firm and go up about 3 clicks. Now go out and enjoy your better feeling brake pedal, decreased stopping distance and properly operating parking brake.
Video
I found this YouTube video helpful: Adjusting the star wheel - Adjust in opposite direction from the video to tighten
Diagram
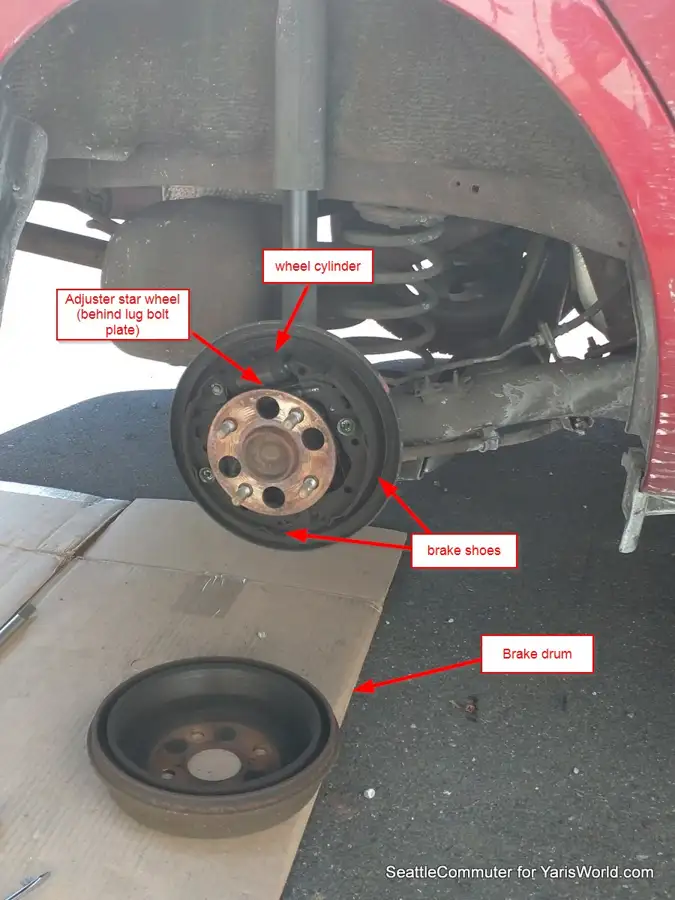
Remove the tire
If you're not sure how to do this, read How to change a tire first.
If the tire is stuck to brake drum, hit the tire with a rubber mallet on alternating sides until it separates from the brake drum.
Remove brake drum
Make sure car is in Park (automatic) or in 1st gear (manual) and parking brake is released (down position).
CAUTION! To avoid inhalation of brake dust which is hazardous to your health, it is recommended to put on a dust mask before removing the drum.
Pull the brake drum outward towards you.
WARNING! Don't take your screwdriver and insert it in between the drum and backing plate and twist. The backing plate bends easily and can rub against wheel.
If the drum is stuck to backing plate, you can utilize the 2 screw holes and insert 2 bolts and ratchet them in till the drum pops off. (You can use bolts from the hinge of the engine hood.) A rubber mallet also works well to loosen the drum without any damage to the drum or backing plate.
Wipe off brake dust
Once the drum is removed, gently wipe the dust off the brake parts with plain water. Chemical cleaners aren't recommended as it will remove the lubrication grease that's needed.
Check the wheel cylinder for hydraulic leaks. If you notice fluid inside the drum or on the brake shoes, get your car inspected by a mechanic. A leak in the hydraulic system, may result in decreased brake performance.
Adjust star wheel
Now locate the adjuster star wheel. It is at the upper portion right below the wheel cylinder. Take your screwdriver again and push it forward toward the backing plate 2 clicks. The star wheel ratchets and turns only in one direction unless the metal tab is pushed in. Test your parking brake. It should feel firm and go up about 3 or 4 clicks. If it goes up more, put the drum back on and try to spin it. It it spins freely, take the drum off and adjust the star wheel 2 more clicks.
Keep doing this till you get satisfactory results. Perfect adjustment you should hear the brake shoe ever so slightly rubbing against the inside of the drum as you spin it and it should fall short of a full spin.
Put tire back on the car
If you're not sure how to do this, read How to change a tire first.
Use a torque wrench and torque all 4 lug nuts to 80 ft-pounds.
Testing parking brake
Your parking brake should feel firm and go up about 3 clicks. Now go out and enjoy your better feeling brake pedal, decreased stopping distance and properly operating parking brake.
Video
I found this YouTube video helpful: Adjusting the star wheel - Adjust in opposite direction from the video to tighten
Diagram
Excellent! this is exactly how we do it at our Toyota dealership. The instructions applies to all model toyotas with drum brakes. We use a soapy water mixture to clean the dust off the brake components.No brake cleaner because it disolve the grease on the backing plate like the original poster mentioned.
Hey all. I did my drums on the 07 Yaris. Everything brand new. Now there is a weird slapping. Any ideas.
I did the rear drums on my 07 Yaris, with all brand new equipment. Drums, shoes, springs etc. Greased the contact points, put back together the way it should be. Now there is a weird slapping when I apply the brakes. Any ideas. Thank you.😕