computerlove87Original postjOakland · Feb 25, 2014#1I always bring you the most interesting problems... 😁 ...
So a few weeks ago I noticed that I had to start pushing on the hatch pretty hard whenever I wanted it to fully engage the door closure switch so that the dome light would go off and I could lock it via the keyless... The problem got progressively worse to the point where the hatch was latched but bouncing around with the car...
I figured I would just take off the plastic piece back there or the bumper and it would be as simple as tightening a bolt and all would be well. As it turns out, one of the bolts fell off (presumably into the body somewhere) and there is no access to the bolts anyway except for 2 little holes (circled in blue), other than that it is completely enclosed by the bodywork... As it stands now, the only way I can think of accessing those bolts is to cut a hole underneath (were I placed the red circle).
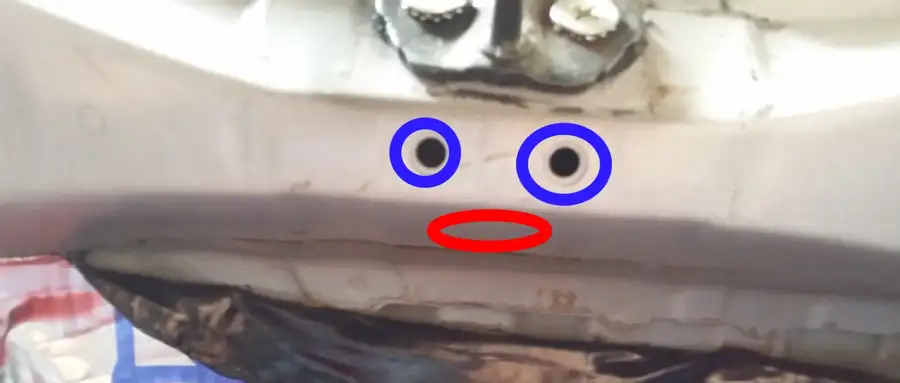
Does anyone know of a better way to access that area to replace a bolt? I assume Toyota installed that piece before pinch welding that seem, unless they have some kind of crazy specialty wrench designed just to reach into that area from the holes that are located 5 inches to the right and left!
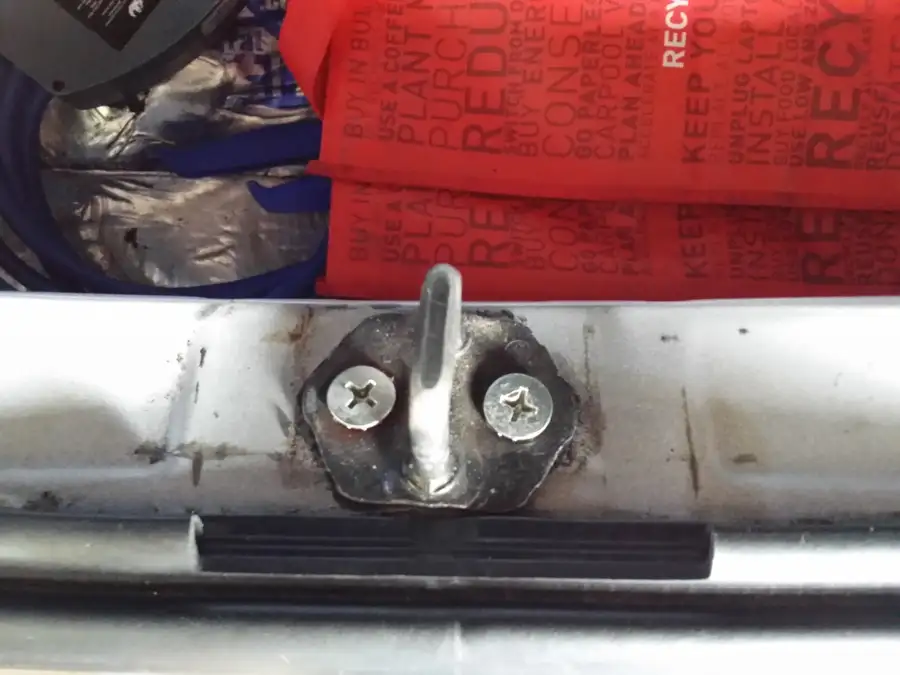
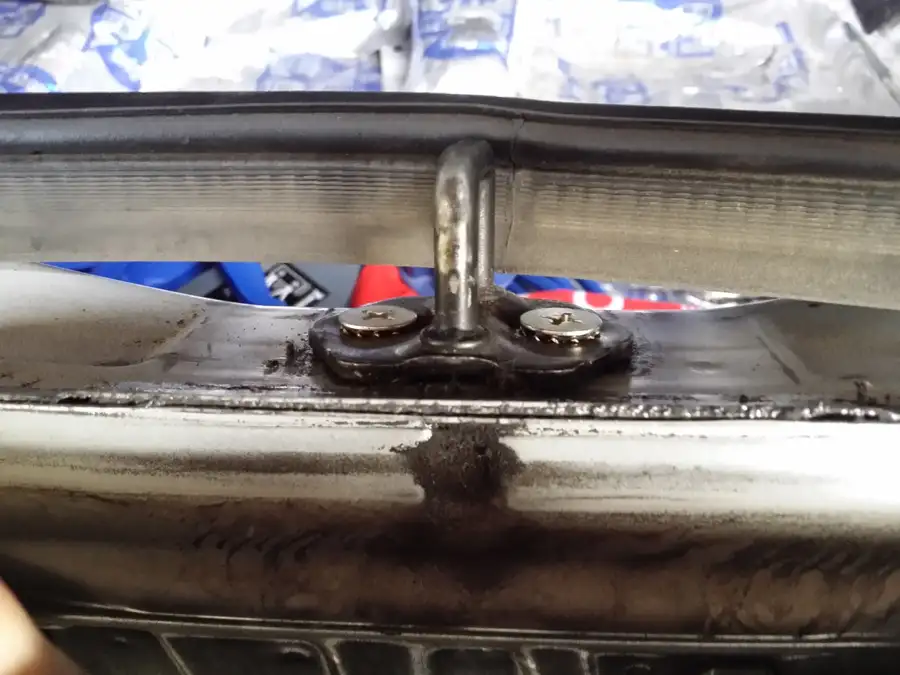
Thanks everyone 🙂
Replies 18
I'm a little confused on what is loose. Are the two screws holding the striker loose? Because when I looked that up in the shop manual, they say to adjust the striker position by loosening these. That would lead me to believe they tapped holes with no nuts to get to inside. I'm not sure that is what you are after...
CTScottUSA, CT · Feb 25, 2014#3Nothing that helps with the hatch latching goes in those two holes. Check the assembly on the bottom of the hatch itself, as you probably have a bolt or two loose there.
computerlove87Thread starterjOakland · Feb 25, 2014#4 Originally Posted by
bairjo ↑ I'm a little confused on what is loose. Are the two screws holding the striker loose? Because when I looked that up in the shop manual, they say to adjust the striker position by loosening these. That would lead me to believe they tapped holes with no nuts to get to inside. I'm not sure that is what you are after...
There is definitely supposed to be a nut there as far as I can tell, I can pull the bolt all the way out and what is left is just a blank, untapped hole... It doesn't seem like it should be a captive nut or tapped hole on the other side, because when I loosen the side that still has its nut, I can move it back and forth, not just rotate on the axis of the bolt. I imagine this is so that you can align the striker and determine how tightly the hatch closes. Or the other possibility is that the captive nut's welds broke off on both sides and that is why one disappeared and the other is allowing me to move it around.
(Thanks bairjo for reminding me of that word that I was looking for (striker) 👏)
Originally Posted by
CTScott ↑ Nothing that helps with the hatch latching goes in those two holes. Check the assembly on the bottom of the hatch itself, as you probably have a bolt or two loose there.
The latching assembly on the bottom of the hatch is fine, it is just the striker that is completely loose. I just thought maybe those holes have something to do with the installation since they line up perfectly with the screws that hold the striker.
Originally Posted by
computerlove87 ↑ There is definitely supposed to be a nut there as far as I can tell, I can pull the bolt all the way out and what is left is just a blank, untapped hole... It doesn't seem like it should be a captive nut or tapped hole on the other side, because when I loosen the side that still has its nut, I can move it back and forth, not just rotate on the axis of the bolt. I imagine this is so that you can align the striker and determine how tightly the hatch closes. Or the other possibility is that the captive nut's welds broke off on both sides and that is why one disappeared and the other is allowing me to move it around.
(Thanks bairjo for reminding me of that word that I was looking for (striker) 👏)
The latching assembly on the bottom of the hatch is fine, it is just the striker that is completely loose. I just thought maybe those holes have something to do with the installation since they line up perfectly with the screws that hold the striker.
Ah, I see now. There are (were) captive nuts in there. Drilling a hole to install a nut from below might indeed be the best fix. I don't think there is enough thickness to the sheet metal to simply tap the hole and use a larger bolt.
Your circles look like a face.
Originally Posted by
Astroman ↑ Your circles look like a face.
You may have just solved his problem with that contribution. It is obvious, the face needs have a smile on it.....not a "I just sharted" look...
It didn't just shart, it had a stroke, a bolt just came loose inside its head, duh! LOL
Yeah, I think unfortunately the hole might be the only option :/ I kind of had a feeling, but I thought I better get a second opinion before I cut an unnecessary hole.
Thanks guys 🙂
One last thing you could do is contact the dealer service department. Maybe they could show you how they would do the repair...just a thought.
CTScottUSA, CT · Feb 27, 2014#10 Originally Posted by
bairjo ↑ One last thing you could do is contact the dealer service department. Maybe they could show you how they would do the repair...just a thought.
I bet no dealer has ever seen this before. I still can't figure out how it would have failed that way.
Another thing you could try is using a threaded insert (like a helicoil).
I bet if you remove the rear bumper you could get access. It seemed like I was pretty close to that to run the wires for my back up cam above the license plate.
There was definitely a weldnut on the bottom and if it happened to you I bet it has happened to someone else but is probably really rare. I can only think that it got loose and then you started slamming it really hard to get it to latch still and eventually it fatigued the weld out
Jason@SportsCarDebary, FL · Feb 27, 2014#12Well if none of the options presented here work, could he just tack weld the whole thing in place on the outside on top and then spray some paint on it?...that has to be better than bustin a hole in his car...
CTScottUSA, CT · Feb 28, 2014#14 Originally Posted by
bairjo ↑ Well if none of the options presented here work, could he just tack weld the whole thing in place on the outside on top and then spray some paint on it?...that has to be better than bustin a hole in his car...
That would work as well.
I really like Jason's idea of the rivet nut. I think I am going to order myself one of those kits...
The rivnut (also called nut-sert) would likely work for you. I work as an accessory installer and use these frequently for various mounts in thin metal. If you can't get the tool yourself, I'd wager some garages have one. If not, try somewhere that installs safety equipment on trucks (like rotating beacons, fire extinguishers, that sort of thing).
Originally Posted by
JDMeg ↑ The rivnut (also called nut-sert) would likely work for you. I work as an accessory installer and use these frequently for various mounts in thin metal. If you can't get the tool yourself, I'd wager some garages have one. If not, try somewhere that installs safety equipment on trucks (like rotating beacons, fire extinguishers, that sort of thing).
A rotating beacon....That will be next on CTScotts list for crashy...LOL!
So...computerlove87, what did you end up doing with this?...
computerlove87Thread starterjOakland · Apr 14, 2014#18Sorry for the slow reply guys... After talking to some (not surprisingly) EXTREMELY unhelpful and hateful dealership service reps, I just wound up using a hole saw and cutting an access hole. There are indeed 2 square holes where there were supposed to be captive nuts. One of the nuts was loose, but still attached to the bolt, the other was just completely gone. I replaced both nuts with some over sized washers and lock washers (I can't remember the official name, the washers that have jagged edges to prevent them from spinning) and new nuts. The trickiest part is locating the latch just right as the square holes allow it to move up to about 5mm in every direction. You have to get it centered just enough to land in the latch and then you have to get it adjusted front to back so the hatch closes enough to seal and trigger the switch so that the dome light doesn't stay on... After that, I scored some marks into the metal around the shackle so I know exactly where to place it if it comes loose again, then I tightened the s*** out of my aforementioned washer sandwich and put some thread-lock on so it hopefully won't come loose again! <--- PS. You're welcome if you just arrived here by googling 5 years in the future when this thread is archived 😁
TommyWasabiAlabama · Aug 11, 2023#19  Yarisworld