Time Required Depending upon your skill level, I would estimate that this would 20 minutes (advanced skill level) to 2 hours (basic skill level). I was in no rush at all and would guess that I took at most 3 hours spread out over several days (this included documenting everything).
Tools Needed- all ratchets on page 1
- all sockets on page 1
- all pliers on page 1
- WD-40
- work gloves (optional)
Parts Needed- MI short shifter (if not already installed)
- MI-supplied cotter pin (if short shifter not already installed)
- MI shifter cable bracket
- MI-supplied washers
Installaion Disassembly In order to install the complete MI short kit, you need to remove the stock shifter cable bracket and replace it with the MI shifter cable bracket. To do so, we must follow these steps to gain access to it and then remove it.
The first thing to do is remove the battery by removing the battery tie-down and disconnecting the battery (highlighted in yellow). The plastic battery tray is also removed at this time. This will give you ample access to the driver’s side shifter cable end.
Picture lost · yarisworld.com If you already installed the MI short shifter, then remove the MI-supplied cotter pin from the short shifter and slip the shifter cable off of the peg on the short shifter. (The needle-nose pliers came in handy here.) If you have not installed the MI short shifter, you can remove the OEM cotter pin from the shifter cable end. If you don’t want to deal with the hassle of removing the air filter box, you can just remove the OEM cotter pin from the passenger side shifter cable end by reaching between the radiator and air supply hose. (Remember to remove and keep track of the washers that go over the cable bushing!)
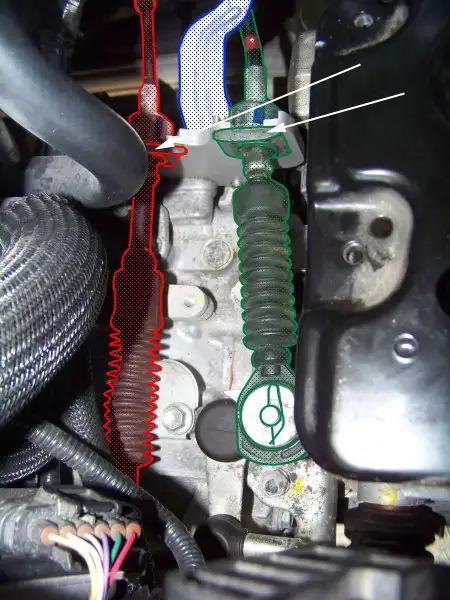
The next step is to remove the clips that hold the shifter cables into the OEM shifter cable bracket. This step may require you to utilize whatever method you find most convenient. The method that worked best for me was to soak the clips and bracket with some WD-40, then lock a set of 7WR locking pliers on the end of the clip and wiggle it left and right while pulling up. Eventually, the clips broke free and came out.
Picture lost · yarisworld.com Once you have removed the clips, you can disengage the shifter cables from the shifter cable bracket by shifting the cables back towards the firewall and lifting up. After the shifter cables are clear of the shifter cable bracket, you can move them into a position that gives you better access to the rear of the bracket. In my case, I left the passenger side shifter cable where it was and moved the driver’s side shifter cable back along the firewall.
I disconnected the clip closest to the passenger side of the battery tray bracket (highlighted in orange). This allowed me to push the wiring cable back just enough to get a small ¼-in. drive ratchet in and onto the 12mm bolt holding the wiring bracket to the shifter cable bracket. Using this method, you can remove the OEM shifter cable bracket without removing the battery tray bracket.
Picture lost · yarisworld.com Once you get the wiring bracket bolt loose enough, finger loosen the bolt and take it out (this may be easier than using the wrench and decreases the chance of losing the bolt). After removing the wiring bracket bolt, swung the wiring bracket up and out of the way to give you better access to the two 14mm bolts that hold the shifter cable bracket in. Using the same technique as before, break the bolts free with a ½-in. drive ratchet and finger loosen them until they come out. You can now remove the OEM shifter cable bracket.
Reassembly Now that you have removed the OEM shifter cable bracket, you can reassemble everything that you just disassembled. Replace the OEM shifter bracket with the new MI shifter cable bracket utilizing the MI-supplied washers and original bolts. Swing the wiring bracket down and attach it to the MI shifter cable bracket using the OEM bolt.
Place the shifter cables back into the MI shifter cable bracket and resecure them using the original clips. Reattach the shifter cable ends on the shifter levers and replace the original washers. Replace the OEM and MI-supplied cotter pins to each shifter cable end respectively.
Picture lost · yarisworld.com Snap the clip that held the wiring cable back on to the battery tray bracket. Place the plastic battery tray back into the battery tray bracket. Replace the battery and reattach the battery tie down and reattach the battery terminals.
Functions Check To ensure that everything was done correctly, check the following:
- Make sure that you can engage all 5 forward gears, as well as reverse. Shifts should feel a little more “notchy”; this is normal and takes some time to get used to.
- Start the car and make sure that the engine idles smoothly and that you don’t have a Malfunction Indicator Lamp (i.e. the “check engine” light) lit up. If this happens, stop the engine and check to see if you knocked any wiring or hoses loose during your install.
 Yarisworld