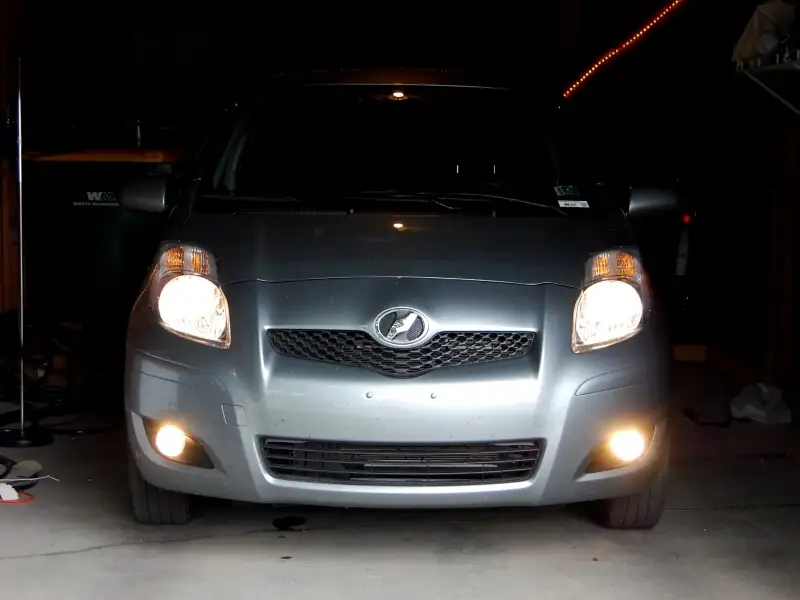
jpmck03Original postUSA · Jun 3, 2010#1So, I ordered a fog light kit from Garm, but I've decided to go with the OEM headlight stalk instead of ripping apart my interior and splicing wires.
I'm still waiting on the stalk from my dealer, and know I can handle the engine bay portion of the install, but the question I have is, can you replace the light stalk without pulling off the entire steering wheel?
From what I understand, you can just pull off the steering wheel shroud and pop in a cruise control stalk or intermittent wiper stalk... but does anybody know if the same holds true for the headlight stalk?
Replies 24
Yaris0609Tucson, AZ · Jun 3, 2010#2sorry, you've got to pull the wheel off. when u receive the part you'll see why.
jpmck03Thread starterUSA · Jun 3, 2010#3Bummer, maybe I can sweet talk the dealer into swapping them out. (Messing up the airbag is my main concern...)
Thanks.
IsLNdbOiLas Vegas, NV · Jun 4, 2010#4Good luck asking the dealer to do it. First time I did this mod. I went to the dealer and they wouldn't do it. I went to some other auto body and repair shops and no one wanted to touch it (the airbag). All of them said things about it being a liability.
Yaris HiltonBristol, Tennessee, USA · Jun 4, 2010#5It's a good way to get yourself killed or maimed if you don't follow the proper procedure. There's a lot of power in those airbags.
jpmck03Thread starterUSA · Jun 4, 2010#6devinlamotheSudbury, Canada · Jun 4, 2010#7Just make sure you don't twist the clockspring too much, there is a really delicate ribbon cable inside (I snapped mine with little force while changing my headlight stalk).
And also make sure to leave your battery disconnected for at least 5 MINUTES prior to removing the airbag contacts, else you have a chance of setting it off. Also make sure to place the horn/airbag with the Toyota symbol facing down, in a place where it won't be hit or touched by anything.
Once you get past that it's really not hard. :)
jpmck03Thread starterUSA · Jun 4, 2010#8It's going to be about a week or two before I pick up the stalk up, but I've been looking around to make sure I've got this figured out so it's good to go once I've got all my parts. Once I have everything ready, the battery will be disconnected while I pull the bumper off, which I'm sure will take a good bit of time (Slow is smooth and smooth is fast.).
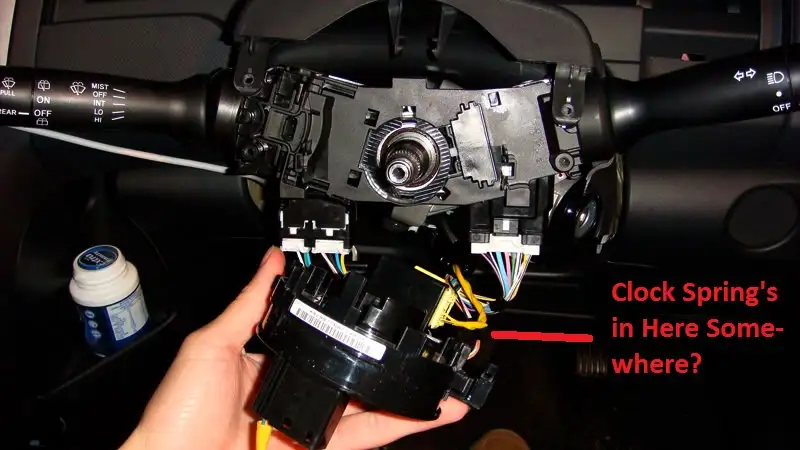
(first attached image) So, the clock spring should be in the "centre spiral assembly" in step 16 of the DIY from my previous link, correct?
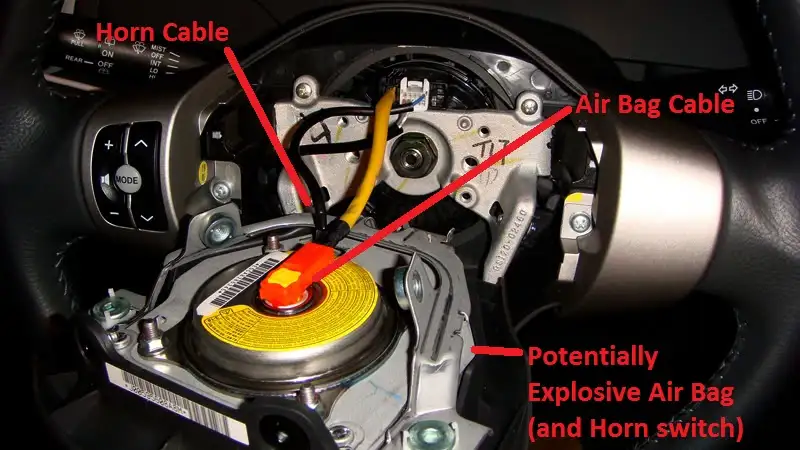
(second attached image) And obviously the center pad contains the airbag, which I'll try my best to treat it like I'm an EOD tech defusing a bomb.
The first picture the guy is actually holding the clockspring in his hand - it's that whole black plastic thing.
yaris2010RSAngus, Ontario · Jun 6, 2010#10wtf? y are ur lights and wipers on opposite sides then mine?
IsLNdbOiLas Vegas, NV · Jun 6, 2010#11Those are pictures from that Australian site isn't it?
90tsimissouri · Jun 6, 2010#12hey i tried to do that... go tired of messing with it and just ran the aftermarket switch. but kept that switch installed.... useless but installed.
jpmck03Thread starterUSA · Jun 6, 2010#13Yes, those pictures are from an Australian DIY, so they are reversed.
I think I've got this pretty much figured out:
- Take off the steering wheel pad and disconnect the air bag and horn.
- Pull off the steering wheel.
- Pull off the clock spring.
- Pull off the head light stalk and replace it with the stalk with fog switch.
- Put everything back together in reverse order, minding the clock spring.
I think I can handle this!
I changed mine out its pretty easy to do. The hardest part was getting the torch screws loose to remove the steering pad. I have pics of my disassembly ill post them for u to follow. Oh n make sure when your new stalk comes not to remove the red tabbed ring
jpmck03Thread starterUSA · Jun 6, 2010#15Thanks bizzlebaby, any more info that I have will make things easier!
I'm going to have to put together a nice DIY guide when I'm done with this.
90tsimissouri · Jun 6, 2010#16its really pretty easy todo.. the "hardest" part was getting the old light stalk to unsnap out of the housing its clipped into. i had to be a mean with it haha. but dont get to ruff tho
bizzlebabyVirginia · Jun 6, 2010#17My pics r on my other memory card so I will try to post them late tonight .... if u make the dumb mistake of pulling the red thing off you will have a hard time getting the new stalk on... its purpose is to hold the stalk opening open so u can easily slip it on the steering column. I removed it n most if my installation time was trying to pry that piece back open.
jpmck03Thread starterUSA · Jun 15, 2010#18When I got my stalk out of the bag, the red thing was in there separate from the stalk.
Anyone have a clue how it's supposed to go back on, and if it's just a temporary thing used to aid in putting on the stalk?
Should be putting this all together this weekend, so any help before I go from the shallow end to the deep end of the "Yaris mods pool" would be great!
CTScottUSA, CT · Jun 15, 2010#19 Originally Posted by
jpmck03 ↑ When I got my stalk out of the bag, the red thing was in there separate from the stalk.
Anyone have a clue how it's supposed to go back on, and if it's just a temporary thing used to aid in putting on the stalk?
Should be putting this all together this weekend, so any help before I go from the shallow end to the deep end of the "Yaris mods pool" would be great!
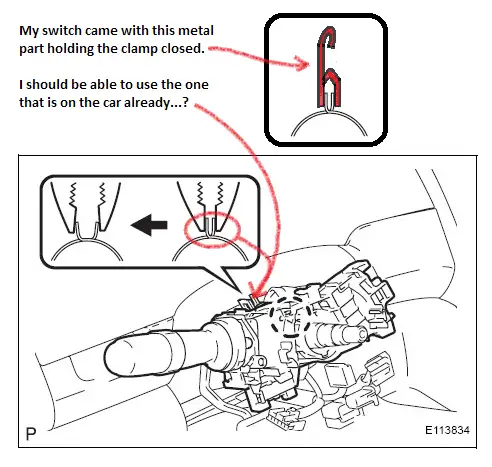
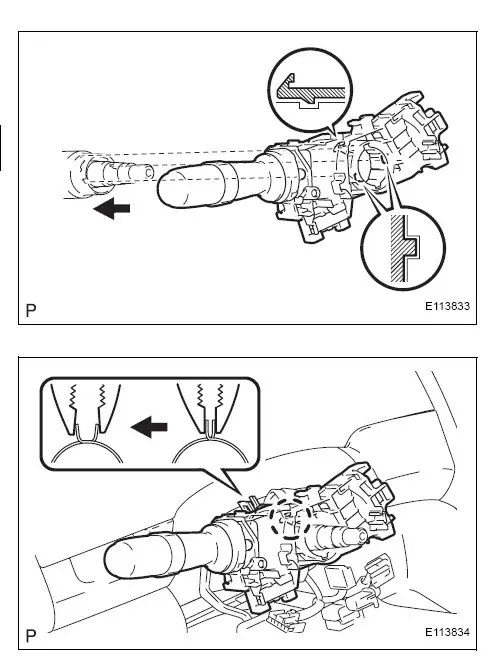
The service manual just shows using a pair of pliers to keep the band clamp open while slipping the switch over the column. I'd use a small pair of needle nose vice-grips to make it easier.
Hmm, this seems like something that I'd need to see a picture of to see if where I think it goes is right. I'm assuming that I'll see it on the factory switch when I pull everything off this weekend...
CTScott, do you have a copy of the service manual I could see or is it on paper?
CTScottUSA, CT · Jun 15, 2010#21 Originally Posted by
jpmck03 ↑ Hmm, this seems like something that I'd need to see a picture of to see if where I think it goes is right. I'm assuming that I'll see it on the factory switch when I pull everything off this weekend...
CTScott, do you have a copy of the service manual I could see or is it on paper?
The entire service manual is posted in a sticky in the DIY section, but this image shows it:
I forgot that those service manuals were there...
😳
...but, I've got it!
The metal hoop is simply a clamp that, once you remove the red part, holds the stalk onto the steering column.
The only thing I'm wondering is, can I tape the clock-spring in order to keep everything in the same position once I put it back on. I'm thinking either this is one clever idea... or really dumb. (Yeah, that's nothing to do with the light stalk...)
Originally Posted by
jpmck03 ↑ I forgot that those service manuals were there...
😳
...but, I've got it!
The metal hoop is simply a clamp that, once you remove the red part, holds the stalk onto the steering column.
The only thing I'm wondering is, can I tape the clock-spring in order to keep everything in the same position once I put it back on. I'm thinking either this is one clever idea... or really dumb. (Yeah, that's nothing to do with the light stalk...)
Tape is definitely a good idea. Below is a link to a video I just put together to make things easier for you. A picture may be worth a thousand words, but a video is worth millions...
http://www.youtube.com/watch?v=LgWSzVeILhc🙇 🙇 🙇 🙇 🙇 🙇
CTScott, you are the man!
 Yarisworld