 Yarisworld
I want to paint my grey hubcaps black til I save up enough for some new wheels, so I was wondering, do I just sand them a little, then primer and then paint...? If not, what's the most "professional" way of doing it?
What's the right way to paint hubcaps?
31 posts · 36,665 views
Replies 30
I'd sand them down stepping up(?) in grit, meaning going from coarse to really fine (not directly of course), then wash them up really good with some dish wash soap. Primer, then base coat about an hour later. Add more layers as you wish at the recommended intervals on the can. Then after letting it dry, shoot it with some clear coat.
I'd like to do this as well and I've had questions about what grit of sandpaper to use. I started to sand one of the wheelcovers but stopped after getting one section done and I thought I'd check around here and ask.
I started sanding with 150 grit sandpaper and that seemed like it was gouging the plastic a little. After using that to get the first section done, I went back over it with 80 grit and that removed the deeper marks but here's my question.
Do I need to use a lower grit paper after the 80 to get better results or am I just wasting precious calories at that point?
Thanks,
S.R.
I started sanding with 150 grit sandpaper and that seemed like it was gouging the plastic a little. After using that to get the first section done, I went back over it with 80 grit and that removed the deeper marks but here's my question.
Do I need to use a lower grit paper after the 80 to get better results or am I just wasting precious calories at that point?
Thanks,
S.R.
mate i gave them a lit sand 1200 grit hit them wis wax and grease remover don't touch after applying then sprayed them take your time do it in a dry/warm place away from dust for best outcome
yeh guys that grit is too rough you need 800 grit some thing to just take the shine off thats all
You can just use a scuff pad for the sandingOriginally Posted by eocintron ↑I want to paint my grey hubcaps black til I save up enough for some new wheels, so I was wondering, do I just sand them a little, then primer and then paint...? If not, what's the most "professional" way of doing it?
Sweet... Thanks guys. I'll be painting them in the next couple of weeks, and I'll be sure to post some pics so u can see the results!
Thanks! Can you post "before, during, after " ? :)
well, if you want 😉
well, if you want 😉
sand to scuff surface
clean
primer
paint
clear
clean
primer
paint
clear
So I guess I'm +1 on the overkill then :)
Thanks for the info.
S.R.
Thanks for the info.
S.R.
At least you learned what 120 grit will do to a surface 😉Originally Posted by SaerinRhoe ↑So I guess I'm +1 on the overkill then :)
Thanks for the info.
S.R.
Get some plastic filler from a hobby shop and fill in those gouges before sanding and painting.
dont tell my you guys are still clipping the gutter :P lol
Get some plastic filler from a hobby shop and fill in those gouges before sanding and painting.
Sure!Originally Posted by tomato ↑Thanks! Can you post "before, during, after " ? :)
well, if you want 😉
I actually just did this and here is what was successful for me.
Remove Hubcaps
Wash thoroughly with dish soap
Remove the Toyota emblems if you want them to remain chrome
Scuff all of the shine off of the caps with grey scotch brite
Wash again with dish soap
Once dry, dust them with a tack cloth without touching the surface to be painted with you hands
Put a light coat of Adhesion Promoter(I use this when painting any plastic or Aluminum)
Prime
Paint
Clear coat if necessary
Glue the emblems back on (I used a high strength Resin glue)
Done
Remove Hubcaps
Wash thoroughly with dish soap
Remove the Toyota emblems if you want them to remain chrome
Scuff all of the shine off of the caps with grey scotch brite
Wash again with dish soap
Once dry, dust them with a tack cloth without touching the surface to be painted with you hands
Put a light coat of Adhesion Promoter(I use this when painting any plastic or Aluminum)
Prime
Paint
Clear coat if necessary
Glue the emblems back on (I used a high strength Resin glue)
Done
what kind of paint do you use? Anything?
Prep prep prep prep and more prep!
Did I say prep?
That's the most important thing by far! Getting a nice clean surface so you can lay down paint nice and even.
Did I say prep?
That's the most important thing by far! Getting a nice clean surface so you can lay down paint nice and even.
Don't do it. Buy rims.Originally Posted by eocintron ↑I want to paint my grey hubcaps black til I save up enough for some new wheels, so I was wondering, do I just sand them a little, then primer and then paint...? If not, what's the most "professional" way of doing it?
Ok, so I started the process, but it's been raining like hell in Puerto Rico, so, that slowed me down. I'll post pics up to what I've done, which is sanding and applying primer.
Picture lost · i37.tinypic.com
Before
Picture lost · i36.tinypic.com
During (after sanding with 3M 1000 and 600 in that order)
Picture lost · i35.tinypic.com
During (after primer)
Picture lost · i35.tinypic.com
During (all hubcaps with primer)
If the weather decides to cooperate with me, I'll soon post pics of the job finished. Its coming along pretty well I'd say...👍
Picture lost · i37.tinypic.com
Before
Picture lost · i36.tinypic.com
During (after sanding with 3M 1000 and 600 in that order)
Picture lost · i35.tinypic.com
During (after primer)
Picture lost · i35.tinypic.com
During (all hubcaps with primer)
If the weather decides to cooperate with me, I'll soon post pics of the job finished. Its coming along pretty well I'd say...👍
Cool, I can't wait to see. I want to do this eventually. I can't justify spending hundreds of dollars on rims. I don't love my car that much haha.
Messed up man! I do want to get some rims, but I dont have the hundreds of dollars, even though I love the car that much... But, I will, so yeah... Patience is the name of the game 🙄Originally Posted by wiirenet ↑Cool, I can't wait to see. I want to do this eventually. I can't justify spending hundreds of dollars on rims. I don't love my car that much haha.
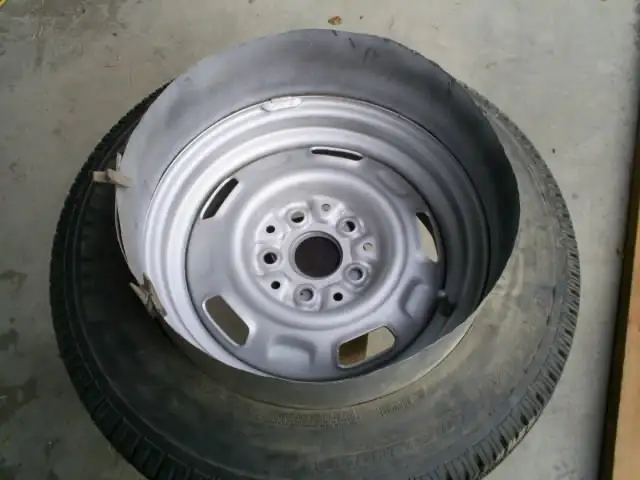
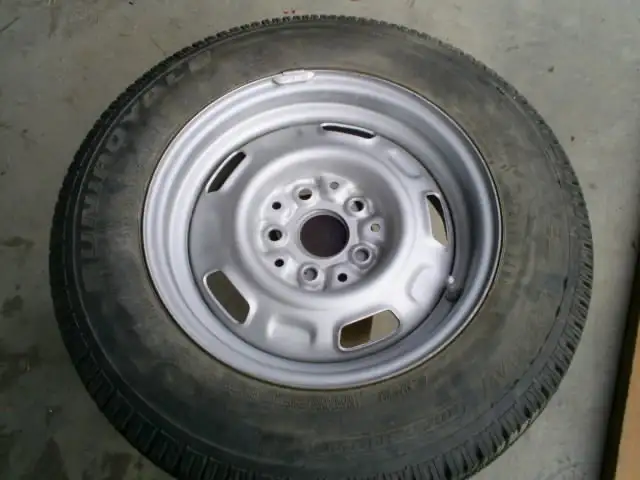
One little trick: go to the hardware store and buy a "lazy susan" bearing for a couple of bucks, set it on a length of 6x6 or a small stool, place the (prepped!) cap on it, and rotate the cap while spraying. If I can post the pics, you will get the idea; pics are of a wheel, with an aluminum mask to keep the paint off the tire...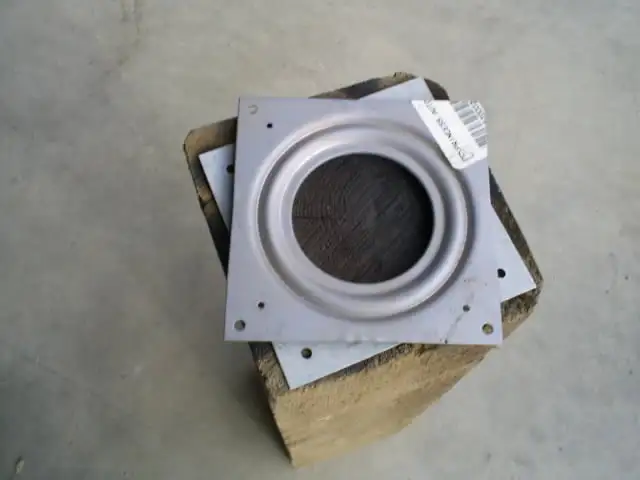
That makes sense... I already did the painting, but for future references, A+
Update:
I already painted the hubcaps, 3 coats of black, heat resistant paint, Ill post pics later cuz I gotta get to work in a couple of minutes, hopefully tomorrow I'll apply the clear coats for the smooth, shiny, pro finish, and obviously pics will be posted... Btw, thanks to everyone for all the ideas and the help u've given me, much appreciated!
Update:
I already painted the hubcaps, 3 coats of black, heat resistant paint, Ill post pics later cuz I gotta get to work in a couple of minutes, hopefully tomorrow I'll apply the clear coats for the smooth, shiny, pro finish, and obviously pics will be posted... Btw, thanks to everyone for all the ideas and the help u've given me, much appreciated!
Ooook, so f'ing finally the weather gave me a break and I was able to finish the job. As soon as I mounted the hubcaps and finished waxing the car, it rained... so fuck... but at least I got to take some pics with the job finished. Here they are...
Picture lost · i49.tinypic.com
after 4 layers of black, heat resistant paint
Picture lost · i50.tinypic.com
Close up...
Picture lost · i49.tinypic.com
Already mounted, after 4 layers of clear coating
Picture lost · i48.tinypic.com
And here's the view from an "angle" O_o
So yeah, its done, it wasnt hard, just annoying because of the weather... In really sunny days I bet you could do it in about 2 days. Oh and btw, since I was dealing with paint and sand paper, I decided to black out the back emblem... Exactly same process that the hubcaps went through, except that I only used 2 layers of black and 2 of clear... here's a pic.
Picture lost · i46.tinypic.com
So thanx to every1 who helped in this thread, much appreciated!
Picture lost · i49.tinypic.com
after 4 layers of black, heat resistant paint
Picture lost · i50.tinypic.com
Close up...
Picture lost · i49.tinypic.com
Already mounted, after 4 layers of clear coating
Picture lost · i48.tinypic.com
And here's the view from an "angle" O_o
So yeah, its done, it wasnt hard, just annoying because of the weather... In really sunny days I bet you could do it in about 2 days. Oh and btw, since I was dealing with paint and sand paper, I decided to black out the back emblem... Exactly same process that the hubcaps went through, except that I only used 2 layers of black and 2 of clear... here's a pic.
Picture lost · i46.tinypic.com
So thanx to every1 who helped in this thread, much appreciated!
I dunno dude....maybe it's just me, but if you wanted black, why not just take off the hubcaps and leave it at that?
Cuz the hubcaps have a much better look than the "rims" the car has installed by default, and they come out not black black, but like a faded black, which sucks. To top it off, they dont have the Toyota logo, and the wheel lugs look horrible, since you can see the whole thing and not just the chrome heads, as u do with the hubcaps or other rims. So that my friend, is why I wanted black hubcaps... 👏Originally Posted by captainm27 ↑I dunno dude....maybe it's just me, but if you wanted black, why not just take off the hubcaps and leave it at that?
lol, well that makes sense I suppose. I'm still not thrilled by the looks, but I'll say this, you did a fine job! Excellent work with the paint. You really planned this out well.Originally Posted by eocintron ↑Cuz the hubcaps have a much better look than the "rims" the car has installed by default, and they come out not black black, but like a faded black, which sucks. To top it off, they dont have the Toyota logo, and the wheel lugs look horrible, since you can see the whole thing and not just the chrome heads, as u do with the hubcaps or other rims. So that my friend, is why I wanted black hubcaps... 👏
FYI for those following this thread, i wanted to note that your earlier posts say you did 1000 grit THEN 600 grit. Your results look great, but people looking to do this should walk UP in grit, moving from 600 (coarse to file down rough spots) to 1000 (to smooth the surface). Great look IMHO!
Hum... good to know for future references. The next thing Im planning to do is to paint the inside's control panel (where the AC controls and radio are) white, so, Im sure its pretty much the same process, but what grit paper would u recommend? and of course, in what order. Im more concerned with this one cuz its the inside and I have to look at it while I drive, so dont wanna mess it up...Originally Posted by PatrickJohnson ↑FYI for those following this thread, i wanted to note that your earlier posts say you did 1000 grit THEN 600 grit. Your results look great, but people looking to do this should walk UP in grit, moving from 600 (coarse to file down rough spots) to 1000 (to smooth the surface). Great look IMHO!
By replacing them with real wheels.
... wut? O_o
Hi, I have had my car since I paid cash for it on my 17th Birthday in 2007. My Fiance drove it for a while, and he ate up my hubcaps badly. I know one is beyond repair as its cracked, but I was hoping to salvage the other 3 if possible.
So, my question is, are these scraped too deep to even bother? I know for sure I can save two of them, but they aren't exactly cheap to replace. These are my second set and he no longer drives Pipsqueak.
Instead of filling the thread of images, I uploaded here to Dropbox in a gallery.
https://www.dropbox.com/sh/b5x71dssjpgu9ks/2rcMFEZidL
So, my question is, are these scraped too deep to even bother? I know for sure I can save two of them, but they aren't exactly cheap to replace. These are my second set and he no longer drives Pipsqueak.
Instead of filling the thread of images, I uploaded here to Dropbox in a gallery.
https://www.dropbox.com/sh/b5x71dssjpgu9ks/2rcMFEZidL