Yarisworld Archive

TANABE DF210 Spring Install [pics]

146 posts · 139,307 views · page 1 of 3

Chris07LBOriginal postNew Jersey · Jul 28, 2006#1
*NOTE TO INSTALLERS*
This is just a GUIDE for the general way of doing the install. This is NOT a bible, you may find an easier way and much quicker way to do the entire procedure. Please add your notes and findings if it will be helpful to others.
Do NOT F*CKING BITCH if you dont know right from left, loose from tight!
Enjoy.


Just finished the install today.

Special thanks to C2AUTOSPL! for hooking me up!! After you see how easy this was, go ahead an order up a set from Jay.

Total time, with finding correct sizes, removing tires, jacking up, positioning jack stands, etc., was just under 2 hours, including cleanup, and taking these pictures and notes. 🙂

Your times may vary.

Before doing any spring installs, I like to measure each corner, to compare later the drop given. I was at 15" at all four corners. This is always the way I measure... bottom of wheel well, in the center to center of wheel
Attached picture not available

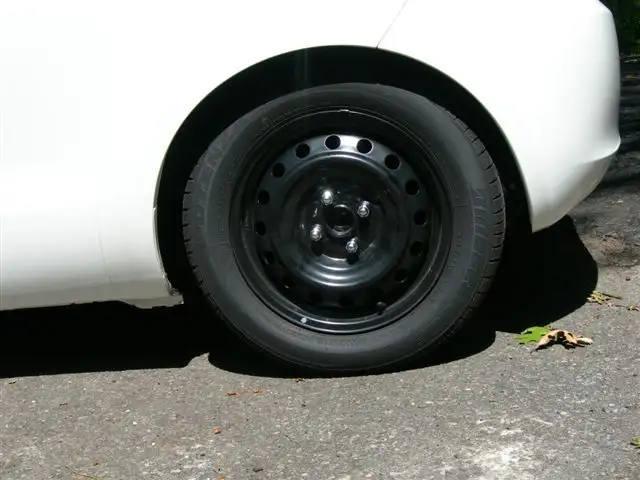
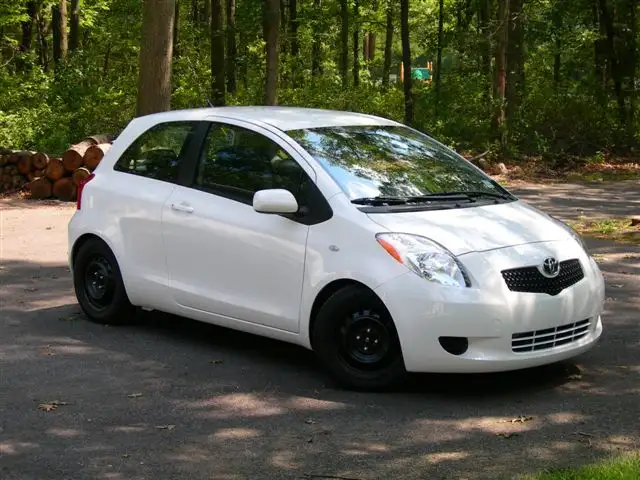
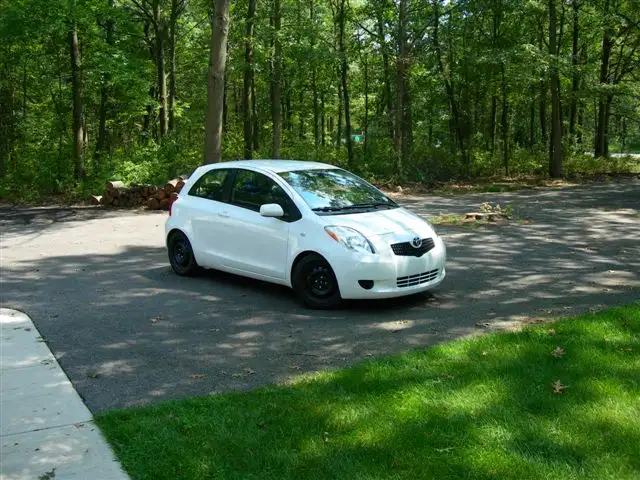
AFTER measurements were 13" all around!

Starting off with the easiest part first, the REAR Springs.
We will be doing both sides at the same time..
Break the lug nuts loose, then jack up the car. Position jack stands, and remove wheels.

Tools Needed for rear:
9/16 deep socket; 1/2 drive
9/16 box wrench

Remove the lower shock nut & bolt. Remember to do both sides before continuing. This will give the most "play" in the suspension, to drop the springs out.
Attached picture not available

Once both lower shocks bolts are out, you can press down on the rear axle's, and the spring will just fall out.

Comparing the Tanbe DF210's to the Stock Toyota.
Attached picture not available

Be sure to re-install the top rubber coil dampener, so that the spring sits in the pocket. NOTE make sure the Tanbe DF210 logo is right-side-up!!
Attached picture not available

Tanbe sends this plastic cover for the bottom of the last 4 coils. I was told its to prevent any kind of chatter, being that area is compressed so close, that the coils may rub a little. PITA to wrap it all around, but it's for the best. 🙂
Attached picture not available

Rear Tanbe's installed. Tighten shock bolts, install wheels, and torque lugs to 75 Foot Pounds. Rear Complete!
Attached picture not available

Moving on to the fronts. I did one side at a time up here.

Tools Needed for Front:
9/16 socket; 1/2 drive
19mm deep socket; 1/2 drive
17mm box wrench
6mm allen key
Hacksaw

We need to remove the (2) Sway Bar end links, (2) Strut bolts, and (1) Brake bolt.
Follow the bolts with sizes marked, and remove.. any order is fine.
Attached picture not available
Should say LOOSEN and tighten below..
Attached picture not available

Once all is removed, the only thing holding the strut/spring assy., is the upper nut.
Open the hood. Remove the entire windshield wiper plastic cowl. Stay with me, its easier then it looks! 😁

First, the wipers need to come off. Remove the cap, and with a 9/16 box wrench, remove the nuts.
Attached picture not available

Next, bend wiper arm, and rock it back and forth, while pulling straight up to remove it from cowl. NOTE, I marked the wiper and threads, to make sure I re-installed it back later in the same place.
Attached picture not available

Remove these (3) plastic push pins. And just set pieces out of the way.
Attached picture not available
[IMG]PICTURE MISSING![/IMG]
[IMG]PICTURE MISSING![/IMG]


Next, pry up the rubber dust cap.
Attached picture not available

Under the cap is a nut holding the top of the strut assy., to the shock tower of car. Get your 17mm box wrench and loosen the nut while HOLDING the center from spinning, with a 6mm allen key.

Once loose, remove enitre assy., from car.
Attached picture not available

Again, not needed, but I marked some reference points.
Attached picture not available

Loosen the top hats nut a LITTLE with your 17mm and 6mm from before.
Attached picture not available

Get the strut assy., in a spring compressor.
Attached picture not available

Compress spring, and now you can SAFELY remove top hat, followed by the dust boot.
Attached picture not available

Comparing the Tanbe and Toyota springs.
Attached picture not available

Bump stop time.. You will need to shorten your bump stops, so that your not "riding the shocks" from your decrease in height.
Cut against the plastic center ring, to make a nice straight cut with a hacksaw.
**** NOTE ****
Follow your spring makers instructions, and search or call to find out how much if any needs to be cut if installing springs/struts OTHER then what is shown in this DIY.


Attached picture not available

Top hat and new, shortened bump stop.
Attached picture not available

Time to re-install the strut with the new Tanbe Spring, being sure to have the bottom of spring, inside the struts stamped groove.
Spring compressor not needed to install new spring. Tighten the top hat all the way (you can compress the spring assy., to see where it bottoms out).
Attached picture not available

New strut ready to install.... Reverse earlier steps,....... and installed! 😁
Attached picture not available

I'm loving the new stance!

Enjoy the How-Do, I hope it helps!!
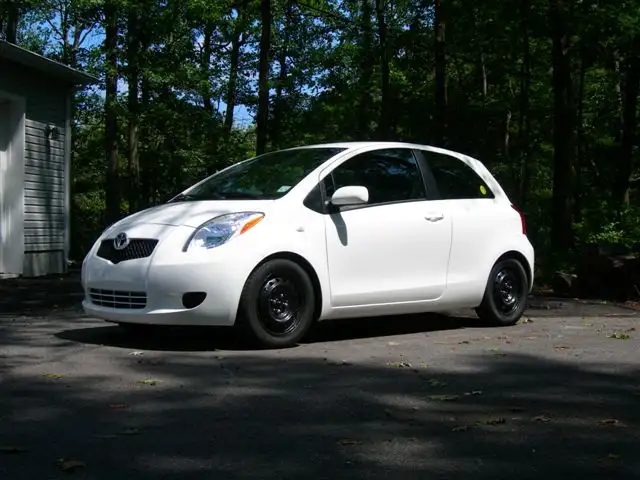
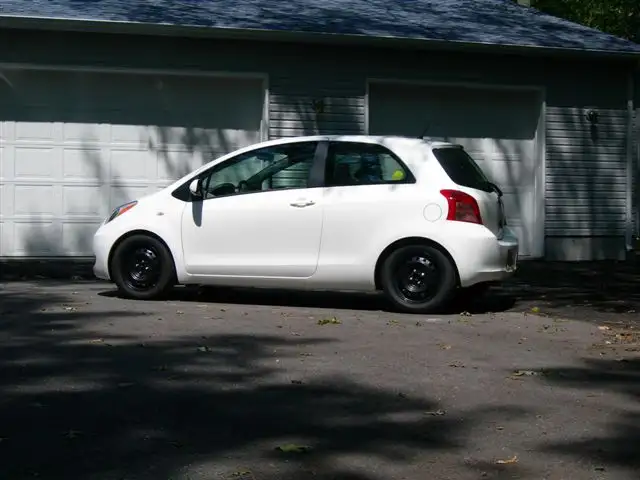
AFTER 003.jpgAFTER 004.jpgAFTER 006.jpgNuxen H4 007.jpgNuxen H4 006.jpg

Replies 145

Chris07LBThread starterNew Jersey · Jul 28, 2006#2
Originally Posted by Sp33dY
Look forward to after pics . !!!
Meaured the distance from teh guard to the center of the wheel yet? :)

One question though .... Surely chopping a 3/5 of the bump stop off isnt the best thing to do??? Ive done this once on a mates Lancer teamed with Hotbits coilovers, purely to get another 1" drop. The ride however was a lot worse with the shortened bump stop, and shocks ended up squeeking badly after a few months.

So in effect, u chopped the bump stop instead of buying shorter shocks to stop the shox from riding ... right? Any idea if there are aftermarket shortened bumpstops ? Is the ride bouncy at all?

Would u consider replacing the bumpstop with a factory item and just buying shorter shocks for better ride quality?
Very tired right now, but ill answer what i can...

1. The new measurement number is posted.
2. You NEED to cut the bump stops if using the stock shocks.
3. Tanbe USA, who I spoke with today, said the DF210's were designed to work with the stock shocks, and stock sway bar links.
4. When these shocks wear out, I will replace with Koni's.

Thanks for your concerns... 🙄
spacemanoeuvresBucks County, PA · Jul 28, 2006#3
👏

you rock, can't wait for the after pics!
Yaris_PRPuerto Rico · Jul 28, 2006#4
Great work and post Chris... I can't wait to see those pictures.🎉
C2AUTOSPLLoma Linda, CA · Jul 28, 2006#5
NIce write up. This needs to be stickied. BTW, i got your lower bar here, just need to get the right box for it.
ChinoCharlesOH · Jul 29, 2006#6
🙇 🙇 🙇 🙇 🙇

WERE NOT WORTHY WERE NOT WORTHY
Yaris_PRPuerto Rico · Jul 29, 2006#7
By the way C2AUTOSPL , need to clear your PM's, I need to ask you a question about some parts...😁
C2AUTOSPLLoma Linda, CA · Jul 29, 2006#8
sorry....PM box cleaned.

BTW, both DF210 and NF210 now instock.
Ran KizamaCanton, GA · Jul 29, 2006#9
Nice write-up. I was installing mine earlier and the backs were a breeze. However, when doing the front I didn't need the allen wrench on the sway bar link and I also only undid the top bolt then swung it out of the way. Oh yeah, one more thing...

WEAR GLOVES

When attempting to undo the top of the front strut, I couldn't get a good feel with my gloves on. So I took them off. Upon applying pressure to my wrench, my hand slipped off and slid cleanly across that sharp aluminum cover that runs across the top of the engine bay. Blood across my engine cover and exposed bone has postponed my front spring installation until further notice.

Just a fair warning to others out there. 🙁

<- Idiot 👎
Chris07LBThread starterNew Jersey · Jul 29, 2006#10
Originally Posted by Ran Kizama
Nice write-up. I was installing mine earlier and the backs were a breeze. However, when doing the front I didn't need the allen wrench on the sway bar link and I also only undid the top bolt then swung it out of the way. Oh yeah, one more thing...

WEAR GLOVES

When attempting to undo the top of the front strut, I couldn't get a good feel with my gloves on. So I took them off. Upon applying pressure to my wrench, my hand slipped off and slid cleanly across that sharp aluminum cover that runs across the top of the engine bay. Blood across my engine cover and exposed bone has postponed my front spring installation until further notice.

Just a fair warning to others out there. 🙁

<- Idiot 👎
Wish I was closer, Id button the front up over a beer or two for ya. 🙁

Feel better bro! 🙂
BooMadison, WI · Jul 29, 2006#11
Just wonder.. do you need to use spring compressing tool for putting back the rear spring?
Chris07LBThread starterNew Jersey · Jul 29, 2006#12
Originally Posted by Boo
Just wonder.. do you need to use spring compressing tool for putting back the rear spring?
Follow the DIY above, there was no mention or need for a spring compressor in the rear.. there is no strut, of shock thru the center.. Its a completely different ballgame back there.
Chris07LBThread starterNew Jersey · Jul 29, 2006#13
Originally Posted by C2AUTOSPL
NIce write up. This needs to be stickied. BTW, i got your lower bar here, just need to get the right box for it.
Thanks Jay.. I look foward to getting it!!! 😁
Chris07LBThread starterNew Jersey · Jul 29, 2006#14
Is everyone able to see all the pictures above in the How-To?? Just want to be sure knowone's getting an error mesasage of sorts. 🙂
johnnyfiveMilwaukee WI · Jul 29, 2006#15
can see all pics fine, and nice job on the write up ;)

cant wait for my springs to come in :)

oh, and maybe you should update your siggy, with the new lower yaris? :)
SamDaYarisManflorida · Jul 29, 2006#16
Great job chris, glad you did the how to instead of me. You didnt miss anything. Im also very happy with mine. Ride is just a tad stiffer but car corners a whole lot better. i didnt cut my bump stops and it hasnt bottomed out yet..knock on wood.
Chris07LBThread starterNew Jersey · Jul 29, 2006#17
Originally Posted by SamDaYarisMan
i didnt cut my bump stops and it hasnt bottomed out yet..knock on wood.
I only cut mine, just because over the years every car i've lowered, said to.
I called Tanbe USA just to ask and be sure, and they said to cut them as well. 🤷
Chris07LBThread starterNew Jersey · Jul 29, 2006#18
Originally Posted by johnnyfive
can see all pics fine, and nice job on the write up ;)
cant wait for my springs to come in :)
oh, and maybe you should update your siggy, with the new lower yaris? :)
Thanks Johnny. 🙂

As soon as I figure out this damn camera, ill do a nice update with my new look I have coming.... 😉
MooseCumming, GA · Jul 29, 2006#19
Originally Posted by Chris07LB
I only cut mine, just because over the years every car i've lowered, said to.
I called Tanbe USA just to ask and be sure, and they said to cut them as well. 🤷
I've lowered countless cars, and I always cut the amount off of the bumpstop that the car is being lowered (cut 1.5" off of the bumpstop if you are lowering the car 1.5"). That way, the strut travel stays exactly the same as it was while stock springs were on the vehicle, and leads to longer strut life, and thus more time to save up for Koni reds. 😆
paultyler_82USA · Jul 29, 2006#20
I second that, when you're working on your car ALWAYS WEAR GLOVES! I learned that nasty lesson the hard way when I changed the knock sensor on my I30 without removing the upper intake manifold... apparently it has this nice sharp little seam edge that's hard to see and razor sharp, I'll leave the rest to your imagination... Anyway, I used to have a nice pair of Mechanix gloves but I tore them to hell so I purchased a pair of Damascus cutproof gloves from the Galls Law Enforcement catalog at work they're meant for officers to use on patdowns, but they do really well for protecting against all the sharp little things lurking in an engine compartment as well. Oh! And looking good with the new springs, I've never used Tanabe, guess I may have to start!
BooMadison, WI · Jul 29, 2006#21
Nice write up 👍 .. I really wish my car can come soon.. so I can install a new set of spring and strut.
Chris07LBThread starterNew Jersey · Jul 30, 2006#22
BTW, I wore gloves, just not while holding the camera. 😉
Chris07LBThread starterNew Jersey · Jul 31, 2006#23
MODERATORS (if any exist on this forum ever!) PLEASE MAKE THIS A STICKY!
Tanabe USATorrance, CA · Jul 31, 2006#24
An excellent writeup Chris! Please let us know your initial impressions on the ride quality, handling, etc!

Out of the three new sub-compact cars (Yaris, Fit, and Versa) the Yaris exhibited the best handling qualities and ability to easily rotate when we tested all 3 during R&D. The car should be a bit more fun to drive now :D
Chris07LBThread starterNew Jersey · Jul 31, 2006#25
Originally Posted by Tanabe USA
An excellent writeup Chris! Please let us know your initial impressions on the ride quality, handling, etc!

Out of the three new sub-compact cars (Yaris, Fit, and Versa) the Yaris exhibited the best handling qualities and ability to easily rotate when we tested all 3 during R&D. The car should be a bit more fun to drive now :D
My pleasure! 🙂 I enjoy doing How-To's that will help the community here.

I am getting ready to leave for work soon, which is a 120 mile trip each way, so I will report back tomorrow with my results.

Side note, the wife took the Yaris out before, rather then the Nissan Armada, and she said she LOVED the way it drove!

Chalk one up to the new ride quality of a slammed Tanbe Yaris! 😁 👏
OxyG3nEMontreal , Quebec , Canada · Aug 2, 2006#26
many people told me to not cut the bumpstop ... i dont know what to do ... if i dont cut it .. is it bad? ;p
Ran KizamaCanton, GA · Aug 3, 2006#27
Originally Posted by OxyG3nE
many people told me to not cut the bumpstop ... i dont know what to do ... if i dont cut it .. is it bad? ;p
Depending, it could ride on the shock which will drastically decrease the lift span of it. If you're really worried about it, save up and get some TRD or Koni shocks to accompany your springs. 🙂
slvryarisIndiana · Aug 3, 2006#28
Originally Posted by OxyG3nE
many people told me to not cut the bumpstop ... i dont know what to do ... if i dont cut it .. is it bad? ;p

Thats the bottoming out we are talking about in the other forums. Lowering your ride brings the shocks and everything down also. Cut the bump stops to keep from slamming the suspension on the bumpstops. They will still do their job just cut off as much as you lowered the car as explained earlier. This is what I have always been taught.
Chris07LBThread starterNew Jersey · Aug 3, 2006#29
Originally Posted by OxyG3nE
many people told me to not cut the bumpstop ... i dont know what to do ... if i dont cut it .. is it bad? ;p
Well I could explain until i'm blue in the face... seems im almost there anyway on this subject.

When in doubt, call the manufacturer of your springs. 🙂

I have been doing this for a looong time, and this is how I (and others that also replied) do it as well with lowering springs.. choice is yours though. Find out, and do it right the first time, or else you will have great practice at removing everything again. 👏
OxyG3nEMontreal , Quebec , Canada · Aug 3, 2006#30
ok thanks :p ill do the way u said to! :) wont ask u anything again lol i know i can be annoying sometime :p
slvryarisIndiana · Aug 3, 2006#31
Originally Posted by Chris07LB
Well I could explain until i'm blue in the face... seems im almost there anyway on this subject.

When in doubt, call the manufacturer of your springs. 🙂

I have been doing this for a looong time, and this is how I (and others that also replied) do it as well with lowering springs.. choice is yours though. Find out, and do it right the first time, or else you will have great practice at removing everything again. 👏
Practice makes perfect 👍 It is really looking good. Do you have any problems making that kick ass turning radius???? If it doesnt rub with the stock 15's then 17's on mine should be fine..Great job and notes are excellent🙇
Chris07LBThread starterNew Jersey · Aug 3, 2006#32
Originally Posted by OxyG3nE
ok thanks :p ill do the way u said to! :) wont ask u anything again lol i know i can be annoying sometime :p
LOL.. no not at all. Its just sometimes I feel like a broken record. If I took the time to do a How-To, I wouldn't do ya's wrong! 🙂
Chris07LBThread starterNew Jersey · Aug 3, 2006#33
Originally Posted by slvryaris
Practice makes perfect 👍 It is really looking good. Do you have any problems making that kick ass turning radius???? If it doesnt rub with the stock 15's then 17's on mine should be fine..Great job and notes are excellent🙇
Turning is still "kick ass."

No rubbing WHAT-SO-EVER! 👍 Full lock, and going over a bump, or up a driveway, no rubbing of fenders, or scrubbing of bumper.

Thank you, it took a while, but IMO, the How-To came out great. 🙂
Chris07LBThread starterNew Jersey · Aug 3, 2006#34
Originally Posted by Sp33dY
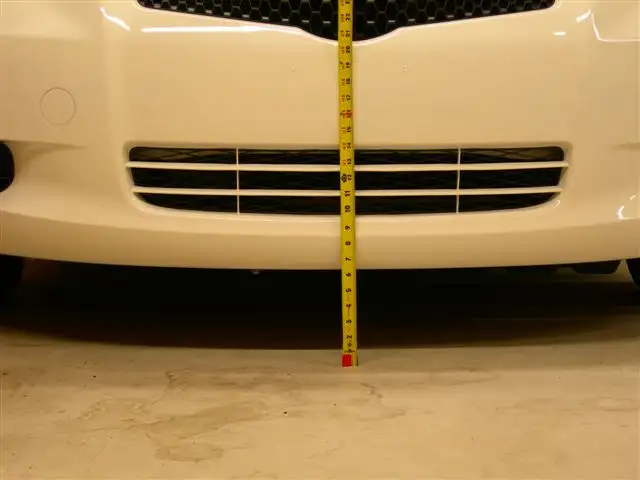
Chris07LB ... only just realised ud updated page #1 with after exterior pics .... Looks nice and low! Just wondering if you are able to measure the car at the lowest point underneath ? I dont know about the US, but in AUstralia a car cannot be less than 100mm at the lowest point. ;) Am just trying to consider my options for when my sedan eventually comes. Cheers!
Not a problem... Ill go out to the garage......give......me.....a........minute...... . 😎
Chris07LBThread starterNew Jersey · Aug 3, 2006#35
Originally Posted by Chris07LB
Not a problem... Ill go out to the garage......give......me.....a........minute...... . 😎
Here ya go... tape tells it all. 😁
Nuxen H4 017.jpg
OxyG3nEMontreal , Quebec , Canada · Aug 3, 2006#36
inch or centimeter?
Chris07LBThread starterNew Jersey · Aug 4, 2006#37
Originally Posted by Sp33dY
6 inch = 15cm! That still way higher than it looked in the pics on page 1! I'd of thought part of the undercarriage or side chassis sills/frame would sit lower than the front bumper! Thanks Chris :)
Crap, there is the lower plastic "skid plate" that does hang a bit lower... its the plastic pannels that keep junk from coming up into the engine bay.
07WYarisRSRidgeway Ontario · Aug 4, 2006#38
What about needing a front end alignment?

The last car I installed struts/springs on was my 88 beretta and it needed an alignment badly when I was finished.
LizardboyMoreno Valley, CA · Aug 4, 2006#39
Chris07LB, how is the ride compared to stock? That's my only concern. I know it'll be harsher, but how much harsher?
slvryarisIndiana · Aug 4, 2006#40
Originally Posted by Chris07LB
Here ya go... tape tells it all. 😁
SWEET. I measured mine today stock and I have almost the same exact measurements on the S. and from the front ground effect from the ground is 8 almost 9 inches. So if lowered it would be almost 6 to 7 like your LB. I thought that was weird.
johnnyfiveMilwaukee WI · Aug 5, 2006#41
got my springs in today, long work day tomorrow, but ill try and sneak out early and throw them on, otherwise ill have measurments, and photos of them on the S sedan sunday after noon :)
slvryarisIndiana · Aug 5, 2006#42
Originally Posted by johnnyfive
got my springs in today, long work day tomorrow, but ill try and sneak out early and throw them on, otherwise ill have measurments, and photos of them on the S sedan sunday after noon :)

Right on. I got my wheels and everything now. Just waiting to put them on. Let me know how it goes and we definitley want to see some pics. I wanna see how low these things are gonna ride.
johnnyfiveMilwaukee WI · Aug 6, 2006#43
install on the S Sedan is done, with one thing to add. If you have ABS you will need to desconect the abs sensor clip from the rear torsionbar to get the travel needed to remove the rear springs (the sensorline on the front is removed with the breakline clip)
the clips are attached just infront of the brake drums, and use a 10mm bolt
Picture lost · img.photobucket.com

another side note, wear gloves...i have always thought that "gloves were for wussys"?... and have always prefered the greater feal of hands on working. but i got a fairly serious cut in my palm when a wrench sliped removing the top nut, and hand slid onto the sharp surface of the wiper cowel area (not bone revealing though 👍 ) would have probably worked better if i was using a box wrench with a droped box (not sure how to explain it) instead of using a combination wrench with just the slightly angled box end.

but 4 stiches later and the job is done, and the bottom of the front lip sits just 5.5" from the roadway, get full lock to lock turning, and no tire rub at speed, or on rough road, and the stance looks 100 times better

before:
Picture lost · img.photobucket.com

after:


next thing on my list is buying a pair of mechanics gloves :)
ohh, and then rims :)
LizardboyMoreno Valley, CA · Aug 7, 2006#44
Originally Posted by johnnyfive
install on the S Sedan is done, with one thing to add. If you have ABS you will need to desconect the abs sensor clip from the rear torsionbar to get the travel needed to remove the rear springs (the sensorline on the front is removed with the breakline clip)
the clips are attached just infront of the brake drums, and use a 10mm bolt


another side note, wear gloves...i have always thought that "gloves were for wussys"?... and have always prefered the greater feal of hands on working. but i got a fairly serious cut in my palm when a wrench sliped removing the top nut, and hand slid onto the sharp surface of the wiper cowel area (not bone revealing though 👍 ) would have probably worked better if i was using a box wrench with a droped box (not sure how to explain it) instead of using a combination wrench with just the slightly angled box end.

but 4 stiches later and the job is done, and the bottom of the front lip sits just 5.5" from the roadway, get full lock to lock turning, and no tire rub at speed, or on rough road, and the stance looks 100 times better


next thing on my list is buying a pair of mechanics gloves :)
ohh, and then rims :)
So what is the ride like? How much harsher is it than stock.
Chris07LBThread starterNew Jersey · Aug 7, 2006#45
Will be updating original post with my ONE WEEK, 600 Mile later review with AFTER pictures, of the Tanbe DF210's.

Stay tuned. 😎
ChinoCharlesOH · Aug 7, 2006#46
Hot.
Chris07LBThread starterNew Jersey · Aug 13, 2006#47
< > BUMP 4 Updated AFTER Pics in Original Post < >
03Z33SoCal · Aug 26, 2006#48
Just finished mine tonight... thanks for the helpfull write up! 👍

I actually didn't have a 6mm allen key that can fit under the metal tray, so I ended up removing the wiper motor and metal tray to get full access to the strut cap from the top... it doesn't take very long at all and I was able to quickly pop the struts out using the impact 🙂

Pics coming soon. 😁
slvryarisIndiana · Aug 26, 2006#49
Just finished my NF drop up yesterday with the 215/40/17 tires. There has been no rubbing at all with just me in it. Me and a friend installed them and if we didnt bs all day it probably would have took about an hour and a half. Chris the write up was very very very helpful and was crazy cause it was like word for word. Here is an after pic.
untitled.jpg
Chris07LBThread starterNew Jersey · Aug 26, 2006#50
Originally Posted by slvryaris
Just finished my NF drop up yesterday with the 215/40/17 tires. There has been no rubbing at all with just me in it. Me and a friend installed them and if we didnt bs all day it probably would have took about an hour and a half. Chris the write up was very very very helpful and was crazy cause it was like word for word. Here is an after pic.
HOTT YARIS BRO! 😳

Glad the How-To was useful... I enjoy doing them. 🙂