Yarisworld
Hey guys i just updated my headlights. NOW ITS WITH RED!!! LOL! (P.S its illigal to paint it black or red or any other colour in australia.....but i see so many cars with black headlights....)
Phase 1 (Stocked)
Picture lost · img221.imageshack.us
Phase 2 (Added black)
Picture lost · img218.imageshack.us
Phase 3 (Added RED!)
Picture lost · img218.imageshack.us
Plz tell me if you think its hot or not!!.....personally i love it!! (Not becuz its done by me, cuz the colours looks soooo good.....lol)
Items i used
- Phillips screw driver (the + head one)
- Black "Power Plus Spray Brush" Spray Paint 150g
(you might want to get a bigger size if your are painting the majority of the headlights)
- Maskin tape
1- Start by opening your hood (DUH)
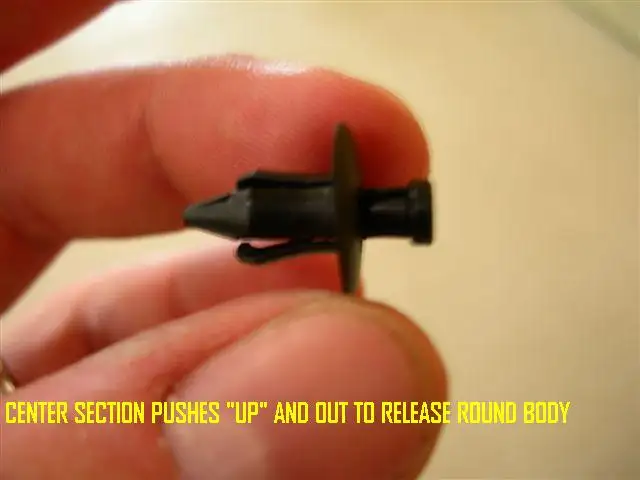
2- You will see these little black pivet thingy's....you need to take all of them out. To get them out push the little circle in the middle of the black things and push them up. to get them back in again do the opposite.
Picture lost · img207.imageshack.us
Picture lost · img95.imageshack.us
3- There will be some on the side of the bumper next to the wheels so u can get them out too.
4-Next thing up - look under the car, there will be screws there. Take them out with a PHILLIPS screwdriver.
5 - Now your ready to take off the bumper. (As for me i didnt take it off, i just pulled it off half way, while half of it was still attached to the car) To take off the bumper you need to put a bit of pulling force. 1st of all PULL each side of the bumper with a bit of force (dont worry i wont snap or bend the bumper)
Picture lost · img95.imageshack.us
6- now its time to remove the lights.........first of all there are 3 screws that are holding the lights in place. Get them out!!!
Picture lost · img95.imageshack.us
Picture lost · img95.imageshack.us
Picture lost · img207.imageshack.us
7-Now take off the head lights and of course the wires are connected to it.
Picture lost · img95.imageshack.us
8-Now thats done, do it to the other one!!! when both headlights are off, shut the hood, lock up ur car and get those things into your OVEN!...lol
(SORRY NO PICS FOR THIS SECTION!!)
9-Ok put your headlights into the oven and set it to 250 - 300 Degrees (I put mine on 250. 250 is enough). Leave it in there for about 5 mins!! DONT LEAVE IT FOR 5 MINS STRAIGHT!!! KEEP CHECKING IT SO IT DOESNT MELT!!
10- The gooey REALLY STICKY glue should all be LOOSENED up, so take it out of the oven and GET A BUTTER KNIFE and try to seperate it with the butter knife!!! (if your doin it with ur hands it will be harder, i suggest get a butter knife and stick it between the black and the clear plastic and bend the knife upwards so it will pop out!!)
11 - once its sperated it will look like this (thats just the gooey glue)
Picture lost · img207.imageshack.us
12- Now get the parts you wanna SPRAY paint. go outside and spray IT! if you are paintin it black, have about 3-5 coats on. AND REMEMBER NOT TO SPRAY TOO CLOSE, becuz there will be dry drip marks on it. you dont want that. it doesnt matter if there are unfinished patches in your 1st - 2nd coat. the 3rd - 5th coat will cover it all up! and it will look great! With every coat leave it in the sun to dry for about 10 mins then go to ur 2nd coat and so on.
Oh yea you might wanna cover the spaces u dont want to spray black, red, blue whatever colour with good masking tape.
12 - once everything is painted and your happy PUT IT ALL BACK TOGETHER :)
Picture lost · img95.imageshack.us
(ive just painted the top bit....thats all i wanted done...)
13- now go back to ur car, put in the headlights, attach the bumper, and put in the little black plastic thingys and the screws back in.
THERE U GO!! WALLA!! you now have sexy black head lights....
Picture lost · img246.imageshack.us
Phase 1 (Stocked)
Picture lost · img221.imageshack.us
Phase 2 (Added black)
Picture lost · img218.imageshack.us
Phase 3 (Added RED!)
Picture lost · img218.imageshack.us
Plz tell me if you think its hot or not!!.....personally i love it!! (Not becuz its done by me, cuz the colours looks soooo good.....lol)
TUTORIAL
As seen from the last thread
Items i used
- Phillips screw driver (the + head one)
- Black "Power Plus Spray Brush" Spray Paint 150g
(you might want to get a bigger size if your are painting the majority of the headlights)
- Maskin tape
1- Start by opening your hood (DUH)
2- You will see these little black pivet thingy's....you need to take all of them out. To get them out push the little circle in the middle of the black things and push them up. to get them back in again do the opposite.
Picture lost · img207.imageshack.us
Picture lost · img95.imageshack.us
3- There will be some on the side of the bumper next to the wheels so u can get them out too.
4-Next thing up - look under the car, there will be screws there. Take them out with a PHILLIPS screwdriver.
5 - Now your ready to take off the bumper. (As for me i didnt take it off, i just pulled it off half way, while half of it was still attached to the car) To take off the bumper you need to put a bit of pulling force. 1st of all PULL each side of the bumper with a bit of force (dont worry i wont snap or bend the bumper)
Picture lost · img95.imageshack.us
6- now its time to remove the lights.........first of all there are 3 screws that are holding the lights in place. Get them out!!!
Picture lost · img95.imageshack.us
Picture lost · img95.imageshack.us
Picture lost · img207.imageshack.us
7-Now take off the head lights and of course the wires are connected to it.
Picture lost · img95.imageshack.us
8-Now thats done, do it to the other one!!! when both headlights are off, shut the hood, lock up ur car and get those things into your OVEN!...lol
(SORRY NO PICS FOR THIS SECTION!!)
9-Ok put your headlights into the oven and set it to 250 - 300 Degrees (I put mine on 250. 250 is enough). Leave it in there for about 5 mins!! DONT LEAVE IT FOR 5 MINS STRAIGHT!!! KEEP CHECKING IT SO IT DOESNT MELT!!
10- The gooey REALLY STICKY glue should all be LOOSENED up, so take it out of the oven and GET A BUTTER KNIFE and try to seperate it with the butter knife!!! (if your doin it with ur hands it will be harder, i suggest get a butter knife and stick it between the black and the clear plastic and bend the knife upwards so it will pop out!!)
11 - once its sperated it will look like this (thats just the gooey glue)
Picture lost · img207.imageshack.us
12- Now get the parts you wanna SPRAY paint. go outside and spray IT! if you are paintin it black, have about 3-5 coats on. AND REMEMBER NOT TO SPRAY TOO CLOSE, becuz there will be dry drip marks on it. you dont want that. it doesnt matter if there are unfinished patches in your 1st - 2nd coat. the 3rd - 5th coat will cover it all up! and it will look great! With every coat leave it in the sun to dry for about 10 mins then go to ur 2nd coat and so on.
Oh yea you might wanna cover the spaces u dont want to spray black, red, blue whatever colour with good masking tape.
12 - once everything is painted and your happy PUT IT ALL BACK TOGETHER :)
Picture lost · img95.imageshack.us
(ive just painted the top bit....thats all i wanted done...)
13- now go back to ur car, put in the headlights, attach the bumper, and put in the little black plastic thingys and the screws back in.
THERE U GO!! WALLA!! you now have sexy black head lights....
Picture lost · img246.imageshack.us